

It was a Tuesday night, right after a heavy lasagna dinner, when my dishwasher decided to voice its displeasure. I pressed start, expecting the usual soothing hum of water, but instead, I was met with a high-pitched, metal-on-metal shriek that echoed through the entire house. It sounded less like a cleaning machine and more like a jet engine failing on the runway. My first thought was the worst-case scenario: a $300 motor replacement. But before I reached for my wallet, I realized I could probably fix this with something much cheaper. If you have ever felt that pit in your stomach when an appliance starts screaming, you are not alone. Today, I am going to show you how a tiny dab of food-grade grease can save your sanity and your bank account.
That High-Pitched Squeal is Telling You Something Important
When you hear that specific sound, you are likely identifying a failing circulation motor by its pitch. It is usually the result of the internal seals drying out or a small bit of debris creating friction against the impeller. In my early DIY days, I made a massive mistake: I sprayed a common household penetrating oil into the pump housing. I thought I was being clever, but the chemicals in that spray actually ate through the rubber seals, turning a small noise into a massive leak. Don’t be like younger me. To do this right, you need high-temp, food-grade silicone grease. This stuff is designed to withstand the heat of a heavy wash cycle without melting away or contaminating your plates.
Is this quick fix actually worth the effort?
I know what you are thinking. Is it worth pulling the machine out just to grease a bearing? Absolutely. A circulation pump often has plenty of life left in it; it just needs a little lubrication to overcome the friction caused by hard water or detergent buildup. Before you commit to a full teardown, you should engage in some expert dishwasher diagnostics to ensure the noise isn’t coming from a stray toothpick or a piece of broken glass hitting the impeller. According to the Lubrication Engineers association, using the wrong lubricant in a high-heat, water-heavy environment can cause total component failure within weeks, which is why food-grade H1 lubricants are the only way to go. Have you ever tried to silence a noisy appliance only to make the problem ten times worse?
Why You Should Skip the New Pump and Grab the Grease Instead
Replacing a motor is a project that takes hours and requires you to tilt the machine, disconnect the sump, and pray that the new seals hold. Greasing the existing pump is often a thirty-minute job that yields the same results. However, you have to be careful about your protection plans. You should check to see if your service plan covers motor failure before you start taking things apart, as manual intervention can sometimes complicate a future claim. If you are out of warranty, though, this is the ultimate neighborly advice: stop the friction, stop the noise. Just remember that while grease is great for the motor shaft, you should never use degreaser on your door gasket or other sensitive seals. We are aiming for a quiet kitchen, not a chemical mess.
To stop that metallic screeching, you have to treat your dishwasher motor like a bicycle chain that’s been left out in the rain. It is a mechanical part fighting against friction, and right now, friction is winning. The first thing you must do is cut the power at the breaker. Don’t just turn off the machine; kill the circuit entirely. While you are down there with your flashlight, it is a great time to engage in some expert dishwasher diagnostics to ensure you aren’t dealing with an electrical short or a seized bearing that is beyond saving.
Get Down and Dirty Under the Kickplate
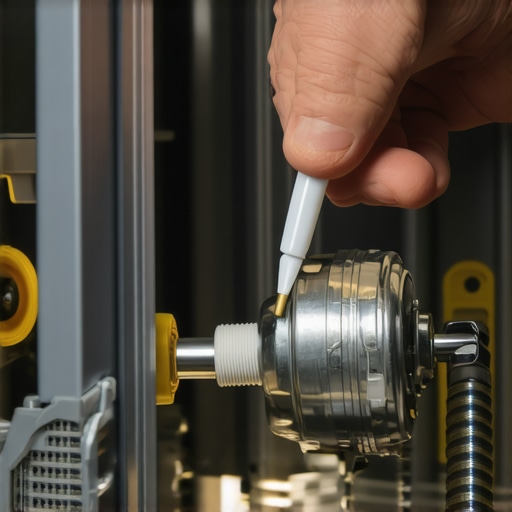
Most modern dishwashers allow you to access the circulation pump by removing the bottom kickplate. It’s usually held by two screws. Once that’s off, you’ll see a maze of wires and hoses. You are looking for the largest motor in the center—the one that drives the water into the spray arms. If you see water pooling here, you might be identifying a failing sump gasket rather than just a dry motor. If it is dry but noisy, your target is the motor shaft. This is the tiny metal rod that connects the motor’s spinning guts to the water impeller inside the housing.
Apply the Grease with Surgical Precision
I remember the first time I tried this on an old Whirlpool. I had a glob of silicone grease on my finger and I just smeared it all over the outside of the motor casing like I was icing a cake. It did absolutely nothing. The noise continued because the grease wasn’t where the friction was. You need to use a small applicator—a toothpick or even the end of a zip tie—to push the grease into the tiny gap where the shaft enters the motor body. Think of it like putting eyedrops in; you need it to seep into the junction. I eventually learned that if the motor is particularly stubborn, you can gently rotate the motor cooling fan by hand to help the lubricant work its way down into the seal. It felt like a miracle when I finally heard that ‘click’ of the grease settling in.
What if the Noise Still Won’t Quit?
If you’ve lubricated the shaft and it still sounds like a banshee, the problem might be deeper inside the pump housing. Sometimes, you need to know how to clean out grease build-up in a drain impeller because old food particles and solidified fats can create a physical drag that sounds exactly like a failing motor. If you find yourself needing to take the whole assembly apart, don’t panic. You can often learn how to replace a cracked sump housing or motor assembly yourself without paying for a $150 service call. While you have the guts of the machine exposed, I always recommend testing a thermal fuse for continuity just to be safe. It’s much easier to check these components now than to put the whole kitchen back together only to realize the machine won’t even power on because a fuse popped during your repairs.
Most homeowners assume that if the machine makes a noise, the warranty is their safety net. This is where the logic fails. In my experience, a service technician’s first goal isn’t to fix your machine for free; it’s to determine if the failure was caused by ‘user error’ or ‘lack of maintenance.’ If they find that your circulation motor squeal was caused by hard water buildup you never treated, you’ll likely see why your warranty claim was denied due to lack of maintenance. The nuanced reality of appliance repair is that the machine is rarely at fault; it is usually the environment we put it in.
The Garbage Disposal Connection Nobody Tells You About
Here is a contrarian view: your dishwasher isn’t the problem, your sink is. A huge percentage of ‘motor failures’ reported to manufacturers are actually drainage back-pressure issues. If your garbage disposal is even slightly clogged, it forces the dishwasher motor to work twice as hard to push water out. This extra strain leads to the exact overheating and bearing wear we discussed earlier. In fact, many people find that their warranty claim got denied because of their garbage disposal. Before you even think about greasing a motor, you should be unjamming your garburator to clear the path for the dishwasher’s effluent. If the water can’t leave, the motor will eventually scream in protest, grease or no grease.
Why do smart sensors make manual repairs even trickier?
Modern machines are essentially computers that happen to splash water. One of the most common mistakes DIYers make is ignoring the software side of the hardware. According to a study by the Association of Home Appliance Manufacturers (AHAM), over 20% of service calls for ‘mechanical failure’ are actually resolved through software recalibration or firmware updates. If your motor is acting up, it might just need the secret diagnostic mode hidden on your touch control panel to reset the torque parameters. I’ve seen people replace perfectly good pumps when firmware updates for new smart dishwashers were the actual solution. This is the ‘Oops’ factor: if you replace a part that wasn’t actually broken, you’ve not only wasted money, but you’ve also likely voided the remainder of your manufacturer’s protection plan.
Protect Your Investment with Pre-Repair Evidence
If you decide to go the DIY route and grease that motor shaft, you need to be strategic. Before you touch a single screw, document the noise. Understanding how appliance diagnostics can save your warranty benefits is about proving that the failure was mechanical and not due to a power surge or a clogged drain. For instance, you should know how to prove your appliance failure was caused by a power surge if you find the control board fried alongside the motor. This evidence is your only leverage if the manufacturer tries to walk away from their obligations. Have you ever fallen into this trap where a simple repair led to a denied claim? Let me know in the comments below.
When I first started tinkering with these machines, I thought a screwdriver and a can-do attitude were enough. I was wrong. If you want to move from ‘guessing’ to ‘knowing,’ you need a digital multimeter. I personally use a Fluke 117 because it handles non-contact voltage detection, which is a lifesaver when you’re elbow-deep in water lines. This isn’t just about safety; it’s about testing your heating element for ground faults with a meter before you drop $100 on a part that might be perfectly fine. Another non-negotiable in my kit is a high-powered shop vacuum. It’s the only reliable way I’ve found for how to clear a blocked impeller with a shop vacuum without having to pull the entire motor assembly and risk a leak.
#IMAGE_PLACE_HOLDER_D#
How do I maintain my dishwasher’s health over the long haul?
The secret to a 15-year appliance life isn’t luck; it’s a monthly ritual of descaling and debris removal. Most people wait for a leak before they act, but identifying a failing sump gasket before the floor warps starts with looking for salt-like crust around the base of the motor. I recommend cleaning your sump filter with a soft brush to stop foul odors every four weeks like clockwork. If you live in an area with hard water, the Water Quality Association (WQA) notes in their technical briefs that mineral buildup can reduce appliance efficiency by up to 30% in just two years. This is why I religiously use the secret to de-scaling your machine using lemon juice or citric acid to keep the internal lines smooth and friction-free.
The Future of Home Diagnostics Is Already in Your Pocket
The landscape of repair is shifting rapidly toward data. I predict that within five years, we won’t even be listening for squeaks; our phones will alert us to vibration anomalies in the motor bearings before they ever become audible to the human ear. We are already seeing the beginning of this trend with how smart diagnostic apps are changing home appliance repair. However, high-tech sensors won’t save you if you ignore the basics of physics. You still need to be clearing the air gap to stop sink water from backing up to prevent back-pressure from killing your expensive new smart motor. Even the smartest machine is only as good as the plumbing it’s attached to.
If you really want to stay ahead of the curve and avoid the dreaded ‘denied claim’ scenario, stop treating your dishwasher like a secondary garbage disposal. The single most effective thing you can do tonight—and my biggest tip for any homeowner—is cleaning the hidden spray arm nozzles with a toothpick. It takes five minutes, costs nothing, and ensures your water pressure stays exactly where the manufacturer intended. If you’ve been putting off a deep clean, grab that toothpick and get to work; it’s the easiest maintenance win you’ll get all week and keeps your warranty in good standing by proving you’ve done your part.
Dealing with a failing appliance is never just about the hardware; it is about the disruption of your daily rhythm. When I first started fixing my own machines, I assumed every noise was a death knell. I’ve since learned that most issues are just the machine’s way of asking for a little attention before a small problem becomes a permanent failure.
The Most Expensive Lesson I Learned Under the Sink
The hardest truth I had to swallow is that modern appliances are designed for efficiency, not necessarily for neglect. I once spent an entire weekend replacing a pump only to realize the issue was a simple blockage in the drainage line. Here are the lightbulb moments that changed how I approach repairs:
- Maintenance is your best insurance policy. Manufacturers look for any reason to dodge a bill, and I’ve seen firsthand why your warranty claim was denied due to lack of maintenance. A clean filter is cheaper than a new motor.
- Software is as vital as hardware. Before you grab the grease, check the digital side. Sometimes firmware updates for new smart dishwashers can resolve torque and sensor issues that sound like mechanical grinding.
- Diagnostic data is your shield. If you do have to call a pro, having your own data ready is crucial. I always suggest understanding appliance diagnostics to improve your warranty claims so you aren’t at the mercy of a technician’s whims.
My Unbeatable Toolkit for Appliance Longevity
You don’t need a van full of tools to keep your kitchen running, but you do need the right ones. I never start a job without my Fluke multimeter and a high-quality shop vacuum. A shop vacuum is the only reliable way I’ve found for clearing a blocked impeller without a messy teardown. I also keep a stash of citric acid on hand; using lemon juice or citric acid for de-scaling is the best way to keep those internal seals from drying out and causing the very friction we’ve been trying to solve. Finally, always keep a record of your service agreements. It is vital to check if your service plan actually covers motor failure before you break the factory seals.
Take Back Control of Your Kitchen’s Peace
Don’t let a mechanical squeal intimidate you into a $1,000 purchase you don’t need. Most of the time, your dishwasher just needs a human touch, a bit of grease, and a systematic approach to dishwasher warranty and appliance repair diagnostics. When you take the time to understand the machine, you aren’t just saving money—you’re becoming a more capable homeowner. If you’re ever in doubt about whether to keep going or call for help, check the top signs your dishwasher needs professional diagnostics to stay safe. You’ve got this. Have you ever managed to save an old appliance with just a simple cleaning or a dab of lubricant? Let me know your success stories below!