

The kitchen was eerily quiet, which is never a good sign when the dishwasher is supposed to be mid-cycle. I opened the door, and instead of a cloud of steam, I got a face full of stagnant water and a dark control panel. My first thought? ‘There goes my weekend and five hundred bucks.’ I nearly called for professional diagnostics right then and there. But before I threw in the towel, I remembered a lesson I learned the hard way years ago: never trust a power cord just because it is plugged in. I spent hours once disassembling a pump only to find out the outlet had tripped. It was embarrassing, and honestly, a huge waste of a Saturday. Today, I am going to show you how to use a voltmeter to confirm if your appliance is actually the problem or if the electricity is getting lost somewhere between the wall and the machine. This simple check can save your warranty benefits by proving the failure isn’t caused by your home’s wiring. [image placeholder]
Stop Assuming and Start Measuring
Early in my DIY journey, I once replaced a perfectly good motor because I assumed the ‘humming’ meant it had power. It didn’t. It was a partial short in the cord. Talk about an expensive mistake! Most people jump straight to the most expensive part—the control board or the motor—without checking the basics. If you do not have power, you do not have a broken appliance; you have a delivery problem. By using a multimeter, you can quickly determine if you are dealing with a power surge issue or a simple cord failure. This isn’t just about being handy; it is about being smart with your wallet.
Will I Get Zapped if I Try This?
It is the number one fear I hear from my neighbors. Electricity is invisible and intimidating, and it should be respected. However, with the right tools and a bit of caution, you aren’t ‘poking’ at random; you’re performing a targeted test. According to the National Fire Protection Association (NFPA), electrical failures or malfunctions were the second leading cause of U.S. home fires between 2015-2019, so knowing how to troubleshoot dishwasher problems correctly isn’t just about saving money—it’s about home safety. We’re going to walk through the exact steps to see if your cord has continuity or if the outlet is pushing the right voltage. Before you dive into understanding appliance diagnostics, you have to make sure the ‘juice’ is actually flowing. Have you ever been tempted to just buy a new machine before even checking the breaker? Tell me I’m not alone in that panic!
Stop Guessing and Grab Your Multimeter
Think of your multimeter like a doctor’s stethoscope. It doesn’t fix the patient, but it tells you exactly where the heartbeat stopped. When I first started doing my own repairs, I was terrified of the ‘Ohms’ setting. I thought I needed an engineering degree just to read the screen. In reality, you are simply looking for a path. If the electricity cannot get from point A to point B, you have a broken circuit. This is why understanding appliance diagnostics is so crucial; it turns a blind guess into a surgical strike. Start by setting your meter to the continuity setting—usually indicated by a symbol that looks like a little sound wave. If you touch the probes together and it beeps, you are ready to play detective.
Check the Wall Before You Tear Down the Machine
I cannot tell you how many times I have seen people pull their entire dishwasher out of the cabinetry only to find out the outlet was dead. I once spent forty-five minutes wrestling with a rusted mounting bracket, sweating through my shirt, only to realize my kid had tripped the GFCI outlet in the kitchen while making toast. It was a humbling moment that taught me to always test the source first. Plug a lamp or a phone charger into the same outlet. If the device does not power up, your dishwasher is fine, but your house wiring needs help. If the outlet is hot, then you need to check if a power surge issue fried the internal protection. This simple step protects your sanity and ensures you are not chasing ghosts inside the machine’s guts.

Find the Tiny Part That Kills the Whole System
If the outlet is good, the most common culprit for a ‘dead’ dishwasher is the thermal fuse. It is a tiny, inexpensive component designed to blow if the machine gets too hot, preventing a potential fire. To test it, you will need to access the control board behind the door panel. When I tested my first fuse, I expected it to look burned or melted. Nope. It looked perfectly fine, but my multimeter showed ‘OL’ (Open Line), meaning it was dead inside. You can find the specific way to test a thermal fuse for continuity online, but the process is straightforward: if the meter does not beep when you touch both ends of the fuse, it is garbage. Replacing this small part is a lot easier than how to tell if your service plan actually covers motor failure, which is a much bigger headache. If the fuse is fine, your next stop is the door switch. You can actually how to test a door latch using a screwdriver handle to see if it is physically engaging, but use the meter to ensure the electrical connection is closing when the door shuts.
Don’t Forget the Secret Menus
Modern machines are smarter than we give them credit for. Before you start ripping wires apart, check if your unit has a digital brain you can talk to. Many brands have the secret diagnostic mode hidden on your touch control panel that will spit out an error code. I remember a friend who was convinced his pump was dead because the machine would not start. We ran the diagnostic sequence—a weird combo of pressing ‘Normal’ and ‘Heated Dry’ three times—and the code told us the water inlet valve was the problem. We saved three hours of unnecessary labor by just listening to what the machine was trying to tell us. It is much more efficient than testing a thermal fuse for continuity without a pro kit if you are not sure where to start. Diagnostic modes are like having a direct line to the manufacturer’s engineers without the hold music.
While those secret menus are a godsend, here is where most DIYers—and even some green techs—get it wrong: they treat the error code like a final verdict. If the screen flashes a drain error, they immediately buy a new pump. In my experience, a ‘drain failure’ code is often just a symptom of a clogged filter or, weirder yet, using too much detergent. The suds create an air pocket that the pump can’t grab, so the sensor assumes the pump is dead. This is why how appliance diagnostics can save your warranty benefits—it stops you from replacing parts that aren’t actually broken, which can lead to a rejected claim later.
Why Your New Machine Stays Cold When You Expect Heat?
One of the most common ‘faults’ people report is that the water doesn’t feel hot at the start. You might think your heating element is shot, but here is the nuance: many modern Energy Star-rated units purposely keep the water cool during the initial rinse. According to the American Council for an Energy-Efficient Economy (ACEEE), modern sensors are designed to let enzymes in the detergent work at lower temperatures first to break down proteins before the high heat kicks in. If you’re wondering why your new machine stays cold during the pre-wash, it is likely by design. If you jump the gun and ‘fix’ it, you are fighting the machine’s own intelligence.
The Drain Trap That Most People Forget
Here is the ‘oops’ factor that almost cost me a floor. When you pull the machine out to test the motor, you might accidentally disturb the drain hose. If you do not reinstall it with a ‘high loop’—fastening it higher than the sink’s drain—you will get ‘backflow,’ where dirty sink water siphons into your clean dishwasher. It is the primary reason why your service tech always checks the drain hose high loop the second they walk into your kitchen. Even worse, if you are not careful, you might trigger the clause that voids your coverage if you move the appliance without professional supervision. 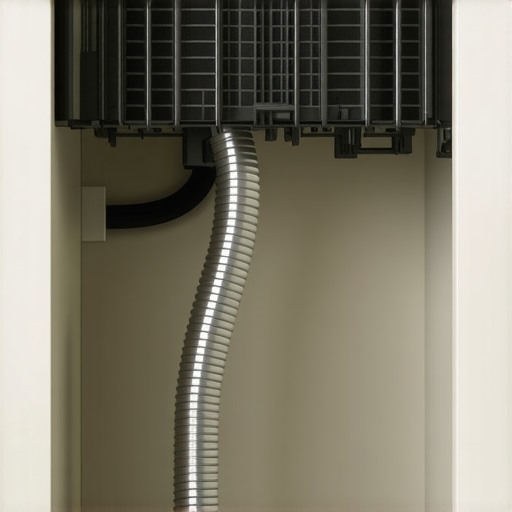
Pre-Rinsing Is Killing Your Sensors
Contrarian view: Stop scrubbing your plates before they go in. It sounds productive, but you are actually confusing the turbidity sensor. If the water stays too clean, the machine’s ‘brain’ thinks the load is finished and shortens the cycle, leaving your dishes less sanitized than they should be. This leads to gunk buildup over time, and why your warranty claim was denied due to lack of maintenance often comes down to this exact habit. Trust the tech; let the machine do the heavy lifting. Have you ever fallen into this trap? Let me know in the comments. If you’re still stuck, feel free to contact us for more specific advice.
Maintenance is not just about clearing the filter once every six months; it is about the deep-seated grime that eventually chokes the life out of your appliance. I have seen perfectly good machines headed for the landfill simply because the owner did not know how to deep clean the hidden spray arm bearings. When those bearings seize up, the arms do not spin, the dishes stay dirty, and you end up assuming the motor is dead. This kind of neglect is exactly why your warranty claim was denied due to lack of maintenance in so many cases. If you want your machine to last fifteen years instead of five, you have to look beyond the surface.
Stop Ignoring the Hidden Sludge in Your Spray Arms
Most people think a splash of vinegar is a magic cure-all, but it won’t reach the calcium deposits hardening inside the nozzle tips. I personally use a simple dental pick or a paperclip to clear those tiny holes. It is tedious, but the results are immediate. Beyond that, if you are starting to hear a high-pitched whine, don’t ignore it. You can often how to quiet a screeching circulation pump with food-grade grease before the bearings permanently fail. This is the difference between a five-dollar fix and a three-hundred-dollar motor replacement. As noted in the Whirlpool Technical Training manuals, even a 1/16th inch of scale on a turbidity sensor can trigger false readings, causing the machine to cycle incorrectly and waste energy.

The One Tool That Stops the Guessing Game
If you want to move from ‘DIYer’ to ‘Pro,’ you need to stop guessing where the heat is going. I’ve started using a thermal camera to find heat leaks in your dishwasher door, and it has been a game-changer. It shows you exactly where a gasket is failing or where the insulation has slipped, causing the control board to overheat. It might feel like overkill, but compared to the cost of a flood, it is a bargain. In the next five to ten years, I predict we will see this tech built directly into the machines. We are already seeing how smart diagnostic apps are changing home appliance repair by allowing your phone to ‘listen’ to the motor’s frequency to detect impending failure. The era of the ‘blind repair’ is ending.
How do I keep my machine running like new for years?
The secret is consistency and software. Just like your smartphone, your dishwasher now relies on code to function. You might not realize it, but why firmware updates are essential for new smart dishwashers often comes down to the manufacturer refining the heater timings to prevent part burnout. If your machine is Wi-Fi enabled, keep it connected. These updates can fix bugs that would otherwise lead to a service call. Combine that with a monthly descaling and a check of the door seal, and you will stay ahead of the curve. If you are unsure about whether a repair is worth it, you need to know when to trust a warranty for dishwasher repairs versus when to just pick up a wrench yourself. My advice? Try to access the secret tech menu that calibrates your water sensors today—it’s the single best way to ensure your machine actually knows when the dishes are clean.
Hard Lessons Bought with Sweat and Spare Parts
After years of tinkering, I have realized that the most expensive part you can replace is the one you didn’t need to buy in the first place. One of my biggest lightbulb moments was discovering that diagnostics are about elimination, not just identification. If you can prove three things aren’t broken, you’ve found your culprit by default. This systematic approach is the core of understanding appliance diagnostics properly. Another hard truth? Your plumbing is often the ‘silent killer’ of your machine. I have seen countless DIYers tear their unit apart only to realize that the garbage disposal was the bottleneck all along. In fact, knowing why your warranty claim got denied because of your garbage disposal is a lesson you want to learn from me, not from an expensive technician’s bill. Lastly, patience is your best tool; sometimes a machine just needs a hard reset or a full power cycle to clear a ghost error in the control board.
What Stays in My Diagnostic Toolkit
I don’t leave for a repair without a high-quality digital multimeter. It is the only way to get an objective answer from a silent machine. Beyond the hardware, I rely heavily on the manufacturer’s technical service sheets—usually tucked in a plastic pouch behind the kickplate. These are the ‘holy grail’ of repair. I also keep a close eye on my phone for software errors. If you are dealing with connectivity issues, knowing why your smart appliance app keeps crashing during firmware updates can prevent you from assuming the main control board has fried. Finally, I always have a copy of my service agreement handy. Understanding when to trust a warranty for dishwasher repairs versus when to grab the screwdriver yourself is the ultimate way to manage your home maintenance budget.
Stop Fearing the Machine and Start Fixing
You don’t need to be a master electrician to take control of your kitchen. By following these diagnostic steps, you are moving from a place of panic to a place of power. Whether you are performing a simple continuity test or learning how to appeal a rejected extended warranty claim, every bit of knowledge you gain makes you a more capable homeowner. Dishwasher repair isn’t just about clean plates; it is about the confidence that comes from knowing how your home actually works. Don’t let a flashing light or a weird hum intimidate you—you have the tools, the logic, and the resources to handle it. Have you ever successfully diagnosed a ‘dead’ appliance only to find out it was something incredibly simple? Let me know your biggest ‘aha!’ moment in the comments below! If you have specific questions, feel free to contact us any time.