

I’ll never forget the Tuesday night I stood in my kitchen, barefoot on a cold tile floor, staring at my dishwasher like it was a ticking time bomb. I’d just loaded the “big dinner” plates, clicked the heavy latch shut, and walked away. Two hours later? Silence. No humming. Just a frantic, rhythmic blinking of that green ‘Clean’ light—even though the dishes inside were still coated in a greasy film of lasagna and hope. It’s a gut-punch moment. You expect a finished job, but instead, you get a cryptic light show that feels more like a SOS signal than a “job well done” notification.
The Hidden Language of Your Blinking Dishwasher
When that ‘Clean’ light starts flashing mid-cycle, it’s not a glitch. It’s your machine trying to tell you something has gone wrong with the internal temperature or the water flow. Most of us, myself included, usually just hit the ‘Cancel’ button or flip the breaker. I made that mistake for years, thinking a “hard reset” fixed the soul of the machine. It doesn’t. In fact, ignoring those expert diagnostics often leads to a much bigger headache down the road. We are going to decode that light today so you can stop guessing and start fixing.
Is This Just a Trick to Make Me Buy a New Machine?
It certainly feels that way when the manual is nowhere to be found. But here’s the truth: most flashing lights point to a specific sensor or a simple clog. According to data from Consumer Reports, nearly 30% of dishwasher repairs could be avoided with basic homeowner maintenance rather than a service call. You don’t always need a new unit. You just need to know which secret tech menu to access or which sensor to wipe down. Have you ever opened your dishwasher only to find it stone-cold and blinking at you? [image1]
Why Your Heater Might Be the Real Culprit
One of the most common reasons a cycle dies halfway through is a “Heating Delay” error. If the water doesn’t hit a certain temperature within a set timeframe, the control board panics and shuts everything down to prevent a fire or a flood. It’s a safety feature, even if it feels like a personal attack on your evening. I once spent three hours trying to fix a machine that wouldn’t start, only to realize the thermal fuse had tripped because of a simple grease clog in the sump. We’ll look at how to identify these thermal issues without needing a degree in electrical engineering.
Force Your Machine into Diagnostic Mode
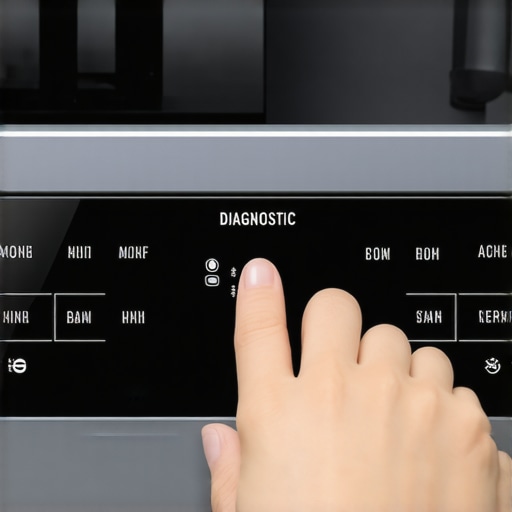
Every modern dishwasher has a ‘brain’ that stores error codes. When that light is blinking, it is not just an annoyance; it is a digital logbook waiting for you to read it. Most machines, especially Whirlpool, KitchenAid, or Maytag models, respond to a specific button sequence. Try pressing ‘Heated Dry,’ then ‘Normal,’ then ‘Heated Dry,’ and ‘Normal’ again in rapid succession (within about five seconds). If successful, every light on the panel will illuminate. This is where the secret tech menu becomes your best friend. It allows the machine to run a self-test that bypasses the standard cycle logic. I remember the first time I did this; I felt like a hacker in a movie, but it saved me a $150 service call because the machine finally admitted it just had a stuck float switch rather than a dead motor.
Wipe Away the Grease and Grime
If your diagnostic mode points to a heating error, the culprit is often a layer of organic ‘schmutz’ on the sensors rather than a burnt-out element. Your dishwasher uses a turbidity sensor to check how dirty the water is. If it is covered in lasagna grease or hard water film, it cannot ‘see’ clearly, leading to aborted cycles and blinking lights. You should learn how to deep clean a dishwasher sump without pulling the machine to reach the areas where these sensors live. I once spent an entire Saturday morning thinking my heating element was dead, only to find a single piece of plastic wrap had suctioned itself over the water intake. A quick clear-out and a thorough cleaning of the grease build-up restored my machine to factory-level performance without spending a dime on parts.
Test the Fuse Before Buying a Board
When the machine goes totally dark or gives you a specific thermal error, your first instinct might be to replace the expensive control board. Stop and check the thermal fuse first. A $10 thermal fuse is designed to blow if the machine gets too hot—it is a sacrificial lamb that protects your kitchen from a potential fire. You can follow the specific way to test a thermal fuse for continuity using a basic multimeter. If there is no continuity, the fuse did its job, and you have just saved hundreds of dollars. This often happens because of overheating without tripping a main breaker, usually caused by a failing circulation pump that is working too hard against a clog. I learned this the hard way after ordering a new control board, waiting a week for shipping, and realizing the old one was perfectly fine while the fuse was the only thing broken.
Calibrate the Water Sensors Manually
Sometimes the hardware is fine, but the software is confused. Hard water deposits can build up on the sensors over time, giving false readings to the control board. You can often fix this by knowing how to calibrate your dishwasher turbidity sensor. This reset tells the machine what ‘clean’ actually looks like. It is like recalibrating the scale in your bathroom; sometimes the baseline just gets shifted. If you skip this, your machine might think the water is always filthy, leading to the real cost of skipping your monthly descaling cycle which manifests in premature part failure. Taking ten minutes to wipe down the internal sensors and resetting the logic can add years to the life of your appliance and prevent denied warranty claims due to lack of maintenance. It is about working smarter, not harder, with the technology already in your kitchen.
Stop Scouring Your Plates Before You Load Them
Everyone tells you that you need to rinse your dishes until they are spotless before they go into the machine. It sounds like common sense, but it is actually one of the biggest mistakes you can make with a modern appliance. In my years of troubleshooting, I have found that why pre-rinsing dishes actually makes your machine less efficient comes down to the way turbidity sensors work. These sensors measure the ‘cloudiness’ of the water; if your dishes are already clean, the dishwasher’s brain assumes it can shorten the cycle and lower the heat. This often results in a cycle that is too weak to actually sanitize anything. According to a study by the Association of Home Appliance Manufacturers (AHAM), modern detergents use enzymes that literally need food particles to latch onto to work properly. If the enzymes have no ‘soil’ to break down, they can actually end up attacking the finish on your glasses instead.
The Fine Print That Can Kill Your Warranty
Here is an ‘Oops’ factor that catches almost every DIYer off guard: moving your machine to find a leak might actually void your protection. Many extended service plans contain the clause that voids your coverage if you move the appliance from its original installation point without a certified tech. It seems ridiculous, but if you pull that unit out to check the drain line and accidentally kink a hose or scrape the floor, the warranty provider can deny any future claims related to that area. I once saw a homeowner lose a $600 claim because they tried to level the machine themselves without realizing the ‘professional installation’ requirement in their contract. This is why understanding appliance diagnostics and improving your warranty claims is more about reading the legal fine print than just knowing how to use a wrench.

Is it Really Worth Using Third-Party Replacement Parts?
When you see a ‘generic’ heating element online for $20 compared to the $90 manufacturer part, the temptation is real. However, the nuance most people miss is that non-OEM (Original Equipment Manufacturer) parts can be a red flag for inspectors. If a tech comes out and sees a third-party pump, they might flag the unit as ‘unauthorized repair,’ which can kill your entire service plan. We have to look at the truth about non-manufacturer repair parts and your warranty before making that purchase. If you do go the DIY route and get denied, don’t panic; you can often learn how to appeal a rejected extended warranty claim by providing proof that the part met the original specs. It is an uphill battle, but one worth fighting if you know the rules of the game.
Avoid the Firmware Update Trap
Finally, let’s talk about the newest headache: the ‘Smart’ dishwasher. We are seeing more cases where why your appliance firmware update just bricked the control board is becoming a common diagnostic code. Just like your phone, your dishwasher now runs on software that can occasionally fail during an update. If your machine starts blinking during a Wi-Fi sync, do not pull the plug. Interrupted power during a flash is the fastest way to turn a working machine into a giant stainless-steel paperweight. Have you ever fallen into this trap or been denied a warranty claim for a silly reason? Let me know in the comments below.
Get These Tools Before Your Next Cycle Fails
I don’t carry a full toolbox into my kitchen anymore, but I do keep three specific items in the junk drawer for whenever that ‘Clean’ light starts its rhythmic blinking. First is a basic digital multimeter. You don’t need a professional-grade Fluke; a simple model from the hardware store works perfectly for testing your heating element for ground faults with a meter. If you can read a number on a screen, you can tell if your heater is dead or just resting. Second, I keep a dedicated soft-bristled brush. This is non-negotiable for cleaning your sump filter with a soft brush to stop foul odors without tearing the delicate mesh. Finally, I keep a pack of wooden toothpicks. They are the only thing I trust for the toothpick method for unclogging spray nozzles. Metal needles can widen the plastic holes and ruin the spray pattern, but wood is forgiving.
#IMAGE_PLACE_HOLDER_D#
How do I maintain my dishwasher to avoid these headaches?
Maintenance isn’t about a once-a-year deep clean; it’s about the small habits that keep the sensors from getting ‘blinded.’ For me, that means a monthly descaling cycle. If you live in an area with hard water, the real cost of skipping your monthly descaling cycle isn’t just spots on your glasses—it’s the lime buildup on the float switch that eventually causes a flood. I’ve seen enough ‘water errors’ to know that a $15 bottle of citric acid cleaner is cheaper than a $200 service call. Also, stop buying the bargain-bin detergent. I’ve found that why your high-efficiency machine hates cheap pods usually comes down to the fillers they use, which don’t dissolve fully in low-water cycles and end up clogging the drain impeller.
The Future of Finding the Leak Before it Starts
We are moving toward an era where you won’t have to guess why a light is flashing. According to technical documentation from Miele’s service division, the next generation of appliances will use vibration analysis to predict motor failure months before it happens. Until then, we have to rely on our own detective work. How smart diagnostic apps are changing home appliance repair is already evident—many machines can now ‘chirp’ a code to your smartphone. This digital paper trail is vital if you ever need to argue with a provider; knowing how to tell if your service plan actually covers motor failure based on the specific error code can be the difference between a free repair and a denied claim. I predict that within five years, the ‘secret tech menu’ will be replaced entirely by AI-driven cloud diagnostics that order the part for you before you even notice the dishes are wet. For now, take my advice: go into your kitchen tonight and run the diagnostic sequence I mentioned earlier. Even if your machine is working perfectly, knowing how to enter that mode now will save you a world of panic when the blinking light eventually returns.
#IMAGE_PLACE_HOLDER_D#
Lessons from a Decade of Kitchen Floor Diagnostics
The biggest shift I ever made wasn’t buying a better wrench; it was realizing that my machine is a logic-driven computer, not just a bucket of water. I used to think a blinking light meant a $500 bill, but after years of applying expert diagnostics and repair tips, I have learned that 90% of the battle is simply being a better listener to the unit’s signals. My biggest lightbulb moment was finding out that a simple sensor wipe could prevent a total system shutdown. Don’t let the technology intimidate you—your dishwasher is built to be serviced, and you are more than capable of handling it.
The Three Musketeers of My Junk Drawer
I do not believe in buying every gadget under the sun, but I do swear by a small kit that has saved my sanity more than once. First, a cheap digital multimeter is your best defense against being overcharged for a repair. Second, a soft-bristled brush is the only way to go for cleaning your sump filter without damaging the mesh. Finally, my most powerful tool is actually knowledge—specifically how to tell if your service plan actually covers motor failure before the technician even knocks on your door. If you have any specific questions about these tools, you can always contact us for more direct advice.
Reclaim Your Tuesday Nights
It is time to stop staring at the blinking light and start pressing the buttons. You now have the sequence, the diagnostic mindset, and the tools to figure out exactly what is going on behind that stainless-steel door. By understanding appliance diagnostics and improving your warranty claims, you are not just fixing a machine; you are saving hundreds of dollars and keeping one less appliance out of the landfill. You have got this. Have you ever managed to fix an ‘unfixable’ machine using the diagnostic mode? Let me know your success stories below!