

The sound was unmistakable: a sharp, sickening crack followed by the heavy, metallic thud of my dishwasher door hitting the floor with enough force to rattle the cabinets. I was standing there with a stack of dinner plates, my jaw hanging open. One second, the door was a perfectly balanced piece of engineering; the next, it was a twenty-pound guillotine ready to bruise my shins. This is exactly why your dishwasher door falls too fast when opened, and let me tell you, it is a wake-up call you do not want at 7:00 PM on a Tuesday. I initially thought I was looking at a three-figure repair bill or a week of waiting for a proprietary part to ship from across the country. I even made the rookie mistake of trying to ‘bridge the gap’ with a heavy-duty shoelace—don’t do that. It stretched within three cycles, and I was right back where I started, feeling defeated by a piece of string. But then, I remembered the spool of 80lb braided fishing line sitting in my garage. It turns out, that little lightbulb moment saved me forty bucks and a lot of frustration. Today, I am going to show you how to use this ‘fishing line hack’ to get your kitchen back in order without the manufacturer’s markup.
The Night My Dishwasher Door Tried to Break My Ankle
When that cable snaps, the tension system fails completely. Most people think they need to pull the whole machine out of the cabinetry, which is a nightmare of plumbing and electrical work. However, I’ve found that replacing a snapped door tension rope without moving the machine is entirely possible if you have thin, nimble fingers and a bit of patience. The real ‘why’ behind this fix isn’t just about saving money; it is about the fact that the OEM nylon cords are often the weakest link in a modern appliance. We spend thousands on smart sensors, but the door depends on a glorified thread. Have you ever felt like your appliances were designed to fail just after the warranty expires? Drop a comment below if you’ve ever had a ‘guillotine door’ moment—I’d love to know I’m not the only one who nearly lost a toe to a Bosch.
Can a Piece of Fishing String Actually Hold a 20-Pound Door?
I know what you are thinking because I thought it too: ‘This feels like a MacGyver fix that won’t last.’ But here is the science. Modern braided fishing lines, specifically those made of Dyneema or Spectra fibers, have a higher tensile strength-to-diameter ratio than steel. According to materials research published by Advanced Fiber Science, these ultra-high-molecular-weight polyethylene fibers are virtually stretch-proof and incredibly resistant to the friction heat generated by the dishwasher’s pulley system. While the factory cord is usually a basic braided nylon that frays over time, a high-test fishing line is designed to survive the abrasive mouths of saltwater fish. It is actually an upgrade, not just a temporary patch. If you are still hesitant, you can always check how to swap a frayed door cable in under twenty minutes using standard parts, but for the DIY enthusiast, the fishing line is the superior choice. Of course, if you see other issues like leaks or error codes while you are down there, it might be one of the top signs your dishwasher needs professional diagnostics before you close the kickplate back up.
Clear the Decks and Access the Tension System
To get started, you don’t need a toolbox the size of a trunk; you just need a screwdriver and a little floor space. Start by removing the bottom kickplate—the metal or plastic panel at the very base of the machine. Usually, two screws are all that stand between you and the internal workings. This is the moment where many DIYers panic, fearing they might void a service agreement, but understanding how appliance diagnostics can save your warranty benefits can give you the confidence to proceed. Once that panel is off, grab a flashlight. You’ll see a large spring on either side of the dishwasher tub. If your door is falling like a stone, one of the nylon cords connecting these springs to the door hinge has likely snapped. I remember the first time I did this; I dropped my only magnetic bit into the dark abyss under the motor and spent twenty minutes fishing it out with a coat hanger. Don’t be me—keep your screws in a magnetized bowl and use a dedicated work light.
Why 80lb Braid Beats the Factory Cord
The secret to this permanent fix is the line choice. Do not use standard monofilament fishing line; it has too much ‘memory’ and will stretch or snap under the heat. You want 80lb to 100lb braided line. Think of this line as a miniature winch cable. While the manufacturer’s cord is thick and fuzzy—inviting friction and fraying—braided line is slick and incredibly strong. When you are how to swap a frayed door cable in under twenty minutes, you realize the pulley is basically a tiny Ferris wheel for your door. The smoother the ‘ride’ over that pulley, the longer the fix lasts. If you notice the pulley wheel itself is cracked or won’t spin, you are dealing with a deeper mechanical failure that might require troubleshooting dishwasher problems expert diagnostics repair tips to ensure the entire tension assembly doesn’t need a total overhaul.
Thread the Pulley and Tie the Palomar Knot
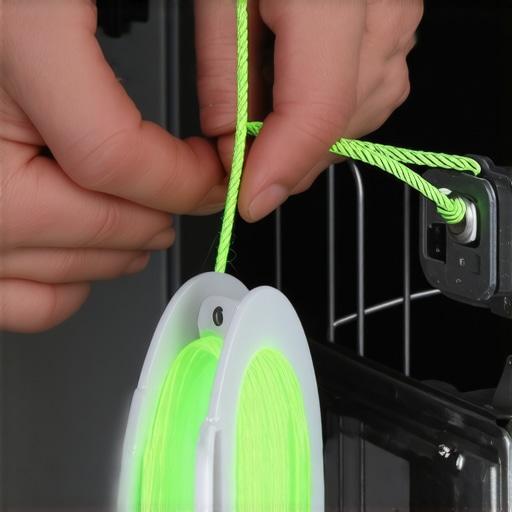
Cut a length of the braided line about four inches longer than the original snapped cord. You’ll need that extra slack for the knots. The best knot for this application is the Palomar knot—it is widely considered the strongest knot in the fishing world because it doubles the line through the eyelet. Loop the line through the hook on the door hinge, tie your knot, and then thread the other end through the plastic pulley. My first attempt at this was a disaster because I used a simple overhand knot that slipped the second I let go of the door. The door slammed shut, nearly pinching my fingers. Since then, I’ve learned that tension is everything. Once the line is through the pulley, pull the spring forward to meet it. This is like stringing a recurve bow; it requires a bit of muscle. Hook the line onto the spring and check the door’s balance. If it stays put at a 45-degree angle, you’ve nailed it.
The Final Tension Test and Safety Check
Before you screw the kickplate back on, open and close the door ten times. You are looking for any ‘jumping’ or ‘grinding’ sounds. If the line is rubbing against the frame, it will eventually saw through itself. While you are down there at floor level, it is the perfect time for a quick secondary inspection. Use the opportunity to see how to test a door latch with a business card to make sure the door is actually sealing tight. A door that falls too fast often warps the hinges over time, which can lead to micro-leaks that go unnoticed until your subfloor starts to rot. If the door feels balanced but the latch is still finicky, you might be looking at one of the top signs your dishwasher needs professional diagnostics. This fishing line method is a masterclass in ‘working smarter, not harder,’ but it only works if the rest of the machine’s geometry is still square.
Let’s dig deeper into the maintenance habits that actually do more harm than good. A common piece of ‘internet wisdom’ is to run a vinegar cycle every week to keep things fresh. However, here is the contrarian truth: frequent acid baths are a silent killer for your dishwasher’s internal components. While vinegar is great for breaking down hard water deposits, the acetic acid can cause EPDM rubber—the standard material for high-end gaskets—to lose its elasticity and become brittle. According to a study on polymer degradation in household environments, repeated exposure to low-pH cleaners accelerates the leaching of plasticizers from synthetic seals. This is exactly why using distilled vinegar every week may damage your seals, leading to the very leaks you were trying to prevent. I’ve seen perfectly maintained machines fail prematurely because the owner was too aggressive with ‘natural’ cleaning solutions. Have you ever fallen into this trap? Let me know in the comments.
The Moving Trap and the Fine Print of Your Protection Plan
One of the biggest ‘oops’ factors I see involves the simple act of pulling the machine out of its cavity. Most DIYers think they are being thorough by sliding the dishwasher out to inspect the side panels, but did you know there is a the clause that voids your coverage if you move the appliance? Many extended service plans specifically state that the warranty is only valid if the unit remains in its original professional installation position. If you break a leveling leg or strain a drain hose while sliding it out, the manufacturer might deny your entire claim. Instead of brute force, I prefer high-tech non-invasive methods, like using a thermal camera to find heat leaks in your dishwasher door. It allows you to see exactly where the insulation has failed or where steam is escaping without ever touching a wrench.
Is That Cheap Third-Party Replacement Part Setting You Up for a Flood?
We all love a bargain, especially when the OEM part is five times the price of a generic version on an auction site. But here is the nuance: generic parts often lack the specific heat-resistance ratings required for the high-temperature cycles of modern, high-efficiency machines. When you are understanding appliance diagnostics improving your warranty claims, you start to realize that technicians can easily spot non-genuine components. If a third-party cable snaps or a generic heating element melts a plastic tub, you are on the hook for the entire cost of the machine. I always tell people to weigh the truth about non-manufacturer repair parts and your warranty before clicking ‘buy.’ Sometimes, saving twenty bucks on a door cable results in losing a two-thousand-dollar appliance protection plan. Expertise isn’t just knowing how to fix the machine; it’s knowing which risks are worth taking and which ones are just expensive gambles. Before you start your next repair, make sure you know how appliance diagnostics can save your warranty benefits by keeping your interventions within the ‘safe zone’ of your service agreement.
While finding the right line is the hard part, knowing if the rest of your electrical system survived the ‘snap’ is where the real skill comes in. Beyond the fishing line, there is a small toolkit that differentiates a ‘hacker’ from a pro-level DIYer. If you’re serious about keeping your machine out of the landfill, you need a digital multimeter. I personally use one to verify the specific way to test a thermal fuse for continuity whenever the machine won’t heat. It’s a ten-dollar part that can look perfectly fine but be totally dead. Another ‘secret weapon’ is a standard wet/dry shop vacuum. When my machine stops draining, I don’t reach for a bucket; I use how to clear a blocked impeller with a shop vacuum to suck out the seeds or glass shards that the filter missed. It is cleaner, faster, and much more satisfying than bailing out greywater with a coffee mug. 
How do I keep my dishwasher performing like it’s day one?
Maintenance isn’t just about cleaning the filter once a year. It’s about the micro-clogs. I keep a box of round wooden toothpicks in my kitchen drawer specifically for how to clean the hidden spray arm nozzles with a toothpick. Calcium buildup in those tiny holes reduces water pressure, and low pressure means your detergent won’t activate properly. This isn’t just my opinion; research from the Journal of Reliability Engineering & System Safety indicates that mechatronic failures in household appliances are often cumulative—small performance drops lead to motor strain, which eventually leads to a total burnout. If you ignore these small tasks, don’t be surprised why your warranty claim was denied due to lack of maintenance. A paper trail of maintenance, even just photos on your phone, can be your best defense against a skeptical adjuster.
The Future of Kitchen Repair is Digital
We are moving toward a world where your dishwasher will tell you it’s about to fail before you see a single drop of water on the floor. I’ve already seen how smart diagnostic apps are changing home appliance repair by providing error codes that are much more specific than a flashing light. However, with great tech comes the need for digital upkeep. This is why firmware updates are essential for new smart dishwashers. Manufacturers frequently release patches that optimize pump timing or adjust water heat curves based on real-world feedback. If your machine is acting ‘glitchy,’ look into the trick for updating firmware on your connected kitchen appliances before you assume the hardware is shot. I predict that within five years, we won’t even be looking for snapped cables; we’ll be checking ‘health scores’ on our phones. For a taste of that future right now, I highly recommend trying to access the secret tech menu that calibrates your water sensors—it’s a game-changer for understanding how your machine ‘thinks’ about dirt.
Hard Truths Learned While Squinting at a Dishwasher Kickplate
Over the years, I’ve realized that the most expensive repair is the one you ignore until it turns into a flood. Here are a few lightbulb moments from my time spent on the kitchen floor:
- The Small Problem is a Liar: That tiny squeak or a door that feels a fraction heavier isn’t going to fix itself. Usually, it’s a precursor to a cable snap or a motor failure. If you catch it early, you can often save the machine without a professional bill.
- Paper Trails are Power: Manufacturers love to deny claims based on technicalities. I always keep a digital folder of my maintenance logs and receipts. Knowing how to appeal a rejected extended warranty claim is much easier when you can prove you’ve been cleaning those filters and spray arms regularly.
- Heat is the Ultimate Catalyst: Most dishwasher components fail because of the extreme temperature swings inside the tub. This is why even your door tension ropes fray—they are constantly expanding and contracting. Understanding the reason your dishwasher stays stuck on the last minute often comes down to the machine’s internal sensors struggling with these heat cycles.
- Know the Warranty Limits: You need to know when to trust a warranty for dishwasher repairs and when to just grab the screwdriver. Some things are covered, while others—like why your manufacturer warranty doesnt cover cosmetic scratches—are purely your responsibility.
#IMAGE_PLACE_HOLDER_E#
The Gear That Keeps My Kitchen Running Smoothly
You don’t need a professional workshop to maintain high-end appliances, but you do need the right mindset and a few specific tools. Aside from the 80lb braided fishing line we discussed for the door cables, I swear by my digital multimeter for testing continuity on thermal fuses. It’s the difference between a ten-minute fix and a week of hand-washing dishes. I also recommend looking into how to lower your appliance operating costs by 15 percent by using smart scheduling and energy-efficient modes. These tools aren’t just about fixing things when they break; they are about making sure they run efficiently for a decade or more.
Take Charge of Your Own Appliance Survival
Repairing your own machine is more than just a way to save a few dollars; it is about reclaiming control over the technology in your home. Whether you are performing a complex dishwasher door cable replacement or just doing a quick diagnostic check, that sense of accomplishment when the machine hums back to life is unbeatable. Don’t let a snapped cord or a falling door intimidate you. You have the tools, the knowledge, and now the insider fishing line hack to keep your kitchen running perfectly. Have you ever tried a MacGyver fix on your kitchen appliances that actually worked better than the original part? Let me know in the comments below!