

There I was, staring at a pool of murky, gray water that smelled faintly of old lasagna and regret. It was 11 PM on a school night, and my dishwasher had decided to stage a silent protest. Instead of the usual rhythmic swoosh of clean water, all I got was a pathetic, low-frequency hum. I knew that sound. It was the sound of a drain pump struggling against something it couldn’t swallow. I remember the first time this happened; I panicked and grabbed a metal coat hanger, thinking I could just fish the problem out. Big mistake. I ended up scratching the housing and nearly voiding my entire warranty. Today, I am going to show you a much smarter, cleaner way to handle this mess using something you probably already have in the garage: your shop vacuum.
That Dreaded Hum Means Business
When your machine refuses to drain, it is usually not a catastrophic motor failure. Most of the time, it is just a rogue popcorn kernel or a shard of glass wedged in the impeller. I have learned the hard way that identifying a failing drain pump by sound is the first step in avoiding a massive repair bill. If it is humming but not moving water, the motor is trying, but the blades are stuck. This is where troubleshooting dishwasher problems becomes a bit of an art form. You could spend an hour with a tiny sponge and a bucket, or you could use the suction power of a shop vac to do the dirty work in seconds. It is about working smarter, not harder, especially when you are dealing with standing water that is getting funkier by the minute.
Is Sucking Out the Gunk Actually Safe?
I get this question all the time from neighbors who fear that a vacuum will pull too hard and break the internal seals. It is a valid concern, but your dishwasher is actually built to handle significant water pressure during the wash cycle. According to the repair experts at RepairClinic, most drain blockages are easily dislodged by the controlled suction of a wet/dry vac without risking the integrity of the internal valves. The key is to create a proper seal around the drain port. I have found that deep cleaning a dishwasher sump with a vacuum is actually safer than poking around with sharp tools that can nick the delicate plastic components. Before you dive in, grab a bright LED and use the flashlight trick to see if you can spot any obvious obstructions near the filter housing first. Have you ever been faced with a dishwasher full of water and felt that immediate urge to call a technician? Do not pick up the phone just yet.
Clear the Path for the Vacuum
You cannot just shove a vacuum hose into the water and hope for the best. First, you need to pull out the bottom rack and clear away any physical debris you can see. I once spent twenty minutes trying to figure out why my suction was weak, only to find a plastic bottle cap was perfectly sealing the drain hole. Take out the cylindrical filter—this is the hidden filter most owners never clean—and set it aside. While you have it out, give it a quick scrub. If you notice a greasy film, the best way to degrease a clogged pump impeller is actually a bit of hot water and dish soap, but for now, we just want it out of the way so the vacuum has a clear shot at the drain port. Once the filter is removed, you will likely see the sump area where the water pools before the pump kicks in. This area is notorious for collecting bits of broken glass and those tiny twist-ties that fall off bread bags.
Prepare Your Shop Vac for Liquid
This is where people usually mess up. You must remove the paper filter from your shop vac. If you do not, you will end up with a ruined filter and a vacuum that smells like a wet basement for a month. Once the filter is out and the wet-float is free to move, you are ready. I remember helping my brother-in-law with his ‘broken’ machine; he was convinced the motor was dead, but we pulled about two cups of slimy sludge and a penny out of the sump using this method, and it fired right back up. Working in this wet environment means you should always double-check your power connections to ensure everything is grounded and away from the puddles. 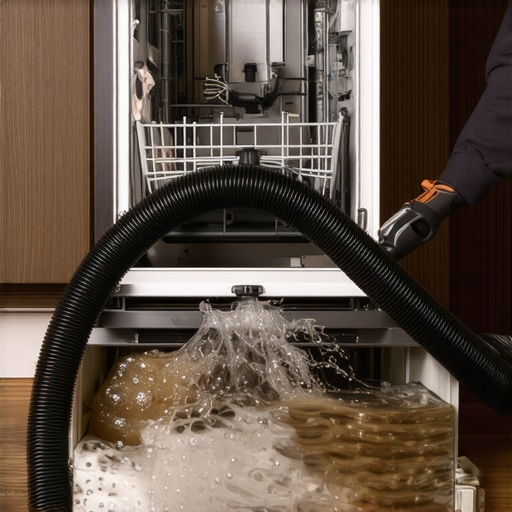
Wet-Dry Suction is Your Secret Weapon
Stick the vacuum hose directly over the drain opening at the bottom of the tub. If your hose is too big, wrap a damp rag around the nozzle to create a makeshift gasket. Turn on the vacuum and listen. You want to hear that distinct ‘slurp’ sound. If the water vanishes and you hear a rattling noise inside the hose, that is good news—you are likely pulling out the debris that caused the jam. This is often the difference between a clogged hose and a dead drain pump. If you can get the impeller moving freely again, you have saved yourself a massive service call. I find that pulse-suction—turning the vacuum on and off for three-second bursts—can sometimes dislodge stubborn obstructions better than one long pull.
The Under-Sink Power Move
Sometimes the blockage isn’t in the machine at all; it is in the hose. Go under your sink and find where the dishwasher drain line connects to your garbage disposal or the sink tailpiece. Often, you will find a buildup of old food right at the connection. By clearing the air gap to stop sink water from backing up, you ensure that the path is clear for the machine to push water out. I have seen cases where homeowners thought they needed a new machine, but the only issue was the quick drain pipe fix of just cleaning out the disposal nipple with a screwdriver. If you have a warranty, be careful here; when to trust a warranty for dishwasher repairs usually depends on whether the fault is with the machine or your home’s plumbing. Most manufacturers will not pay for a technician to come out just to tell you that your kitchen sink is clogged with potato peels.
Stop Rinsing Your Dishes Before You Load Them
Everyone says you should practically wash your dishes before putting them in the machine, but in my experience, this is the quickest way to ruin your performance. Modern dishwashers are equipped with soil sensors (turbidity sensors) that measure how dirty the water is. If you pre-rinse, the sensor thinks the water is clean and shortens the cycle, leaving you with gritty residue. Why pre-rinsing dishes actually makes your machine less efficient is a concept many struggle with, but it’s backed by science. According to experts at Consumer Reports, the enzymes in modern detergents are designed to latch onto food particles; without them, the detergent just swirls around and can actually etch your glassware.
The Vinegar Trap Most DIYers Fall Into
I see this all the time on social media: “Just put a bowl of vinegar in every cycle for a clean machine!” Stop. While vinegar is a great descaler, it is an acid. Frequent use can prematurely degrade the rubber gaskets and the shaft seal on your pump. I’ve seen perfectly good machines start leaking because the owner thought they were being “natural.” Using distilled vinegar every week may damage your seals beyond repair. 
Is Your Smart Sensor Actually Outsmarting You?
Advanced readers often ask why their high-end machines suddenly stop mid-cycle or leave things damp. Usually, it’s a calibration issue. You can sometimes access the secret tech menu that calibrates your water sensors to reset these parameters. If you don’t, the machine relies on faulty data, which leads to poor results and unnecessary wear. This level of understanding appliance diagnostics is what separates a frustrated owner from someone who knows how to keep their machine running for a decade.
Don’t Let Lack of Maintenance Void Your Coverage
The biggest “oops” factor I encounter isn’t the repair itself—it’s the paperwork. If a technician opens your machine and finds a layer of slime because you skipped the filter cleaning, they can flag it as “user neglect.” I’ve seen why your warranty claim was denied due to lack of maintenance happen to the best of us. Knowing how appliance diagnostics can save your warranty benefits is about proving you did your part. Have you ever fallen into this trap? Let me know in the comments.I have realized over the years that owning a dishwasher is less about loading it correctly and more about managing the invisible components that keep it efficient. If you want to move beyond basic cleaning, you need a few specialized tools in your kitchen drawer. I am not talking about a basic screwdriver set; I mean a digital multimeter. When my last machine refused to heat water, I did not just guess and order a new part. I used a meter to check the continuity. By testing your heating element for ground faults with a meter, you stop being a parts-changer and start being a technician. It took me five minutes to realize the element was fine, but a terminal had corroded—a five-dollar fix versus a two-hundred-dollar replacement. Another essential is a soft-bristled detail brush. Those plastic spray arms look clean on the outside, but calcium and grease build up inside the tiny nozzles. If you ignore this, you will eventually see why your dishwasher leaves a gritty film on your glasses. Instead of a toothpick, which can snap off and cause a permanent clog, I use a dedicated nylon brush to scrub the openings every few months. This is a far more effective way to clean the hidden spray arm nozzles than just poking at them blindly. 
How do I maintain my dishwasher’s internal components over time?
The secret to longevity is not a magic chemical; it is consistency and technical awareness. Every three months, I perform a deep dive into the sump. While most people stop at the primary filter, I go further to the impeller. I make sure I am cleaning your sump filter with a soft brush to stop foul odors and then checking for any stringy debris wrapped around the pump shaft. This preventative step is vital because understanding appliance diagnostics can often reveal a mechanical strain before it triggers a permanent error code. According to the Association of Home Appliance Manufacturers (AHAM), keeping the internal fluid paths clear of obstructions can extend the life of your motor by nearly 20% compared to neglected machines. If you have a newer, high-tech model, maintenance also means checking the digital health of the unit. I have seen homeowners lose their minds over a ‘broken’ machine that just needed a software reset. Make sure you know why firmware updates are essential for new smart dishwashers because manufacturers often release patches that fix sensor calibration issues. If your machine is acting up, try the trick for updating firmware on your connected kitchen appliances before you start tearing the door apart. I predict that in the next five years, we will not even be doing this manual checking. We are moving toward a world where how smart diagnostic apps are changing home appliance repair means your dishwasher will tell your phone exactly which seal is leaking before a single drop hits the floor. Until that’s standard, you need to be the one in control. Try this today: Grab a business card and test a door latch with a business card to see if your seal is still tight. It is the easiest way to prevent a slow, hidden leak from ruining your expensive kitchen subfloor.
Lessons Bought with a Flooded Kitchen Floor
Over years of wrestling with appliances, I have realized that the biggest mistakes happen when we stop listening. If you hear a rhythmic tapping, it might not be a broken motor; why your drain pump makes a clicking sound often comes down to a simple piece of hard plastic or a fruit pit hitting the impeller blades. Another lightbulb moment for me was realizing that ‘full coverage’ is rarely what it seems. Knowing the truth about third-party warranties and hidden deductible costs saved me from a massive headache when I realized my DIY shop vac trick was faster and cheaper than paying a hundred-dollar service call fee. Finally, never underestimate the power of a clean path. I used to think the machine was failing, but really, the sink was the culprit. Keeping your home’s plumbing clear is just as vital as maintaining the machine itself.
The Handful of Tools I Swear By
You do not need a warehouse of specialized equipment to keep your kitchen running smoothly. Beyond the trusty shop vac, my top recommendation is a digital multimeter. Learning the specific way to test a thermal fuse for continuity can save you from trashing a perfectly good unit due to a five-dollar part. I also keep a set of soft-bristled brushes for cleaning your sump filter with a soft brush to stop foul odors without damaging the delicate mesh. These simple items, combined with the occasional how to test a door latch with a business card check, turn a frantic homeowner into a confident repair pro.
Stop Fearing the Flashing Lights
A dishwasher error code is not a death sentence for your appliance; it is an invitation to learn. When you master the art of troubleshooting dishwasher problems, you take back control of your kitchen and your household budget. This journey into appliance repair might have started with a shop vac and a pool of stagnant water, but it ends with you having the technical skills to keep your home running efficiently for years to come. Do not let a little gray water intimidate you—you have the tools and the knowledge to fix it. Have you ever managed to save an appliance with a simple household tool or a bit of suction? Let me know below!