

I remember waking up to the rhythmic thump-squish of my wet socks on the kitchen floor at 2:00 AM. Just twelve hours earlier, I had felt like a DIY hero for ‘fixing’ a minor drip by cranking the water line connector with a massive pipe wrench until my knuckles turned white. I thought more torque equaled more safety. I was wrong. I had actually crushed the rubber gasket and cracked the plastic threads on the inlet valve, turning a tiny nuisance into a localized flood. It was a humbling, expensive mistake that taught me a vital lesson: in the world of appliance repair, muscle is often the enemy of a good seal. Today, I want to show you the right way to snug up those connections so they stay bone-dry without voiding your warranty or causing a disaster.
Stop Cranking That Wrench Before You Flood the Kitchen
The biggest mistake I see homeowners make—the same one I made—is treating a dishwasher water line like a structural bolt on a bridge. Most modern appliances use compression fittings or hoses with internal rubber washers. These components are designed to seal with relatively low pressure. When you over-tighten, you distort the rubber or, worse, you strip the soft metal or plastic threads on the valve. I learned the hard way that you should always aim for ‘hand-tight plus a quarter turn.’ If you go beyond that, you are likely heading toward a service call. Before you even touch a tool, make sure you know how to find the slow leak hiding under your kickplate so you aren’t tightening the wrong part. According to the Insurance Institute for Business & Home Safety, plumbing supply line failures are among the leading causes of residential water damage, often resulting in claims averaging over $5,000. Learning the best way to protect your kitchen floors from leaks starts with respecting the hardware you are working with.
Is a Tiny Drip Really a Big Deal?
You might be tempted to put a towel down and ‘get to it next weekend,’ but that tiny drip is a ticking time bomb for your subfloor and your bank account. Moisture creates the perfect environment for mold, and if a warranty technician sees evidence of a long-term leak that was ignored, they may deny your claim. Proper appliance diagnostics can help you prove the failure wasn’t due to neglect. Also, keep in mind that many people reach for the Teflon tape immediately, but you need to know why you should never use plumbing tape on a water inlet valve. On most dishwasher hoses, the seal happens at the gasket, not the threads, and tape can actually prevent the nut from seating properly, making the leak even worse. Have you ever tried to fix a small leak only to have it turn into a geyser the moment you touched it?Start by cleaning the entire connection area with a dry microfiber cloth so you can accurately spot where the moisture originates. When you are ready to attach the line, spin the nut counter-clockwise first until you hear a tiny ‘click’—that signals the threads are perfectly aligned and ready to travel forward. This simple trick prevents the cross-threading that often leads to common plumbing errors that cause dishwasher floods. Once you have the nut spinning freely by hand, run it down until it makes firm contact with the valve base. This is your ‘hand-tight’ baseline, and in many cases, it is already 90% of the way to a perfect seal.
The Quarter-Turn Secret for a Perfect Seal
Imagine the nut on your water line is a clock face. After you have reached the limit of what your fingers can tighten, place your wrench at the 12 o’clock position and rotate it only to the 3 o’clock position. That specific ‘quarter-turn’ compresses the internal rubber gasket just enough to block high-pressure water without crushing the material or stripping the threads. If you go to 6 o’clock or beyond, you risk creating hairline fractures in the plastic housing of the inlet valve. I learned this the hard way when I ‘secured’ a line so tight I actually split the valve body, which forced me to learn how to test your inlet valve with a simple voltmeter after the electrical components got soaked from the resulting spray.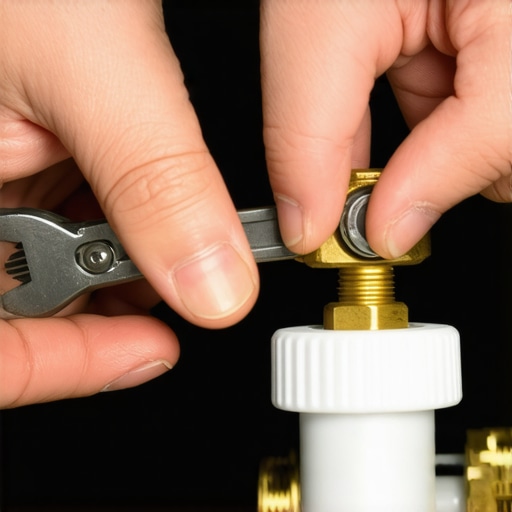
Run a Pressure Test Before You Close the Cabinet
After the quarter turn, resist the urge to shove the dishwasher back into its hole immediately. Turn the water supply valve on slowly and watch the connection for at least five minutes. If you see a tiny bead of water forming, do not panic and crank the wrench; instead, give it a tiny ‘nudge’—no more than the width of a penny at a time. This methodical approach is a core part of troubleshooting dishwasher problems expert diagnostics repair tips. I once helped a neighbor who swore his water line was failing, but after we dried the floor and watched the cycle, we realized the water was actually wicking down from the frame. We ended up using the trick of how to test a door latch with a business card because the leak only appeared when the door wasn’t pulling tight against the tub. If you see water elsewhere, it might be why your dishwasher is leaking from the bottom corners rather than a faulty hose connection. Always remember that modern valves are delicate assemblies of plastic and light alloys. If you strip the threads through sheer force, most manufacturers will categorize that as ‘user-induced damage’ rather than a factory defect. Knowing the fine print about normal wear and tear on appliances can save you from an expensive, denied warranty claim. Using the right amount of finesse isn’t just about plumbing; it is about protecting your investment and your flooring.Everyone tells you to check the error code and immediately replace whatever part the manual points to. That is a rookie mistake. In my experience, error codes are more like a suggestion than a command. If the machine says ‘drain error,’ the pump is often the last thing I check. Most of the time, it is just a shard of glass in the impeller or a grease clog in the line. If you just swap the pump, you are treating the fever rather than the infection. Professionals know that sensors measure resistance or flow, not physical reality. A sensor might trigger an error because of a ‘shorted circuit’ when in reality it is just covered in years of gunk. This is where how appliance diagnostics can save your warranty benefits by preventing unnecessary part replacements that might not be covered.
Why Your Error Code is Probably Lying to You
The most dangerous ‘trap’ I see DIYers fall into is the quick reset. We all love the one minute move to reset your control board because it makes the blinking lights go away, but doing it too often is a major mistake. Modern dishwashers store ‘fault histories’ in their non-volatile memory. If you repeatedly wipe these codes to force one more cycle, you are deleting the very evidence a service technician needs to see to diagnose an intermittent failure. If a tech arrives and the history is empty, they are likely to label it ‘no fault found,’ which means you pay the service fee out of pocket. According to the Yale Appliance Reliability Report, nearly 15% of all service calls are attributed to maintenance or user-error issues rather than mechanical failure. Resetting the board without fixing the root cause is like turning off a smoke alarm because you do not like the noise while the kitchen is still smoldering.
Can Your Choice of Soap Actually Void a Warranty?
Yes, and it happens more frequently than you might think. I have seen factory reps deny coverage because the homeowner was using 3-in-1 pods in a home with a high-end water softener. Those pods are designed to handle hard water, but when used in soft water, they create an ‘over-sudsing’ event that pushes foam through the seals and into the electrical components. This is why service techs deny warranty claims for soap choice. It is also why your service tech secretly hates pod detergents—they take away your ability to control the dosage. Before you let a technician tell you that your repair is not covered, make sure you have the photo evidence you need for every warranty claim. If you can show that you followed the manufacturer’s maintenance schedule to the letter, you may find the hidden loophole that gets your denied claim reversed. In many cases, if you approach them with the right data, you can even learn how to get a manufacturer to pay for an out-of-warranty repair when a known defect is involved. Have you ever felt like your dishwasher was gaslighting you with a fake error code? Let me know in the comments.If you want to move from being a ‘parts-swapper’ to a true diagnostic expert, you need to stop guessing and start measuring. My most trusted tool isn’t a fancy specialized wrench—it is a basic digital multimeter. I use it because, unlike a blinking LED on your interface, electricity does not lie. When my machine would not turn on last winter, I did not just panic and order a new $200 control board. I took ten minutes to learn how to use a multimeter to find a shorted wire and discovered a simple thermal fuse had blown due to a temporary power surge. By knowing the exact multimeter reading for a healthy thermal fuse—which should show continuity with nearly zero ohms—I fixed the whole thing for under ten dollars. Most people do not realize that the answers they need are often literally taped to the machine. You should always look for the tech sheet; it is how to find a service manual hidden inside the unit, usually tucked behind the bottom kickplate or inside the door panel in a small plastic sleeve. Reading those schematics is the difference between an expensive guess and a surgical fix.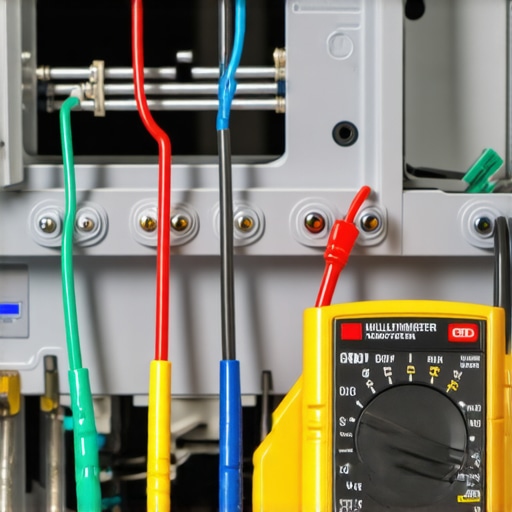
How do I maintain my dishwasher’s performance over time?
The secret to a machine that lasts fifteen years instead of five isn’t luck; it is chemistry and consistency. Hard water is the silent killer of circulation pumps, and I have seen firsthand the real cost of skipping your monthly descaling cycle when a pump impeller gets seized by calcium deposits. Beyond just running a commercial cleaner, you need to get surgical with your cleaning routine. Use how a toothpick can save your spray arm from clogs to clear out the tiny seeds and plastic bits that your main filters might miss. If those arms do not spin freely, your dishes will not get clean, and the heater might stay on too long, risking a thermal event. The Association of Home Appliance Manufacturers (AHAM) recommends that water entering the machine should be at least 120°F for detergents to activate correctly. If your water heater is set too low, your dishwasher has to work twice as hard to heat the water itself, which accelerates wear on the heating element.
The Pro in Your Area Carries a Thermal Camera
We are entering an era where your smartphone is your most powerful diagnostic asset. I recently watched a senior tech use a FLIR attachment to find a hot spot on a wire harness before it even scorched the insulation. This is why your service technician carries a thermal camera now; it allows them to see high-resistance connections that are invisible to the naked eye. In the near future, I predict we will see the rise of ‘Digital Twins,’ where your smart app compares your machine’s live vibration and power data against a perfect factory model to tell you a bearing is failing months before it starts squealing. Until that tech becomes standard, stay ahead of the game by keeping the photo evidence you need for every warranty claim. My advanced tip for you today: next time you have the door panel off for any reason, take a high-resolution photo of the control board wiring and the capacitor. You will thank me the next time a wire shakes loose during a move and you cannot remember where it seats. Have you ever tried to use a multimeter, or does the sight of a wiring harness make you want to call for backup?
The Moment I Stopped Guessing and Started Solving
If there is one thing I have learned from years of staring at wet kitchen floors, it is that your eyes can lie to you but the physics of the machine never will. Most DIYers jump straight to ordering a new motor when they hear a strange noise, but the real pros know that the answer is usually much simpler and cheaper. I spent way too much money on parts I didn’t need before I finally realized that the secret is always hidden in the paperwork. Learning how to find a service manual hidden inside the unit changed everything for me; it turned a stressful afternoon into a logical puzzle. Once you stop fearing the unknown and start trusting the data, you stop being a victim of your appliances and start being their master.
Tools That Turn Frustration into a Five Minute Fix
You do not need a garage full of specialized equipment to handle 90% of dishwasher issues. I always keep a few non-negotiables in my junk drawer that have saved me thousands in service calls. First, a reliable multimeter is your best friend for verifying if a part has actually failed—it is the only way to be sure when how to use a multimeter to find a shorted wire or testing for continuity. Second, never underestimate the power of a simple toothpick or a thin wire. I have seen countless ‘broken’ machines brought back to life just by knowing how to clean the tiny holes in your spray arms. These aren’t just chores; they are the fundamental maintenance steps that keep your warranty valid and your dishes sparkling.
#IMAGE_PLACEHOLDER_E#
Mastering Your Machine One Repair at a Time
Taking the leap to fix your own appliance can feel intimidating, but remember that every expert was once a beginner with a leaky hose. By focusing on understanding appliance diagnostics, you are not just fixing a machine—you are protecting your home and your bank account. You have the tools and the knowledge now to handle that water line with finesse rather than force. So, grab your wrench (carefully!) and get to work. Have you ever successfully diagnosed a problem that a professional technician missed? I would love to hear your success stories in the comments below.