

I’ll never forget the cold, soggy sensation of my favorite wool socks soaking up a mysterious puddle in front of the dishwasher. My first thought? ‘There goes my weekend and at least three hundred bucks.’ I immediately started searching for signs my dishwasher needs professional diagnostics, convinced that the internal pump had finally given up the ghost. I even considered trusting a warranty for dishwasher repairs, only to realize the paperwork was buried in a junk drawer somewhere in the basement. But then I looked closer. It wasn’t a mechanical failure; it was just a tired, frayed piece of rubber. I made the classic rookie mistake of overthinking the problem before simply looking at the seal. Today, I’m going to show you how to swap that gasket out so fast your coffee won’t even have time to get cold.
Stop Looking at New Machines and Grab a Screwdriver Instead
When you see water on the floor, your brain goes straight to the worst-case scenario. You start wondering why your warranty covers parts but not labor costs and get frustrated with the ‘planned obsolescence’ of modern life. I’ve been there. In fact, early in my DIY journey, I once replaced an entire door latch assembly—after testing the latch with a screwdriver handle—only to find out the leak was actually coming from a tiny gap in the door gasket I couldn’t see at first glance. It was an embarrassing waste of time and effort. According to data from the Insurance Institute for Business & Home Safety, water damage from appliances is a leading cause of residential insurance claims, with costs often soaring into the thousands for flooring repairs alone. A simple $20 seal could have prevented most of that. This isn’t just about saving money on a service call; it’s about keeping your kitchen from becoming a swamp.
Is a Ten-Minute Fix Actually Too Good to Be True?
You might be thinking that I’m oversimplifying things. ‘Surely, I need to pull the whole machine out of the cabinet, right?’ Wrong. Most people assume that troubleshooting dishwasher problems requires a degree in engineering or a massive toolkit. The truth is that replacing a frayed door seal for under twenty dollars is one of the most satisfying ‘quick wins’ you can have in home maintenance. Have you ever stared at a puddle on your kitchen floor and felt that immediate sense of dread? Drop a comment and tell me if you’ve ever been tempted to just kick the machine and walk away—I’ve certainly been there. We’re going to dive into the exact steps to seat that new rubber properly so you never have to deal with ‘Soggy Sock Syndrome’ again.
Kill the Power and Prep Your Surface
First things first: you cannot skip the prep work. I once rushed into a repair and forgot that while I was working with water, I was also inches away from electrical connections. If you want to keep things safe, check out using a voltmeter to check your power cord connection safely before you start poking around. Open the door and pull out the old, slimy gasket. It should come out with a firm tug, similar to pulling a stubborn weed from a garden. Once it’s out, you’ll likely see a decade’s worth of built-up soap scum and literal ‘who-knows-what’ in the groove. This is where most people fail—they try to put the new seal over the old gunk. I remember my first attempt where I ignored the cleaning; the new seal just kept popping out like a spring-loaded jack-in-the-box because the channel was full of calcified detergent. Grab a warm, damp cloth and clear that channel completely. While you’re down there, it’s also the perfect time to learn the secret to cleaning behind your dishwasher kickplate to ensure no hidden moisture is rotting your subfloor.
Work from the Center Out to Avoid the Infamous Gasket Bunch
The biggest mistake DIYers make is starting at one end and feeding the rubber all the way around. By the time you get to the other side, you’ll have six inches of ‘extra’ rubber and nowhere for it to go. Think of it like putting a screen protector on a phone; if you don’t start from the middle, you’re guaranteed to get bubbles. Find the exact midpoint of your new seal—most have a small marking—and align it with the exact top-center of the dishwasher tub. Press it in firmly at the top, then work your way down the left and right sides simultaneously. This ensures the tension is even. If the rubber feels too stiff, here is a pro-tip: soak the gasket in a sink of hot water for five minutes first. It makes the material pliable, much like how why running the kitchen sink hot prevents cold starts by getting the internal components ready for action. 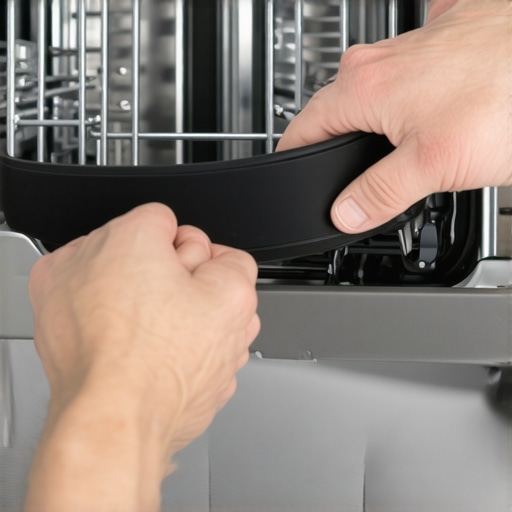
The Simple Paper Test to Prove It’s Watertight
Once the seal is seated, don’t just walk away and start a cycle. You need to verify that the door is actually putting enough pressure on that new rubber to create a vacuum. This is where I use the ‘Dollar Bill Test.’ Close the door on a piece of paper (or a dollar bill) at various points around the edge. If you can pull the paper out with zero resistance, your seal isn’t touching the door. This might mean you need to look into how to level your dishwasher to stop mystery leaks, as a tilted machine will never seal correctly regardless of how new the gasket is. If the latch feels too tight now, don’t panic. You can try testing the latch with a screwdriver handle to see if it just needs a minor adjustment to accommodate the thicker, uncompressed rubber. If you’re still seeing moisture after these steps, it might be time to check top signs your dishwasher needs professional diagnostics just in case the tub itself is warped. Always remember that troubleshooting dishwasher problems is a process of elimination, and you’ve just eliminated the most common culprit for under twenty bucks.Wait, if the seal wasn’t the issue, why is the machine still acting up? Most people think that once they’ve tackled a physical leak, they are in the clear. But I’m here to tell you that the biggest myth in appliance repair is that the hardware is the only thing that fails. Let’s dig deeper. In my years of tinkering, I’ve found that the ‘logic’ of the machine is often where the real headaches begin. Everyone tells you to call the manufacturer the second a light blinks, but did you know that understanding appliance diagnostics improving your warranty claims is actually your responsibility? If you don’t have the data, the service provider has all the leverage.
Your Warranty Isn’t the Safety Net You Think It Is
Most homeowners assume when to trust a warranty for dishwasher repairs is a simple ‘yes’ or ‘no’ question based on the age of the machine. Here is the contrarian truth: your warranty is often more of a legal minefield than a service guarantee. I’ve seen countless cases where a technician arrives, sees a slightly clogged drain, and suddenly your coverage is voided. You need to understand why your warranty claim got denied because of your garbage disposal because in many modern kitchens, the dishwasher’s health is tethered to the sink’s plumbing. If your disposal isn’t clear, the dishwasher works harder, the motor overheats, and the manufacturer blames ‘improper maintenance’ rather than a faulty part. I even encountered the clause in your service plan that voids coverage for hard water which can catch you off guard if you live in an area with high mineral content. It’s a dirty trick, but it’s the industry standard.
Don’t Buy a New Control Board Until You Test This One Tiny Part
The ‘Oops’ factor in advanced repair is almost always the control board. When the screen goes black, the immediate reaction is to drop hundreds on a new ‘brain’ for the machine. Stop. Before you do that, you must try testing your thermal fuse before buying a new control board. It is a tiny, inexpensive component designed to blow if the machine gets too hot. If the fuse is dead, the whole machine looks like a brick, but the fix costs less than a sandwich. I’ve seen so many DIYers waste money replacing perfectly good boards because they didn’t know why your dishwasher screen shows a numeric error code can sometimes be a red herring for a simple power interruption. 
Can You Really Prove Your Machine Failed Due to a Factory Defect?
This is the question that separates the pros from the amateurs. To win an argument with a manufacturer, you need to know how appliance diagnostics can save your warranty benefits. According to a report by the Association of Home Appliance Manufacturers (AHAM), modern high-efficiency units are built with much tighter tolerances than machines from twenty years ago, making them significantly more sensitive to voltage fluctuations and sensor errors. If you can show that you’ve done your homework—perhaps by how to claim a repair refund from your appliance manufacturer with documented error logs—you’re much more likely to get a check in the mail. Don’t let them hide behind the real difference between service plans and manufacturer warranties to avoid paying out. Have you ever fallen into this trap where a ‘covered’ repair suddenly became a massive bill for labor? Let me know in the comments—I’d love to hear how you handled it.
My Toolbox Isn’t as Fancy as You Think
I remember the first time I walked into a professional appliance repair shop. I expected a wall of high-tech lasers and complex diagnostic computers. Instead, I saw a group of experts with well-worn multimeters and a few specialized bits they had custom-filed for specific jobs. It changed my perspective forever. You do not need a thousand dollars’ worth of gear to save your machine from the scrap heap. I’ve learned that the only multimeter settings you need for appliance repair are essentially just continuity and resistance. If you can read those two numbers, you are already more capable than 90% of the homeowners in your neighborhood. You can even learn how to test your float switch using a plastic straw if you want to avoid buying specialized gear. It’s about understanding the internal logic of the machine rather than just owning the most expensive tools. Appliantology’s Master Samurai Tech training, a leading resource for field technicians, suggests that up to 80% of part replacements are performed without proper electrical verification, leading to massive unnecessary costs for the consumer. Don’t be that person. Before you buy an expensive new pump, how to test a dishwasher solenoid with a multimeter should be your absolute first move. 
How do I keep my dishwasher running for a decade?
Maintenance isn’t a one-and-done event; it’s a rhythm you establish with your kitchen. I personally set a calendar reminder every six months to do a deep-clean of the filter mesh and the drain line. If you let debris and calcified detergent build up, you’re just asking for a circulation motor failure. If you want to stay ahead of the game, troubleshooting dishwasher problems is about becoming a detective of your own home. Listen for subtle changes in the pitch of the motor or the sound of the water hitting the door. Those are your early warning signals that a bearing is wearing out or a spray arm is blocked. I also recommend checking your water hardness regularly, as mineral buildup is the silent killer of modern heating elements. By staying proactive and keeping a log of these checks, you’re essentially understanding appliance diagnostics improving your warranty claims by proving that any future failure wasn’t due to neglect.
Why Your Kitchen is About to Get a Lot Smarter
Looking ahead, the DIY landscape is shifting into something far more data-driven and predictive. We are moving toward an era where your machine will likely send a push notification to your phone identifying a failing thermistor before the water even has a chance to get cold. We are already seeing the beginnings of this with homeowners managing your kitchen appliances with voice commands to check cycle status or detergent levels. But the real revolution is in predictive maintenance through cloud-based diagnostics. However, this connectivity comes with its own set of weird quirks—you might eventually wonder why your smart appliance is using more data than expected just to send heartbeat signals to a manufacturer’s server. The trend is clear: while hardware is becoming more efficient, the software layer is becoming the new potential point of failure. My advice is to stay grounded in the physical aspects of the machine. AI can’t tell you if a rodent chewed through a wiring harness, but a simple continuity test can. My challenge to you? Before you call a pro next time, grab a basic multimeter and check your solenoid—it might just save you a three-hundred-dollar service fee and a whole lot of frustration.
The Expensive Lesson I Learned About Your Dishwasher’s ‘Logic’
After years of soggy socks and frustrated phone calls, I realized that the hardest part of any repair isn’t the physical labor—it’s outsmarting the manufacturer’s fine print. I used to think that when to trust a warranty for dishwasher repairs was a straightforward decision based on the age of the unit. I was wrong. The biggest ‘lightbulb moment’ for me was discovering that most warranty denials happen because of simple maintenance oversights, like a clogged air gap or a dirty disposal. I’ve learned that understanding appliance diagnostics improving your warranty claims is the only way to hold these companies accountable. If you can’t speak the language of the machine, they’ll speak the language of ‘user error’ every single time.
The Tiny Toolkit That Outperforms a Professional Service Van
You don’t need a truck full of specialized computers to get your machine back in action. My personal ‘holy trinity’ of repair tools includes a few basics that never let me down. First, a reliable multimeter—once you master the only multimeter settings you need for appliance repair, you will stop guessing which part is broken and start knowing. Second, your smartphone. I use mine for more than just YouTube; I’ve learned how to document intermittent noises for a repair claim to prove a failure exists even when the tech is standing there and the machine is behaving. Finally, remember that information is your strongest tool. Realizing that how appliance diagnostics can save your warranty benefits prevents you from buying a new control board for a simple fuse problem. #IMAGE_PLACE_HOLDER_E#
Stop Fearing the Machine and Start Fixing It
At the end of the day, your dishwasher is just a box of pumps, valves, and sensors. It’s not a mystery box designed to bankrupt you. By taking these small steps and learning the ropes of troubleshooting dishwasher problems, you aren’t just saving a few hundred bucks on a service call; you’re reclaiming your home from the cycle of planned obsolescence. You’ve got the tools, you’ve got the steps, and now you’ve got the insider knowledge to handle whatever error code comes your way. Have you ever managed to fix an appliance with a ‘hack’ or a simple observation that a professional missed? Let me know about your victory in the comments below!