

Picture this: your dishwasher just sang its happy little end-of-cycle tune. You open the door, expecting a cloud of steam and pristine, bone-dry dishes. Instead, you reach for your favorite leftover container and get a hand full of lukewarm water. The ceramic mugs are dry, the glassware is gleaming, but those plastic tubs are still absolutely drenched. I used to stand over my open dishwasher every single night, furiously shaking water off Tupperware lids and cursing my otherwise perfectly good appliance. It felt like a personal insult from a machine I trusted.
The Cold, Wet Truth About Modern Dishwashing
For a long time, I thought my heating element was toast. In fact, in my early DIY days, I made the incredibly annoying mistake of ordering a replacement part and tearing my entire machine apart, only to realize the original element was completely fine. Talk about a waste of a Saturday! What I didn’t understand back then was that plastic simply doesn’t hold heat the way ceramic, glass, or steel does. When the cycle ends, your heavy dishes stay hot and evaporate the remaining water. Your plastic containers cool down almost instantly, leaving the moisture to pool on their surfaces instead of evaporating. Before you go replacing parts, you need to understand how your machine actually dries things.
Is this annoying dampness actually worth a service call?
You might be tempted to call in the pros, but most of the time, wet plastic isn’t a sign of a mechanical failure. However, if your ceramic plates are also coming out soaking wet, you might actually be dealing with a broken heating component. If you suspect that is the case, you can learn the simple fix for dishes that still come out wet to see if your heater is the culprit. According to physics studies on material thermal conductivity, plastics conduct heat up to 500 times slower than metals, which explains why they refuse to dry using standard condensation methods. Today, we are going to look at the easy adjustments you can make to get those stubborn tubs dry without voiding your appliance coverage. If you are worried about making adjustments yourself, keeping an eye on your diagnostic steps can prevent issues; in fact, how appliance diagnostics can save your warranty benefits is a crucial topic for any homeowner looking to avoid expensive repair bills. Have you ever let out a sigh of frustration while drying your plastic food storage containers by hand after a full cycle? Let me know in the comments below!
Step-by-Step Tactics to Force Dry Your Stubborn Plastics
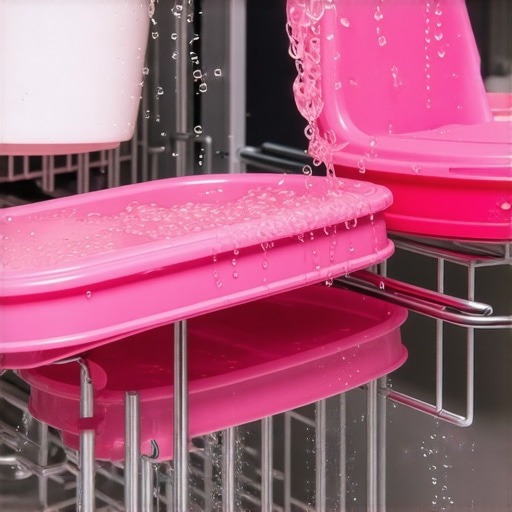
Getting your plastic storage containers to dry without hand-towels requires a mix of physics hacks and clever cycle selections. First, you must change how you load. When I first tried loading my bowls, I used to stack them tightly, nesting them like Russian dolls. The result was a swampy mess of trapped condensation. Now, I angle every single container at a steep 45-degree slope. This tilt prevents pooling by using gravity to roll water droplets away before they can cool down and cling to the plastic surface. Think of your dishwasher rack as a slanted roof; if the shingles are flat, the water pools and rots the wood. If they are sloped, the rain slides straight to the gutters.
Next, you must address your water temperature. Your dishwasher relies on a thermal charge to evaporate moisture at the end of the wash cycle. If your incoming water is too cold, the machine cannot build up enough residual heat. To fix this, simply run the kitchen sink hot water tap until it feels scalding hot before you press start on your dishwasher. This primes the line, ensuring that your machine starts the fill cycle with hot water, giving the heating element a massive head start. If your water heater is set too low, you might want to look into the best temperature for your home water heater to ensure your appliances are actually receiving the thermal energy they need to perform.
Why Your Rinse Aid is Non-Negotiable
Many people view rinse aid as an optional cosmetic extra designed to make wine glasses shine, but it is actually a chemical water repellent. Plastic is naturally hydrophobic, meaning water wants to bead up and sit on it in stubborn drops. Rinse aid breaks the surface tension of the water, turning those round beads into a flat sheet that slides right off. I remember a chaotic Tuesday night when I ran a heavy load of plastic baby bottles without rinse aid. Every single bottle came out filled with a puddle of stale water. The very next night, after refilling the dispenser, those same bottles came out bone dry. If your dispenser door is sticking closed and preventing the rinse aid from releasing, you can learn how to fix a soap dispenser door that stays shut to resolve the issue yourself.
When to Step Away and Call the Professionals
If you have adjusted your loading style, primed the hot water line, and filled your rinse aid, but everything is still soaking wet, the problem might be mechanical. Before you grab your screwdriver, remember that diagnosing a complex appliance issue yourself can sometimes compromise your protection plan if you make a mistake. Understanding the fine print that voids your appliance service plan can help you avoid making a critical error that leaves you paying out of pocket for major repairs. When you decide to call in a technician, you want to be certain it is truly necessary. You should review top signs your dishwasher needs professional diagnostics to make sure you are making the right choice before scheduling a visit.
When you start digging into why your plastics refuse to dry, you will quickly find a mountain of advice telling you to just buy a new heating element or run a cycle on the hottest possible settings. Everyone says a hotter cycle is the magic bullet, but in my experience, cranking up the heat without addressing your machine’s airflow is a complete waste of energy. The industry dirty secret is that modern dishwashers rely on condensation drying, which works by pulling moisture toward the cooler stainless steel walls of the tub. If your kitchen cabinet configuration traps heat around the exterior of the machine, the temperature differential drops, and the drying cycle fails completely. It is not a hardware failure; it is a thermal dynamics issue.
Why does my appliance warranty deny claims for simple drainage and drying issues?
Many homeowners assume that if their dishes are wet or water is pooling at the bottom, their service contract will cover the repair. This is where the “oops” factor kicks in. A study by the National Appliance Repair Association highlights that up to 40% of service calls are actually related to user maintenance rather than mechanical failure. If a technician arrives and finds that a buildup of grease or food particles is blocking your drain line, you will likely be handed a hefty bill for the labor. In fact, understanding why your warranty claim for a clogged pump might get denied can save you from a very expensive surprise. Manufacturer warranties protect against defective components, not neglected filters.
Another classic trap is attempting to fix a suspected control board issue yourself by using uncertified parts. It is tempting to buy a cheap knockoff switch online to get your machine running tonight, but this shortcut is incredibly risky. I always warn my readers that using why third-party-parts might kill your service contract is the fastest way to void your remaining coverage. If your machine experiences a serious issue down the road, a certified technician will immediately spot that non-OEM part and deny your claim on the spot. Before you touch a single wire, you must learn how to properly diagnose the root cause. If you want to check your system without voiding your terms, you should read about understanding appliance diagnostics improving your warranty claims to ensure you stay fully covered.
Ultimately, getting dry plastics comes down to working with your machine’s design, not fighting against it. Keep your rinse aid reservoir full, angle your containers to prevent pooling, and make sure you clean your filters regularly to keep the air flowing freely. Have you ever fallen into this trap and paid for a service call that turned out to be a simple maintenance issue? Let me know in the comments below!
Once you understand how thermal dynamics and proper loading make or break the drying process, the next step is preserving that peak performance over the lifetime of your machine. I used to think that a clean dishwasher stayed clean naturally because, well, it runs with soap and hot water every day. That assumption cost me dearly when a hidden buildup of hard water scale and grease choked my machine’s efficiency, leaving my dishes slick and wet. To keep your unit running flawlessly, you need a proactive maintenance toolkit and a strategy that goes beyond just throwing in a detergent pod.
How do I maintain my dishwasher drying system over time?
To keep the interior of your machine pristine without degrading its sensitive internal components, I recommend a hands-on physical inspection every single month. Instead of relying on harsh chemical flushes, start by manually clearing out the debris trap. Over time, tiny food particles and grease settle into the mesh, restricting the flow of water and air. If you want to keep your hands clean during this chore, utilizing the simple tool for removing hair from a drain pump is an incredibly effective way to clear stubborn debris from deep within the sump area. Additionally, I always recommend keeping a toothpick nearby; using it to clear tiny mineral deposits is a great trick, and you can master cleaning the spray arm nozzles with a simple toothpick in just a few minutes to ensure optimal water pressure during every rinse cycle.
For the DIY tools in my personal kit, I always keep a digital multimeter on hand. This is not just for professional technicians; it is the ultimate diagnostic weapon for any proactive homeowner. If you ever suspect your drying system is failing because of a cold cycle, you can use a multimeter to verify if your heating element or thermal fuse has actually failed. To do this safely, make sure you understand the only multimeter settings you need for appliance repair so you do not accidentally damage your tester or get incorrect readings. Regular physical checks and basic electrical diagnostics will keep your appliance running smoothly for years, saving you hundreds on premature replacements.
Looking ahead, the future of dishwashing is moving toward hyper-efficient zeolite mineral drying systems and smart, sensor-driven cycles. Major manufacturers like Bosch and Thermador are already utilizing specialized minerals that naturally absorb moisture and release intense heat during the dry cycle, eliminating the need for high-wattage heating elements entirely. Furthermore, modern appliances are getting much better at telling us exactly what is wrong. If your machine is throwing a mystery code, checking why your dishwasher screen shows a numeric error code can help you stay ahead of system failures before they ruin your dinnerware. If you want to put these tips into action today, I highly recommend checking your water inlet temperature tonight before your next load to ensure your machine is getting the thermal energy it needs to dry your plastics perfectly.
What Experts Won’t Tell You About Your Dishwasher and Warranty Coverage
Over years of working with home appliances, I have uncovered a few hard truths that standard instruction manuals conveniently omit. First, your appliance design relies heavily on physics that are out of your hands unless you actively intervene. Simply switching to a hotter wash cycle does not solve a lack of airflow, and doing so continuously can prematurely wear out your internal components. Second, many homeowners assume that calling a professional technician under their service contract is always free. In reality, if the technician finds that your drying issues are caused by a clogged filter or a simple lack of rinse aid, the service call will be deemed user-maintenance, and you will be stuck paying the trip fee out of pocket. Understanding when to trust a warranty for dishwasher repairs is essential to protecting your bank account from avoidable diagnostic bills.
My Essential Toolkit for Peak Appliance Performance
You do not need an expensive garage full of professional machinery to keep your dishwasher drying like new. Over the years, I have narrowed down my maintenance kit to just three indispensable items. First, a high-quality digital multimeter is non-negotiable for testing components safely; mastering the only multimeter settings you need for appliance repair will save you from guessing if a heating element is truly dead. Second, a simple, flexible drain clean-out tool is perfect for pulling out stubborn hair and food clogs before they block your pump. Finally, I always keep a pack of wooden toothpicks in my kitchen drawer to manually clear mineral scaling from the tiny spray arm jets. If you want to expand your maintenance arsenal, you can explore the best diy tools for kitchen appliance maintenance to keep your kitchen running smoothly without professional intervention.
Take Control of Your Drying Cycles Today
There is absolutely no reason to accept a lifetime of hand-drying your favorite plastic food storage containers. Armed with a solid understanding of how modern condensation systems operate, you can make immediate, zero-cost adjustments tonight to get perfectly dry results. Before you run your next load of dishes, make sure you tilt those plastic tubs at a steep angle, prime your hot water line, and top off your rinse aid reservoir. Keeping your machine clean and understanding how to run basic checks will keep your unit in top-tier shape for a decade to come. If you suspect your appliance is experiencing a deeper issue, knowing how to perform basic troubleshooting dishwasher problems expert diagnostics repair tips will give you the confidence to handle it like a pro. Have you ever tried the 45-degree tilting trick to dry your plastic containers? Let me know in the comments below!