

I stood there staring at my brand-new dishwasher, feeling like I’d been scammed. I had spent twenty minutes pre-rinsing every single plate until they were practically spotless, yet when the cycle finished, my glasses felt like they were coated in fine sandpaper. It was infuriating. I thought I was being the perfect appliance owner, but in reality, I was actually sabotaging the very machine I was trying to help. This is the frustrating paradox of the modern kitchen. We are told these machines are ‘high-efficiency,’ but if we don’t change how we prep our plates, they leave us with a mess that feels anything but efficient. Today, I’m going to show you why your old-school habits are ruining your new-school results and how you can finally get those crystal-clear finishes you were promised.
The Gritty Truth About Your High-Efficiency Machine
If you grew up with a dishwasher from the 90s, you remember the roar of a machine that used fifteen gallons of water to blast through a Thanksgiving dinner. Those days are gone. Modern units are designed to sip water, often using as little as 3 to 5 gallons for an entire load. Because of this, why modern dishwashers take three hours to run a cycle becomes a lot clearer; they need time and chemistry rather than brute force. When I first got my HE unit, I made the classic mistake of ‘pre-cleaning.’ I thought I was saving the filter from clogs, but I was actually confusing the turbidity sensor. These sensors are the brain of the operation. They look at how dirty the water is to decide how hard to work. If you put in clean plates, the sensor thinks the job is done and cuts the cycle short, leaving detergent residue and grit behind. According to experts at Consumer Reports, pre-rinsing is not only unnecessary but can actually lead to poorer cleaning results because the enzymes in modern detergents have nothing to latch onto. You might even find how to calibrate your dishwasher turbidity sensor with plain water is necessary if yours has become particularly finicky. Have you ever pulled out a ‘clean’ glass only to find it feeling like it was dipped in sugar? Join the club; it’s the most common complaint I hear from my neighbors.
Is this just a clever excuse for poor performance?
It’s natural to feel skeptical. You paid for a premium appliance, so why should you have to ‘learn’ how to load it? It feels like the manufacturers are shifting the blame onto us. But the reality is that the chemistry of cleaning has changed. Most modern pods are packed with enzymes designed to eat protein and starch. If those enzymes don’t find food on your plates, they simply foam up and rinse away, or worse, they start attacking the gaskets and plastic components of the machine itself. This is often why your service tech secretly hates pod detergents when they are used in a machine that is being fed ‘clean’ dishes. We have to stop thinking of the dishwasher as a sanitizer and start seeing it as a specialized chemical reactor. It’s all about saving water without sacrificing clean plates every night, and that requires a bit of a mental shift in the kitchen. In the next section, I’ll break down the exact ‘scrape, don’t rinse’ method that saved my sanity and my glassware.
Ditch the Pre-Rinse to Save Your Glassware
Think of your dishwasher detergent like a heat-seeking missile. It is chemically engineered to lock onto food particles and break them down. When you pre-rinse your dishes until they are practically clean, those enzymes have no target to strike. I remember trying to be ‘helpful’ to my new Bosch unit by scrubbing every plate before loading it; the machine rewarded me with a gritty film on my favorite wine glasses that looked like a dusting of salt. The turbidity sensor saw clear water and thought the job was done early. Think of those enzymes like little Pac-Men; if they do not have food dots to eat, they can even start attacking the soft rubber gaskets instead. Last Tuesday, I did the opposite: I threw a pan caked in dried-on shepherd’s pie straight into the bottom rack. Because I had not pre-rinsed the other plates, the sensor triggered a longer, hotter wash. The result was a pan so shiny I could see my reflection, and the glasses on the top rack were crystal clear. Scrape off the big chunks like chicken bones, but leave the sauces and oils for the machine to handle.
Give Your Detergent Door Some Breathing Room
One of the most common reasons for a failed wash is actually mechanical, not chemical. We all have that one oversized serving platter or the ‘hero’ cutting board that we try to wedge into the bottom rack. If you place a tall item directly in front of the detergent dispenser, the door will not have enough clearance to pop open during the cycle. You will end up with a half-melted pod stuck to the plastic and a load of dirty dishes. It is vital to learn how to stop your detergent door from getting blocked by doing a quick hand-swing of the lower spray arm before you close the unit. If the arm hits a plate or the door path is obstructed, you must rearrange the load. This simple gatekeeper check saves you from the frustration of a wasted three-hour cycle.
Stop Using the Eco Mode for Greasy Loads
I know we all want to save money on the electric bill, but using the ‘Eco’ or ‘Normal’ cycle for a load of greasy Sunday dinner plates is a recipe for disaster. These cycles use lower temperatures that struggle to melt animal fats efficiently. Over time, that grease solidifies inside your internal plumbing. This is why the heavy cycle is actually better for your machines health at least once or twice a week. The extra heat liquefies the gunk and flushes it out of the system, preventing the dreaded ‘wet dog’ smell. If you find your dishes are still greasy, it is not the machine failing—it is the laws of thermodynamics winning over your desire to save a few cents on the power bill.
Clear Your Spray Arms and Filters Every Month
Your dishwasher is not a magic portal where food disappears; it is a recirculating system. If the tiny holes in your spray arms are clogged with lemon seeds or hard water scale, the water pressure drops significantly. You can use the toothpick method to how to clean the tiny holes in your spray arms and restore that factory-level blast. #IMAGE_PLACE_HOLDER_B# While you are at it, reach into the bottom of the tub and pull out the cylinder filter. This is the debris trap most owners miss during monthly cleaning, and if it is covered in slime, your pump has to work twice as hard to move water. If your machine is still acting up after these maintenance steps, it might be time to how to get professional grade diagnostic codes from your interface to see if a sensor has actually failed or if it is just a stubborn clog begging for a quick bath.Most people assume that when a dishwasher throws an error code, it is a death sentence for a specific part. ‘Oh, the code says pump failure, I need a new pump.’ But here is the gritty reality: modern sensors are often reporting a symptom, not the cause. In my experience, homeowners often spend hundreds of dollars on a new drain pump when the real issue was a simple high-loop error in the plumbing. This is where understanding appliance diagnostics improving your warranty claims becomes your secret weapon. If you call a technician out and they find a simple clog you could have cleared yourself, they will likely hit you with a ‘no fault found’ service fee that your warranty will not cover. I have seen it happen dozens of times.
Stop Trusting Your Warranty Without a Paper Trail
We often think of the manufacturer as a safety net, but the engineering standards set by groups like the Association of Home Appliance Manufacturers (AHAM) show that modern units are increasingly sensitive to external variables like water hardness. If your machine fails because of mineral buildup, the company will quickly claim ‘improper maintenance.’ This is precisely why service techs deny warranty claims for soap choice or water quality issues. To fight back, you need more than just a complaint; you need data.
Can You Outsmart the Technician’s Diagnostic Tool?
The short answer is yes, but only if you know how to access the machine’s internal history. Before you ever pick up the phone to schedule a repair, you should learn how to get professional grade diagnostic codes from your interface. These hidden menus reveal the story the machine will not tell you on the surface display. For example, a generic heating error might not be a dead element; it could be a faulty relay on the control board. If you can use a tool to find the exact multimeter reading for a healthy thermal fuse, you are no longer a helpless consumer—you are an informed advocate for your own repair. 
The Diagnostic Mode Is Not a Magic Wand
The biggest ‘oops’ factor I see with DIY enthusiasts is what I call the ‘clean-up trap.’ When a tech arrives and finds a spotless machine that was supposedly leaking or smoking yesterday, they cannot verify the failure. Always take the photo evidence you need for every warranty claim while the leak or suds are still visible. If you clean the evidence before they arrive, you have literally wiped away your proof for the claim. To stay protected, you must keep these three receipts to ensure a smooth repair claim: your original purchase, your detergent brand, and any water softener salt you use. Master when to trust a warranty for dishwasher repairs by knowing exactly where the manufacturer’s responsibility ends and yours begins. Have you ever had a warranty claim denied for a reason that seemed totally unfair? Let me know in the comments.I’ve started pulling my hair out less once I realized my dishwasher has a secret life. Most people don’t know there is a physical map hidden inside their machine. If you unscrew the kickplate—that metal or plastic panel at the bottom—you’ll often find a folded piece of paper known as the tech sheet. This is the holy grail for how to find a service manual hidden inside the unit. It tells you exactly which buttons to press to enter the diagnostic mode. This isn’t just for pros; it’s for anyone who wants to avoid a $150 service call just to find out a sensor is simply unplugged. If you’re wondering where to start, looking into troubleshooting dishwasher problems expert diagnostics repair tips can give you the roadmap you need.
Why a Basic Multimeter Outperforms Any Guesswork
I always keep a basic digital multimeter in my junk drawer. I use it to how to test your inlet valve with a simple voltmeter before I ever think about ordering a new part. It takes three seconds to check for continuity. If you’re nervous about numbers, remember that the exact multimeter reading for a healthy thermal fuse is usually close to zero ohms; if the screen says ‘OL’ or ‘Open,’ your part is toast. According to the Association of Home Appliance Manufacturers (AHAM) in their 2020 Standard for Performance, the efficiency of modern cycles relies heavily on the specific sequence of thermal pauses, making it vital that your heating element is actually functional and not just ‘mostly working.’ 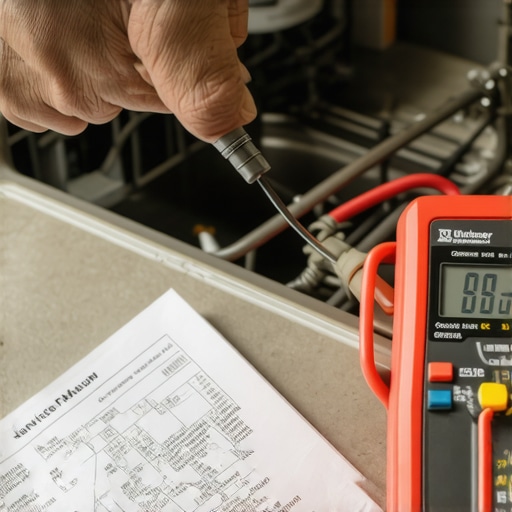 In the very near future, I predict we will see AI-driven internal cameras that identify clogs before the water even drains, but for now, we have to rely on these manual checks to stay ahead of the curve. Be careful with newer ‘Smart’ units, though; I have seen why your appliance firmware update just bricked the control board firsthand when a router rebooted at the wrong moment during a mandatory update.
How do I keep my dishwasher running for another decade?
It is all about descaling and checking the small stuff. I’ve found that the real cost of skipping your monthly descaling cycle isn’t just dirty dishes—it is the accelerated wear and tear on the pump seals caused by calcium buildup. Use a dedicated citric acid cleaner or the natural way to strip hard water buildup from the tub to keep those internal components flexible and free of grit. Also, take five minutes this weekend to do the simple move that doubles the life of your dishwasher racks: check for tiny chips in the vinyl coating and seal them with a touch-up kit before the metal underneath begins to rust. Go pull off your kickplate tonight and look for that tech sheet; it’s the first step to owning your machine instead of it owning you.
The Hardest Lesson I Learned About Dishwasher Maintenance
After years of fixing my own appliances, I realized that the biggest enemy of a long-lasting machine isn’t usage—it’s over-care. I spent far too long believing that a pre-washed plate was a ‘safe’ plate, only to discover that I was effectively starving my detergent’s enzymes. One lightbulb moment occurred when I realized that the fine print about normal wear and tear on appliances often includes damage caused by the very chemicals meant to help, simply because they had no food to bind to. Another revelation was discovering that many ‘broken’ units are just confused. Learning how to recalibrate your turbosity sensor manually can save you from a $500 replacement bill. Finally, always trust your ears; if you hear a strange thumping, it might just be a loose spray arm, and checking the five minute fix for a loose spray arm nut is much cheaper than calling a plumber.
Three Things I Never Start a Repair Without
If you want to move beyond guessing, you need a small kit. First, a digital multimeter is non-negotiable; I use mine to determine how to test the continuity of a heating element in seconds. Second, keep a simple business card in your kitchen drawer. It sounds strange, but you can how to test a door latch with a business card to ensure the sensor is actually engaging. Third, I always have a bottle of high-quality rinse aid. It is not just for shine; it is essential for the drying process in HE machines. If you’re still seeing spots, it might be time to check the top signs your dishwasher needs professional diagnostics before you start tearing the motor apart.
#IMAGE_PLACEHOLDER_E#
Your Machine Should Work for You
You didn’t buy a dishwasher to become its servant. By stopping the pre-rinse habit and learning the basics of your machine’s diagnostic language, you reclaim your time and your sanity. Don’t be afraid to pull off that kickplate and look for the tech sheet—it is your roadmap to appliance independence. Mastering troubleshooting dishwasher problems expert diagnostics repair tips is the difference between a kitchen that runs smoothly and a weekend spent scrubbing plates by hand. What’s the weirdest noise your dishwasher has ever made? Let me know in the comments below!