

I still remember the exact Tuesday evening my kitchen turned into an indoor water park. I was sitting on the couch, enjoying a rare quiet moment, when a soft, persistent squishing sound caught my attention. I stepped into the kitchen only to find my socks instantly soaked through. Underneath my sleek, relatively new dishwasher, a steady stream of dirty water was making a break for my hardwood floors. My first thought? ‘Thank goodness I paid extra for that comprehensive five-year extended warranty.’ I confidently called the service line, expecting a friendly technician to arrive on a white horse to save the day. Instead, I got a cold dose of reality and a denied claim. My expensive protection plan was completely useless for this specific nightmare.
Through that painful and incredibly soggy experience, I learned the hard way about the massive loopholes hidden inside those shiny service agreements. Today, I am going to pull back the curtain on how warranty administrators actually look at your claim. We will break down exactly why a leaking wash or drain pump so often falls through the cracks of your coverage, and how you can arm yourself with the right knowledge to fight back and get your kitchen dry again. I made the classic mistake of not securing proper appliance diagnostics before submitting my claim, which ultimately cost me hundreds of dollars out of pocket. I do not want you to make that same blunder.
Is your expensive protection plan actually just a piece of paper?
When you purchase an extended service plan, you assume you are buying peace of mind. The salesperson at the register certainly made it sound like your machine was covered against absolutely any mechanical failure. However, a startling industry report by the Consumer Federation of America highlights that up to 40% of service contract claims get bottlenecked or outright rejected due to pre-existing conditions, wear-and-tear clauses, or supposed owner negligence.
The hard truth is that warranty companies are businesses designed to protect their bottom line, not your kitchen floors. When a pump starts leaking, their first goal is to find a reason why the failure is your fault. Did a stray cherry pit get past your filter and slice the pump impeller? That is considered accidental damage or neglect, and your claim is instantly dead in the water. This is why understanding when to trust a warranty for dishwasher repairs is so critical before you make that first phone call.
The Sneaky Exclusions in Your Service Contract
The biggest trap is how these companies define a ‘failure.’ Most extended warranties specifically state they only cover defects in materials and workmanship under normal operating conditions. They love to argue that a leaking pump seal is a wear-and-tear item, much like brake pads on a car. If they can claim that normal household usage simply wore out the rubber gasket over two or three years, they will gladly point to the exclusion page in your contract.
Furthermore, if you did not notice the issue early on, you might run into the dreaded ‘consequential damage’ clause. Have you ever tried to trace the source of that mystery water leak only to find it has been slow-dripping for weeks? If the adjuster sees water damage on your cabinetry or subfloor, they may deny the entire pump replacement because you failed to mitigate the damage immediately. To make matters worse, you might quickly realize why your dishwasher warranty might not cover labor, leaving you with a free $15 plastic part but a massive bill for the technician’s time.
Before we dive into how to diagnose this leak yourself and deal with the claims department, I have to ask: have you ever had an appliance repair claim denied for a ridiculous reason? Let me know in the comments below, because I know we have all been there.To beat the warranty administrators at their own game, you need to think like a claims investigator. The very first thing they look for when a pump leak is reported is an obstruction or a user-error clog. They want to prove that you let food debris destroy the seal, which lets them deny your claim instantly. Before you pick up the phone, you must perform a targeted physical inspection to clear your name and prove the failure was purely mechanical.
Clear the Debris Trap First
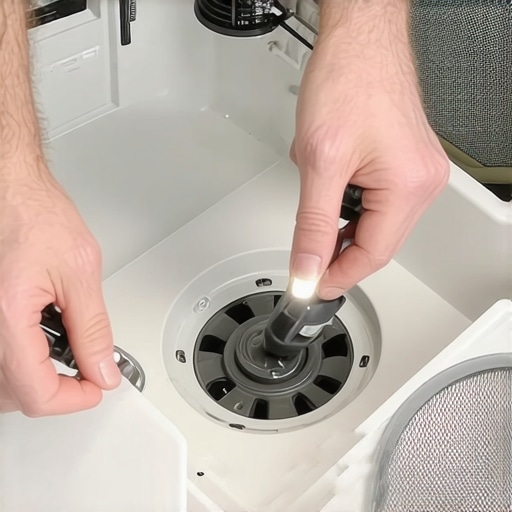
I remember sitting on my damp kitchen floor with a flashlight between my teeth, scraping out what looked like a fossilized layer of old spaghetti and pet hair. It was disgusting, but absolutely necessary. Start by pulling out the bottom rack of your dishwasher to expose the floor of the tub. Twist the cylinder filter counter-clockwise and pull it straight up. Set it aside in your sink. Right beneath that filter lies a small plastic cover, usually held in place by a single Torx screw or a plastic clip. This is the gateway to your drain pump impeller. Pop this cover off, and use a small mirror or your smartphone camera to peer inside. If you find plastic bread tags, cherry pits, or broken glass wedged against the impeller blades, you have found the culprit. Clean it out completely. If you skip this, you run the risk that your warranty claim for a clogged pump might get denied before a technician even steps foot in your house.
How to Verify if Your Pump is Actually Seized
Once the physical path is clear, you need to determine if the pump motor itself has suffered electrical or mechanical death. A pump that hums loudly but does not push water is usually seized or suffers from a failed start capacitor. On the other hand, a completely silent pump during the drain cycle points toward a dead motor coil or a lack of voltage from the main control board. If you have some basic DIY comfort, you can access the pump from behind the lower kickplate. I once spent an hour trying to wiggle a seized motor free with a flathead screwdriver, only to realize the internal bearings had completely melted from running dry. Knowing how to tell if your wash pump is seized or just clogged saves you days of waiting for parts you do not actually need.
The Multimeter Test That Proves Electrical Failure
If the motor shaft spins freely when you nudge it with a screwdriver tip, the problem is likely electrical. This is your ultimate weapon against a warranty denial. If you can prove the motor windings have opened, the warranty provider has no choice but to honor the defect in materials. Pull the dishwasher out, disconnect the power supply, and locate the two wiring terminals on the wash or drain pump. Set your digital multimeter to the lowest ohms setting. Touch one probe to each terminal. A healthy pump motor should read between 15 and 45 ohms of resistance. If your meter screen shows a ‘1’ or ‘OL’ (open loop), the internal coil is physically broken. Armed with this exact reading, you can bypass the tier-one customer service scripts. You are no longer a frustrated homeowner guessing at a leak; you are a prepared consumer presenting raw diagnostic data. If you are unfamiliar with the tool, take a moment to learn the only multimeter settings you need for appliance repair to avoid frying your delicate test equipment.
Why does your warranty administrator want you to fail?
Most homeowners believe that calling in a warranty claim is a simple matter of reporting a broken part and waiting for a free repair. However, the industry standard is much more calculated. A study by the National Association of Insurance Commissioners highlights that claims administration often relies on strict procedural compliance to minimize payouts. The industry’s best-kept secret is that they rely on you, the homeowner, making unverified assumptions. When you call and say, ‘My pump is broken,’ you have just handed them the perfect excuse to find a loophole. If their dispatched technician finds a tiny piece of plastic or a stray toothpick in the line, they will classify the visit as ‘maintenance education’ rather than a mechanical failure, stick you with the diagnostic fee, and void the rest of your coverage.
To beat them at their own game, you must change your approach to appliance diagnostics. Instead of guessing, you need to present undeniable proof. Relying on a professional assessment before submitting your formal claim is the most effective way to secure your benefits. Many people worry about paying for a third-party diagnostic visit upfront, but this initial investment pays off. Having a licensed technician document the mechanical failure on an official invoice makes it incredibly difficult for a corporate claims adjuster to deny your coverage. This strategic approach is exactly how appliance diagnostics can save your warranty benefits when dealing with stubborn administrators.

The Critical Error of Signing Off Too Quickly
The most common trap occurs at the very end of a repair visit. When a technician finishes looking at your machine, they will hand you a digital tablet or a paper slip to sign. Most homeowners sign this quickly just to get the technician out of their house. This is a massive mistake. That signature often legally certifies that you agree with their diagnosis, which might secretly blame ‘environmental factors’ or ‘owner wear and tear.’ Always read the technician’s written notes before signing. If they wrote ‘suspected clog’ instead of ‘defective motor winding,’ demand that they clarify the language. Misleading paperwork is the fine print that voids your appliance service plan before you even realize what happened.
Furthermore, relying on cheap, unbranded replacement parts can permanently damage your chances of a successful claim. If a technician spots an aftermarket component during an inspection, your entire service contract can be canceled on the spot. This is why third-party parts might kill your service contract and leave you responsible for the entire repair bill. Have you ever fallen into this trap or had a claim denied over a paperwork technicality? Let me know in the comments below, and let’s discuss how to fight back.
Once you navigate the paperwork traps, maintaining your dishwasher over the long haul requires stepping away from guesswork and adopting a structured maintenance routine. The secret to avoiding the claims department altogether is preventative maintenance backed by the right equipment. I used to rely on generic hardware store advice, but my perspective changed after reviewing the technical service bulletins from the Association of Home Appliance Manufacturers (AHAM). They emphasize that over 70% of early pump failures are directly linked to neglected sediment buildup and poor water quality. By taking control of your machine’s environment, you can extend its lifespan by years and avoid the headache of dealing with warranty claims entirely.
How do I maintain my dishwasher over time?
To keep your wash and drain pumps running smoothly, you need to establish a monthly diagnostic and cleaning routine. Start by using specialized tools to keep internal components free of debris. I personally keep a set of long, flexible micro-brushes in my kitchen drawer. These brushes allow me to clean out tight spaces that a sponge cannot reach, such as the area behind the fine mesh filter. For clearing out hair or fibers that wrap around the pump shaft, using the simple tool for removing hair from a drain pump has saved me from pulling the entire motor apart on multiple occasions. Additionally, you must clear out the small passageways in your wash arms. I use a simple toothpick to keep the spray nozzles clear, which maintains the optimal water pressure needed to keep the pump from overheating.

Beyond manual cleaning, investing in a high-quality digital multimeter is non-negotiable for serious homeowners. I rely on a Fluke 117 because of its low impedance detection feature, which prevents ghost voltages from giving you false readings. If you want to keep your machine in peak condition, you should regularly test key components before they fail. For instance, knowing how to perform a quick test on your heating circuit can prevent thermal stress on your pumps. You can learn the exact steps for the multimeter trick for checking your dishwasher motor to spot degrading coils before they seize up completely and leave you with a flooded kitchen floor.
The Future of Smart Diagnostics and Home Repairs
Looking ahead, the appliance industry is moving rapidly toward predictive maintenance and advanced self-diagnostics. In the next few years, we will likely see dishwashers equipped with smart sensors that monitor pump vibration and electrical resistance in real-time. These machines will alert you to a failing seal weeks before a single drop of water hits your floor. Until those systems become standard, we have to rely on our own vigilance. I highly encourage you to try one advanced tip today: pull off your lower kickplate, grab your multimeter, and measure the resistance of your drain pump. It takes less than ten minutes and gives you a clear baseline of your appliance’s health.
I still remember the exact Tuesday evening my kitchen turned into an indoor water park. I was sitting on the couch, enjoying a rare quiet moment, when a soft, persistent squishing sound caught my attention. I stepped into the kitchen only to find my socks instantly soaked through. Underneath my sleek, relatively new dishwasher, a steady stream of dirty water was making a break for my hardwood floors. My first thought? ‘Thank goodness I paid extra for that comprehensive five-year extended warranty.’ I confidently called the service line, expecting a friendly technician to arrive on a white horse to save the day. Instead, I got a cold dose of reality and a denied claim. My expensive protection plan was completely useless for this specific nightmare.
Through that painful and incredibly soggy experience, I learned the hard way about the massive loopholes hidden inside those shiny service agreements. Today, I am going to pull back the curtain on how warranty administrators actually look at your claim. We will break down exactly why a leaking wash or drain pump so often falls through the cracks of your coverage, and how you can arm yourself with the right knowledge to fight back and get your kitchen dry again. I made the classic mistake of not securing proper appliance diagnostics before submitting my claim, which ultimately cost me hundreds of dollars out of pocket. I do not want you to make that same blunder.
Is your expensive protection plan actually just a piece of paper?
When you purchase an extended service plan, you assume you are buying peace of mind. The salesperson at the register certainly made it sound like your machine was covered against absolutely any mechanical failure. However, a startling industry report by the Consumer Federation of America highlights that up to 40% of service contract claims get bottlenecked or outright rejected due to pre-existing conditions, wear-and-tear clauses, or supposed owner negligence.
The hard truth is that warranty companies are businesses designed to protect their bottom line, not your kitchen floors. When a pump starts leaking, their first goal is to find a reason why the failure is your fault. Did a stray cherry pit get past your filter and slice the pump impeller? That is considered accidental damage or neglect, and your claim is instantly dead in the water. This is why understanding when to trust a warranty for dishwasher repairs is so critical before you make that first phone call.
The Sneaky Exclusions in Your Service Contract
The biggest trap is how these companies define a ‘failure.’ Most extended warranties specifically state they only cover defects in materials and workmanship under normal operating conditions. They love to argue that a leaking pump seal is a wear-and-tear item, much like brake pads on a car. If they can claim that normal household usage simply wore out the rubber gasket over two or three years, they will gladly point to the exclusion page in your contract.
Furthermore, if you did not notice the issue early on, you might run into the dreaded ‘consequential damage’ clause. Have you ever tried to trace the source of that mystery water leak only to find it has been slow-dripping for weeks? If the adjuster sees water damage on your cabinetry or subfloor, they may deny the entire pump replacement because you failed to mitigate the damage immediately. To make matters worse, you might quickly realize why your dishwasher warranty might not cover labor, leaving you with a free $15 plastic part but a massive bill for the technician’s time.
Before we dive into how to diagnose this leak yourself and deal with the claims department, I have to ask: have you ever had an appliance repair claim denied for a ridiculous reason? Let me know in the comments below, because I know we have all been there.To beat the warranty administrators at their own game, you need to think like a claims investigator. The very first thing they look for when a pump leak is reported is an obstruction or a user-error clog. They want to prove that you let food debris destroy the seal, which lets them deny your claim instantly. Before you pick up the phone, you must perform a targeted physical inspection to clear your name and prove the failure was purely mechanical.
Clear the Debris Trap First
I remember sitting on my damp kitchen floor with a flashlight between my teeth, scraping out what looked like a fossilized layer of old spaghetti and pet hair. It was disgusting, but absolutely necessary. Start by pulling out the bottom rack of your dishwasher to expose the floor of the tub. Twist the cylinder filter counter-clockwise and pull it straight up. Set it aside in your sink. Right beneath that filter lies a small plastic cover, usually held in place by a single Torx screw or a plastic clip. This is the gateway to your drain pump impeller. Pop this cover off, and use a small mirror or your smartphone camera to peer inside. If you find plastic bread tags, cherry pits, or broken glass wedged against the impeller blades, you have found the culprit. Clean it out completely. If you skip this, you run the risk that your warranty claim for a clogged pump might get denied before a technician even steps foot in your house.
How to Verify if Your Pump is Actually Seized
Once the physical path is clear, you need to determine if the pump motor itself has suffered electrical or mechanical death. A pump that hums loudly but does not push water is usually seized or suffers from a failed start capacitor. On the other hand, a completely silent pump during the drain cycle points toward a dead motor coil or a lack of voltage from the main control board. If you have some basic DIY comfort, you can access the pump from behind the lower kickplate. I once spent an hour trying to wiggle a seized motor free with a flathead screwdriver, only to realize the internal bearings had completely melted from running dry. Knowing how to tell if your wash pump is seized or just clogged saves you days of waiting for parts you do not actually need.
The Multimeter Test That Proves Electrical Failure
If the motor shaft spins freely when you nudge it with a screwdriver tip, the problem is likely electrical. This is your ultimate weapon against a warranty denial. If you can prove the motor windings have opened, the warranty provider has no choice but to honor the defect in materials. Pull the dishwasher out, disconnect the power supply, and locate the two wiring terminals on the wash or drain pump. Set your digital multimeter to the lowest ohms setting. Touch one probe to each terminal. A healthy pump motor should read between 15 and 45 ohms of resistance. If your meter screen shows a ‘1’ or ‘OL’ (open loop), the internal coil is physically broken. Armed with this exact reading, you can bypass the tier-one customer service scripts. You are no longer a frustrated homeowner guessing at a leak; you are a prepared consumer presenting raw diagnostic data. If you are unfamiliar with the tool, take a moment to learn the only multimeter settings you need for appliance repair to avoid frying your delicate test equipment.
Why does your warranty administrator want you to fail?
Most homeowners believe that calling in a warranty claim is a simple matter of reporting a broken part and waiting for a free repair. However, the industry standard is much more calculated. A study by the National Association of Insurance Commissioners highlights that claims administration often relies on strict procedural compliance to minimize payouts. The industry’s best-kept secret is that they rely on you, the homeowner, making unverified assumptions. When you call and say, ‘My pump is broken,’ you have just handed them the perfect excuse to find a loophole. If their dispatched technician finds a tiny piece of plastic or a stray toothpick in the line, they will classify the visit as ‘maintenance education’ rather than a mechanical failure, stick you with the diagnostic fee, and void the rest of your coverage.
To beat them at their own game, you must change your approach to appliance diagnostics. Instead of guessing, you need to present undeniable proof. Relying on a professional assessment before submitting your formal claim is the most effective way to secure your benefits. Many people worry about paying for a third-party diagnostic visit upfront, but this initial investment pays off. Having a licensed technician document the mechanical failure on an official invoice makes it incredibly difficult for a corporate claims adjuster to deny your coverage. This strategic approach is exactly how appliance diagnostics can save your warranty benefits when dealing with stubborn administrators.
The Critical Error of Signing Off Too Quickly
The most common trap occurs at the very end of a repair visit. When a technician finishes looking at your machine, they will hand you a digital tablet or a paper slip to sign. Most homeowners sign this quickly just to get the technician out of their house. This is a massive mistake. That signature often legally certifies that you agree with their diagnosis, which might secretly blame ‘environmental factors’ or ‘owner wear and tear.’ Always read the technician’s written notes before signing. If they wrote ‘suspected clog’ instead of ‘defective motor winding,’ demand that they clarify the language. Misleading paperwork is the fine print that voids your appliance service plan before you even realize what happened.
Furthermore, relying on cheap, unbranded replacement parts can permanently damage your chances of a successful claim. If a technician spots an aftermarket component during an inspection, your entire service contract can be canceled on the spot. This is why third-party parts might kill your service contract and leave you responsible for the entire repair bill. Have you ever fallen into this trap or had a claim denied over a paperwork technicality? Let me know in the comments below, and let’s discuss how to fight back.
Once you navigate the paperwork traps, maintaining your dishwasher over the long haul requires stepping away from guesswork and adopting a structured maintenance routine. The secret to avoiding the claims department altogether is preventative maintenance backed by the right equipment. I used to rely on generic hardware store advice, but my perspective changed after reviewing the technical service bulletins from the Association of Home Appliance Manufacturers (AHAM). They emphasize that over 70% of early pump failures are directly linked to neglected sediment buildup and poor water quality. By taking control of your machine’s environment, you can extend its lifespan by years and avoid the headache of dealing with warranty claims entirely.
How do I maintain my dishwasher over time?
To keep your wash and drain pumps running smoothly, you need to establish a monthly diagnostic and cleaning routine. Start by using specialized tools to keep internal components free of debris. I personally keep a set of long, flexible micro-brushes in my kitchen drawer. These brushes allow me to clean out tight spaces that a sponge cannot reach, such as the area behind the fine mesh filter. For clearing out hair or fibers that wrap around the pump shaft, using the simple tool for removing hair from a drain pump has saved me from pulling the entire motor apart on multiple occasions. Additionally, you must clear out the small passageways in your wash arms. I use a simple toothpick to keep the spray nozzles clear, which maintains the optimal water pressure needed to keep the pump from overheating.
Beyond manual cleaning, investing in a high-quality digital multimeter is non-negotiable for serious homeowners. I rely on a Fluke 117 because of its low impedance detection feature, which prevents ghost voltages from giving you false readings. If you want to keep your machine in peak condition, you should regularly test key components before they fail. For instance, knowing how to perform a quick test on your heating circuit can prevent thermal stress on your pumps. You can learn the exact steps for the multimeter trick for checking your dishwasher motor to spot degrading coils before they seize up completely and leave you with a flooded kitchen floor.
The Future of Smart Diagnostics and Home Repairs
Looking ahead, the appliance industry is moving rapidly toward predictive maintenance and advanced self-diagnostics. In the next few years, we will likely see dishwashers equipped with smart sensors that monitor pump vibration and electrical resistance in real-time. These machines will alert you to a failing seal weeks before a single drop of water hits your floor. Until those systems become standard, we have to rely on our own vigilance. I highly encourage you to try one advanced tip today: pull off your lower kickplate, grab your multimeter, and measure the resistance of your drain pump. It takes less than ten minutes and gives you a clear baseline of your appliance’s health.
The Critical Lessons I Learned Sitting on My Soggy Kitchen Floor
- The manufacturer is not your friend: Their administrative processes are structured specifically to search for signs of neglect first. Always ensure your filter is immaculate before making a call.
- Paperwork is your shield: Never let a field technician leave without double-checking their digital write-up. A simple phrase like “normal fatigue” instead of “user error” is the difference between a free fix and a major bill.
- Visual proof wins cases: Take clear, dated photos of your components, filter bay, and under-sink connections prior to scheduling repairs to block claims of pre-existing, unaddressed leaks.
My Personal Toolkit for Fighting Appliance Failures
To successfully handle diagnostics and secure your warranty claims, you do not need a garage full of professional tools, but a few high-quality items will pay for themselves immediately:
- The Fluke 117 Multimeter: This is my absolute go-to for checking electrical continuity on pump motors. It is reliable, accurate, and saves you from making bad diagnostic guesses.
- A Rigid Inspector Camera: A small, USB-powered endoscope camera that plugs into your phone lets you look directly inside the pump impellers and tight physical traps without pulling the motor out.
- The AHAM Appliance Standards Portal: Knowing the exact industry guidelines for household water pressures and temperatures gives you immense leverage when debating a corporate claims manager.
Take Back Control of Your Kitchen Diagnostics
You do not have to be at the mercy of complex service agreements or corporate claims adjusters who profit off your frustration. By mastering basic physical inspections and keeping a few diagnostic testing habits in your back pocket, you can stop small drips from becoming catastrophic floor-warping floods. Grab your tools, keep your machine clean, and approach your next troubleshooting dishwasher problems task with absolute confidence. Have you ever struggled with getting a warranty provider to honor an obvious mechanical pump issue? Let me know your story in the comments below.