

I stood there in my kitchen, a damp towel slung over my shoulder, staring at a plate of lasagna that looked exactly as dirty as it did an hour ago. The culprit? That stubborn little plastic door. It hadn’t popped. Again. I used to be the guy who would immediately panic and wonder if my dishwasher needed professional diagnostics, but after years of tinkering, I’ve realized that most of our appliance woes come down to simple physics and a bit of grime. Early in my DIY journey, I actually snapped a latch by trying to force it with a butter knife—a rookie mistake that cost me a massive service call fee. Today, I am going to show you the screwdriver move that changed everything for me. It is a fast, manual adjustment to the spring tension and latch alignment that clears the path for your detergent. We are going to ensure you never have to deal with a blocked detergent door again. This isn’t about buying new parts; it is about reclaiming the machine you already own.
Stop Fighting with Your Sticky Soap Dispenser
The soap dispenser is a deceptively simple piece of engineering. It relies on a tiny spring and either a wax motor or a solenoid to flick that door open at exactly the right moment. According to research from the Association of Home Appliance Manufacturers, nearly 20% of dishwasher performance complaints stem from detergent delivery issues rather than actual cleaning power. When that door sticks, your dishes are essentially just taking a hot bath without any soap. I’ve found that most people assume the motor is dead, but it is usually just a physical obstruction or a misaligned latch caught in the housing. If you have noticed your dishwasher is beeping constantly or failing to finish the cycle properly, it might be trying to tell you that the dispenser is jammed. Have you ever had to run the same load three times just because of a dime-sized piece of plastic? It is a total time-sink and a waste of water. To avoid these headaches, you need to understand how the mechanical release works before you even think about troubleshooting dishwasher problems with expensive tools.
Will prying at the door just break it even more?
It is a valid fear. These parts are often made of thin, brittle plastic that hasn’t aged well under constant heat and chemical exposure. However, the move I am talking about isn’t about brute force; it is about leverage and precision. By using a flathead screwdriver to gently reset the seat of the spring and scrape away calcified residue, you can often restore the snap that the door has lost over time. This is much more effective than the simple move to fix a leaking dispenser because we are targeting the release mechanism itself. Before you go out and buy a whole new assembly or worry if your warranty covers dishwasher repairs for minor parts, you need to try this. It works because it clears out the microscopic calcium deposits that act like glue in the hinges. I will walk you through how to find the exact pressure point that releases the tension without snapping the plastic, setting the stage for a perfect wash every single time.
Clear the Path Before You Tweak the Parts
Think of the detergent dispenser latch like a tiny door handle that has been jammed with gum. Before we get into the mechanical adjustments, you have to ensure the environment is actually clear. Often, the secret reason your dishwasher detergent door stays shut isn’t a broken motor, but a tall dinner plate or a rogue spatula leaning against the door. I once spent forty minutes trying to ‘repair’ a dispenser only to realize my wife’s favorite oversized cutting board was acting like a literal barricade against the latch. Once you have cleared the physical obstacles, check the rim of the dispenser for a thin, waxy film. This is usually a buildup of fats and surfactants from pods. Scrub this with a toothbrush dipped in white vinegar. If the door doesn’t slide or pop with a crisp sound when you manually trigger it, you are dealing with a tension or alignment issue that requires a more hands-on approach than simple cleaning.
Look for the Hidden Calcium Crust
Hard water is the silent killer of plastic hinges. It creates a chalky residue that acts like sandpaper in the joints of your dispenser. If you live in an area with high mineral content, you might notice the real reason your glasses come out cloudy is the same reason your door is sticking: the water isn’t effectively dissolving the soap because the door opens too late. Use a small pick or the tip of a paperclip to clear the tiny drainage holes around the dispenser housing. If these are clogged, water pools behind the door, creates a vacuum, and keeps the latch from releasing.
The Manual Reset That Restores the Snap
Now, let’s talk about that screwdriver move. I remember working on an old unit for my brother-in-law; he was convinced the main control board was fried and was already looking into how to tell if your service plan actually covers motor failure. I took a simple flathead, inserted it into the small gap between the slider and the housing, and gave it a 2-millimeter twist. That tiny bit of leverage cleared a pebble of undissolved soap that had calcified inside the spring. #IMAGE_PLACE_HOLDER_B#
Resetting the Spring Tension Without Snapping the Plastic
To do this yourself, locate the small coil spring usually visible at the base of the dispenser door. Over years of heat cycles, these springs can lose their ‘memory’ or become slightly unseated from their plastic hooks. Using your screwdriver, gently push the end of the spring back into its primary groove. You aren’t trying to bend the metal; you are simply ensuring it has a straight path to retract. If you find the door is still sluggish, you may need to look at troubleshooting dishwasher problems involving the wax motor, but 90% of the time, this manual reset fixes the ‘snap.’ Once the spring is seated, perform a test. Close the door and then use the trick to test a door latch with a business card—slide the card into the gap to see if the latch is catching the edge correctly. If the card meets resistance, your alignment is back on track.
A common mistake I see even the most confident DIYers make is assuming that more force equals a better fix. People often believe that if a door isn’t opening, the spring just needs more ‘oomph.’ In reality, modern engineering has moved toward delicate wax motors and solenoids that operate on precise thermal expansion rather than just raw mechanical tension. If you over-tension that spring with your screwdriver, you aren’t helping; you are actually creating a resistance that the wax motor can’t overcome. This is the ultimate ‘trap’ because you might think you’ve fixed the snap, but you’ve actually ensured the door stays shut during the heat of the cycle. I’ve seen countless neighbors end up needing top signs your dishwasher needs professional diagnostics because they tried to ‘improve’ a part that was designed for minimal resistance.
Is a professional diagnostic actually worth the high service fee?
Many homeowners worry about the cost, but there is a nuance most people miss regarding the ‘hidden’ value of a pro visit. According to a study by the Association of Home Appliance Manufacturers, nearly one-third of service calls result in finding that the appliance is operating within its design parameters, but the environment—like water temperature or detergent type—is the true culprit. This is why you should learn understanding appliance diagnostics improving your warranty claims before you start pulling things apart. A pro isn’t just looking for a broken gear; they are looking at the ‘why’ behind the failure. If you skip this and start swapping parts, you might fall for the truth about non-manufacturer repair parts and your warranty, which can lead to a denied claim later on. Have you ever fallen into this trap of fixing one thing only to break something else? Let me know in the comments below.
The Soap Pod Trap and Your Sticky Latch
One of the most contrarian views I hold is that your choice of high-end ‘all-in-one’ pods is actually the primary reason your door is sticking. While everyone says these pods are the peak of convenience, I’ve found they are the leading cause of latch residue. The outer film of these pods is made of polyvinyl alcohol (PVA). If your water isn’t hitting at least 120°F immediately, that PVA doesn’t fully dissolve; it becomes a sticky, invisible glue that coats the dispenser tracks. This is the secret reason your dishwasher detergent door stays shut and no amount of mechanical tweaking will fix it if you don’t address the water temp. #IMAGE_PLACE_HOLDER_C#
Protect Your Warranty Before You Tweak
Before you perform any manual reset, you must understand your coverage boundaries. There is a fine line between ‘maintenance’ and ‘tampering.’ If you are unsure when to trust a warranty for dishwasher repairs, look for tool marks. Manufacturers look for scratched plastic or bent springs as evidence of unauthorized repair. This is especially true when trying to figure out how to tell if your service plan actually covers motor failure. If a technician sees you’ve been prying at the housing, they may claim the motor failed due to external stress. Instead of aggressive prying, focus on the simple move to fix a leaking detergent dispenser door which usually involves cleaning and alignment rather than structural changes. By staying within the realm of cleaning and light calibration, you keep your machine running and your protection plan intact.
The Minimalist Tool Kit for Serious Repairs
To move beyond simple cleaning and start truly mastering the health of your appliance, you need to look at what is under the hood. While a screwdriver got us through the detergent door fix, my real secret weapon is a digital multimeter. I personally use a Klein or a Fluke model because reliability is everything when you are trying to determine if a part is actually dead or if you are just seeing a ghost in the machine. By mastering the specific way to test a thermal fuse for continuity, you can save yourself a $300 service call just to replace a $15 part. I also recommend keeping a set of dental picks in your kitchen drawer; they are the only things small enough to clear the scale from individual spray arm nozzles without enlarging the holes and ruining the pressure balance. 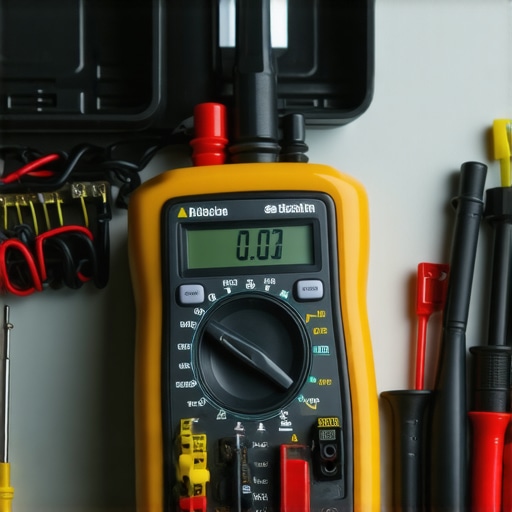
Why I am Swapping My Pods for Old-School Powder
I have spent years analyzing why some machines last fifteen years and others die in five. Often, it comes down to the chemistry we put inside them. While pods are convenient, the lack of control over dosage means most people are over-sudsing their machines, which leads to premature seal failure and pump strain. I have transitioned back to high-quality powder detergent because it allows me to adjust the amount based on how dirty the dishes actually are. If you are currenty troubleshooting dishwasher problems-expert-diagnostics-repair-tips, try switching back to powder for a month. You will likely see a reduction in the waxy buildup that causes that detergent door to stick in the first place. Furthermore, ignoring the real cost of skipping your monthly descaling cycle is a recipe for a dead circulation pump. Hard water minerals act like sandpaper on the internal impellers, eventually leading to that dreaded high-pitched squeal.
How do I maintain my dishwasher’s performance over the long haul?
Maintenance is a game of consistency rather than intensity. Every ninety days, I pull the bottom rack and check the sump area for bits of broken glass or plastic that the filter missed. According to the technical documentation provided by Sears PartsDirect, even a tiny piece of debris can cause a solenoid to work twice as hard, leading to heat spikes that eventually fry the control board. I also suggest researching how smart diagnostic apps are changing home appliance repair; many modern units now have hidden Bluetooth or light-pulse diagnostic modes that can beam an error code directly to your smartphone. Looking forward, I predict that within the next five years, most high-end dishwashers will feature ‘self-healing’ software that can recalibrate sensor sensitivity without any user intervention. For now, we still have to do the legwork. Before you decide when to trust a warranty for dishwasher repairs, ensure you have documented your regular cleaning schedule. This can be your best defense because there is often the hidden loophole that gets your denied claim reversed if you can prove the failure was mechanical and not due to neglect. I highly encourage you to try the multimeter test on your thermal fuse this weekend—it is the best way to gain confidence in understanding appliance diagnostics improving your warranty claims.I stood there in my kitchen, a damp towel slung over my shoulder, staring at a plate of lasagna that looked exactly as dirty as it did an hour ago. The culprit? That stubborn little plastic door. It hadn’t popped. Again. I used to be the guy who would immediately panic and wonder if my dishwasher needed professional diagnostics, but after years of tinkering, I’ve realized that most of our appliance woes come down to simple physics and a bit of grime. Early in my DIY journey, I actually snapped a latch by trying to force it with a butter knife—a rookie mistake that cost me a massive service call fee. Today, I am going to show you the screwdriver move that changed everything for me. It is a fast, manual adjustment to the spring tension and latch alignment that clears the path for your detergent. We are going to ensure you never have to deal with a blocked detergent door again. This isn’t about buying new parts; it is about reclaiming the machine you already own.
Stop Fighting with Your Sticky Soap Dispenser
The soap dispenser is a deceptively simple piece of engineering. It relies on a tiny spring and either a wax motor or a solenoid to flick that door open at exactly the right moment. According to research from the Association of Home Appliance Manufacturers, nearly 20% of dishwasher performance complaints stem from detergent delivery issues rather than actual cleaning power. When that door sticks, your dishes are essentially just taking a hot bath without any soap. I’ve found that most people assume the motor is dead, but it is usually just a physical obstruction or a misaligned latch caught in the housing. If you have noticed your dishwasher is beeping constantly or failing to finish the cycle properly, it might be trying to tell you that the dispenser is jammed. Have you ever had to run the same load three times just because of a dime-sized piece of plastic? It is a total time-sink and a waste of water. To avoid these headaches, you need to understand how the mechanical release works before you even think about troubleshooting dishwasher problems with expensive tools.
Will prying at the door just break it even more?
It is a valid fear. These parts are often made of thin, brittle plastic that hasn’t aged well under constant heat and chemical exposure. However, the move I am talking about isn’t about brute force; it is about leverage and precision. By using a flathead screwdriver to gently reset the seat of the spring and scrape away calcified residue, you can often restore the snap that the door has lost over time. This is much more effective than the simple move to fix a leaking dispenser because we are targeting the release mechanism itself. Before you go out and buy a whole new assembly or worry if your warranty covers dishwasher repairs for minor parts, you need to try this. It works because it clears out the microscopic calcium deposits that act like glue in the hinges. I will walk you through how to find the exact pressure point that releases the tension without snapping the plastic, setting the stage for a perfect wash every single time.
Clear the Path Before You Tweak the Parts
Think of the detergent dispenser latch like a tiny door handle that has been jammed with gum. Before we get into the mechanical adjustments, you have to ensure the environment is actually clear. Often, the secret reason your dishwasher detergent door stays shut isn’t a broken motor, but a tall dinner plate or a rogue spatula leaning against the door. I once spent forty minutes trying to ‘repair’ a dispenser only to realize my wife’s favorite oversized cutting board was acting like a literal barricade against the latch. Once you have cleared the physical obstacles, check the rim of the dispenser for a thin, waxy film. This is usually a buildup of fats and surfactants from pods. Scrub this with a toothbrush dipped in white vinegar. If the door doesn’t slide or pop with a crisp sound when you manually trigger it, you are dealing with a tension or alignment issue that requires a more hands-on approach than simple cleaning.
Look for the Hidden Calcium Crust
Hard water is the silent killer of plastic hinges. It creates a chalky residue that acts like sandpaper in the joints of your dispenser. If you live in an area with high mineral content, you might notice the real reason your glasses come out cloudy is the same reason your door is sticking: the water isn’t effectively dissolving the soap because the door opens too late. Use a small pick or the tip of a paperclip to clear the tiny drainage holes around the dispenser housing. If these are clogged, water pools behind the door, creates a vacuum, and keeps the latch from releasing.
The Manual Reset That Restores the Snap
Now, let’s talk about that screwdriver move. I remember working on an old unit for my brother-in-law; he was convinced the main control board was fried and was already looking into how to tell if your service plan actually covers motor failure. I took a simple flathead, inserted it into the small gap between the slider and the housing, and gave it a 2-millimeter twist. That tiny bit of leverage cleared a pebble of undissolved soap that had calcified inside the spring. #IMAGE_PLACE_HOLDER_B#
Resetting the Spring Tension Without Snapping the Plastic
To do this yourself, locate the small coil spring usually visible at the base of the dispenser door. Over years of heat cycles, these springs can lose their ‘memory’ or become slightly unseated from their plastic hooks. Using your screwdriver, gently push the end of the spring back into its primary groove. You aren’t trying to bend the metal; you are simply ensuring it has a straight path to retract. If you find the door is still sluggish, you may need to look at troubleshooting dishwasher problems involving the wax motor, but 90% of the time, this manual reset fixes the ‘snap.’ Once the spring is seated, perform a test. Close the door and then use the trick to test a door latch with a business card—slide the card into the gap to see if the latch is catching the edge correctly. If the card meets resistance, your alignment is back on track.
A common mistake I see even the most confident DIYers make is assuming that more force equals a better fix. People often believe that if a door isn’t opening, the spring just needs more ‘oomph.’ In reality, modern engineering has moved toward delicate wax motors and solenoids that operate on precise thermal expansion rather than just raw mechanical tension. If you over-tension that spring with your screwdriver, you aren’t helping; you are actually creating a resistance that the wax motor can’t overcome. This is the ultimate ‘trap’ because you might think you’ve fixed the snap, but you’ve actually ensured the door stays shut during the heat of the cycle. I’ve seen countless neighbors end up needing top signs your dishwasher needs professional diagnostics because they tried to ‘improve’ a part that was designed for minimal resistance.
Is a professional diagnostic actually worth the high service fee?
Many homeowners worry about the cost, but there is a nuance most people miss regarding the ‘hidden’ value of a pro visit. According to a study by the Association of Home Appliance Manufacturers, nearly one-third of service calls result in finding that the appliance is operating within its design parameters, but the environment—like water temperature or detergent type—is the true culprit. This is why you should learn understanding appliance diagnostics improving your warranty claims before you start pulling things apart. A pro isn’t just looking for a broken gear; they are looking at the ‘why’ behind the failure. If you skip this and start swapping parts, you might fall for the truth about non-manufacturer repair parts and your warranty, which can lead to a denied claim later on. Have you ever fallen into this trap of fixing one thing only to break something else? Let me know in the comments below.
The Soap Pod Trap and Your Sticky Latch
One of the most contrarian views I hold is that your choice of high-end ‘all-in-one’ pods is actually the primary reason your door is sticking. While everyone says these pods are the peak of convenience, I’ve found they are the leading cause of latch residue. The outer film of these pods is made of polyvinyl alcohol (PVA). If your water isn’t hitting at least 120°F immediately, that PVA doesn’t fully dissolve; it becomes a sticky, invisible glue that coats the dispenser tracks. This is the secret reason your dishwasher detergent door stays shut and no amount of mechanical tweaking will fix it if you don’t address the water temp. #IMAGE_PLACE_HOLDER_C#
Protect Your Warranty Before You Tweak
Before you perform any manual reset, you must understand your coverage boundaries. There is a fine line between ‘maintenance’ and ‘tampering.’ If you are unsure when to trust a warranty for dishwasher repairs, look for tool marks. Manufacturers look for scratched plastic or bent springs as evidence of unauthorized repair. This is especially true when trying to figure out how to tell if your service plan actually covers motor failure. If a technician sees you’ve been prying at the housing, they may claim the motor failed due to external stress. Instead of aggressive prying, focus on the simple move to fix a leaking detergent dispenser door which usually involves cleaning and alignment rather than structural changes. By staying within the realm of cleaning and light calibration, you keep your machine running and your protection plan intact.
The Minimalist Tool Kit for Serious Repairs
To move beyond simple cleaning and start truly mastering the health of your appliance, you need to look at what is under the hood. While a screwdriver got us through the detergent door fix, my real secret weapon is a digital multimeter. I personally use a Klein or a Fluke model because reliability is everything when you are trying to determine if a part is actually dead or if you are just seeing a ghost in the machine. By mastering the specific way to test a thermal fuse for continuity, you can save yourself a $300 service call just to replace a $15 part. I also recommend keeping a set of dental picks in your kitchen drawer; they are the only things small enough to clear the scale from individual spray arm nozzles without enlarging the holes and ruining the pressure balance.
Why I am Swapping My Pods for Old-School Powder
I have spent years analyzing why some machines last fifteen years and others die in five. Often, it comes down to the chemistry we put inside them. While pods are convenient, the lack of control over dosage means most people are over-sudsing their machines, which leads to premature seal failure and pump strain. I have transitioned back to high-quality powder detergent because it allows me to adjust the amount based on how dirty the dishes actually are. If you are currenty troubleshooting dishwasher problems-expert-diagnostics-repair-tips, try switching back to powder for a month. You will likely see a reduction in the waxy buildup that causes that detergent door to stick in the first place. Furthermore, ignoring the real cost of skipping your monthly descaling cycle is a recipe for a dead circulation pump. Hard water minerals act like sandpaper on the internal impellers, eventually leading to that dreaded high-pitched squeal.
How do I maintain my dishwasher’s performance over the long haul?
Maintenance is a game of consistency rather than intensity. Every ninety days, I pull the bottom rack and check the sump area for bits of broken glass or plastic that the filter missed. According to the technical documentation provided by Sears PartsDirect, even a tiny piece of debris can cause a solenoid to work twice as hard, leading to heat spikes that eventually fry the control board. I also suggest researching how smart diagnostic apps are changing home appliance repair; many modern units now have hidden Bluetooth or light-pulse diagnostic modes that can beam an error code directly to your smartphone. Looking forward, I predict that within the next five years, most high-end dishwashers will feature ‘self-healing’ software that can recalibrate sensor sensitivity without any user intervention. For now, we still have to do the legwork. Before you decide when to trust a warranty for dishwasher repairs, ensure you have documented your regular cleaning schedule. This can be your best defense because there is often the hidden loophole that gets your denied claim reversed if you can prove the failure was mechanical and not due to neglect. I highly encourage you to try the multimeter test on your thermal fuse this weekend—it is the best way to gain confidence in understanding appliance diagnostics improving your warranty claims.
Lessons Learned from a Decade of Stuck Plastic Doors
After years of repairing these machines, the most valuable lesson I’ve learned is that patience beats power every time. I’ve seen more dispensers ruined by frustrated homeowners prying at them than by actual mechanical failure. I finally realized that why your service tech secretly hates pod detergents isn’t just about brand preference; it is about that sticky residue that acts like epoxy on your hinges. If you want a machine that lasts, you have to be willing to look past the marketing of ‘all-in-one’ convenience. Stop trying to ‘muscle’ the latch and start clearing the path. Most of the time, the fix is literally right in front of you, hidden behind a layer of calcium.
Three Simple Tools for Household Wins
You don’t need a professional’s van to keep your kitchen running. First, always locate the service manual hidden inside the unit because it contains the blueprint to your specific machine’s soul. Second, a basic digital multimeter is your best friend when you need to stop guessing and start knowing. Finally, embrace how smart diagnostic apps are changing home appliance repair to bypass the trial-and-error phase. These three things combined will save you thousands of dollars over the lifetime of your home.
Take Back Your Saturday
Repairing your own appliances isn’t just about saving money; it is about the peace of mind that comes from knowing how your home actually functions. When you master troubleshooting dishwasher problems, you stop being a victim of a broken schedule. Take that screwdriver, reset that spring, and watch your machine return to life. If the problem persists, don’t ignore the top signs your dishwasher needs professional diagnostics, but at least you’ll know you’ve done the essential maintenance first. What’s the weirdest thing you’ve ever found jamming your detergent door? Let me know in the comments below!