

I remember the first time I peered underneath my dishwasher, hearing that relentless rattling every time it ran. It was like a freight train derailing in my kitchen — loud enough to wake the neighbors, and honestly, I was just about ready to pull the plug and call it a day. But then I had that lightbulb moment: could a simple piece of cardboard not only silence the noise but also protect my floors?
That realization led me down a rabbit hole of DIY tweaks, and today, I want to share a surprisingly effective trick I discovered to level and quiet a noisy dishwasher, all without breaking the bank or calling in a repair technician. If your appliance is making a racket that sounds like it’s auditioning for a action movie, stick around — I promise, this quick fix can save your peace of mind.
Why Your Dishwasher Vibration Is More Than Just Annoying
A noisy dishwasher isn’t just a minor annoyance; it can be a sign of underlying issues like improper leveling, loose mounting, or unstable flooring. Over time, these vibrations can cause wear on components or even lead to leaks. Plus, that constant rattle can rattle your nerves and make you dread dish duty.
In my experience, the root cause often turns out to be simple: the dishwasher isn’t perfectly level, which causes it to wobble during cycles. Being the DIY enthusiast I am, I first tried tightening bolts and adjusting the feet — but sometimes, even these efforts fall short if your kitchen floor isn’t perfectly flat.
Here’s the thing: I learned that an easy fix involves a humble piece of cardboard, carefully placed beneath one of the dishwasher’s adjustable feet. It sounds almost too simple, but this little trick can stabilize the unit, absorb vibrations, and silence that irritating noise — all in a matter of minutes.
Before jumping into complex repairs or worrying about the warranty, try this cardboard shim method. It’s a move I wish I had discovered sooner, especially since defective leveling can cause more damage down the line. And if you’re worried about causing harm, just know that understanding your appliance’s diagnostics can help prevent bigger issues — you can check out how to do that [here](https://applianceoutletpro.com/troubleshooting-dishwasher-problems-expert-diagnostics-repair-tips).
Now, let’s get practical. Ready to see how a simple piece of cardboard can make your dishwasher run smoother and quieter? Here’s what you need to know to level that unit and restore your kitchen peace.
Select the Right Tools and Prepare Your Workspace
Start by gathering a few essentials: a sturdy flat-head screwdriver, a level (preferably a digital one for accuracy), a piece of clean, stiff cardboard, and a towel to catch any drips. Clear the area around your dishwasher and unplug it from the power source to ensure safety. I recommend placing the towel beneath the appliance to catch any accidental spills during adjustments.
Identify and Access the Adjustable Feet
Most dishwashers have adjustable feet located at each corner. To access them, remove the kickplate or bottom panel, which is usually held by a few screws. Use your screwdriver to carefully detach the panel. Once removed, locate the threaded feet—these are the adjustment points that control the tilt and levelness of your unit.
Check the Level and Spot the Problem
Place your level on the top edge of the door or the inner rim to assess whether the dishwasher sits level. If it leans forward, back, or to the side, note which corners need adjustment. Remember, even a slight tilt can cause vibrations. An example from my experience: my dishwasher tilted forward, causing constant rattling, which I could fix without replacing any parts.
Adjust the Feet with Precision
Using your screwdriver, gently turn the adjustable feet clockwise to raise the low side or counterclockwise to lower it. Turn slowly and check the level after each turn. The goal is to achieve a perfectly even position. Now, for the tricky part—sometimes the feet won’t adjust smoothly, especially on uneven floors. That’s when a cardboard shim comes into play.
Use a Cardboard Shim to Fine-Tune Stability
Cut a piece of stiff cardboard, approximately 1 to 2 inches wide and long enough to fit under the uneven foot. Fold or crease the cardboard so it provides a snug fit when placed under the foot, helping to absorb vibrations and stabilize the dishwasher. I remember a time when the vibration persisted despite leveling; slipping a folded piece of cardboard under the rear right foot completely eliminated the noise and wobbling.
Secure and Double-Check Your Setup
Once the screws are tightened and the cardboard shim is in place, double-check the level both across and along the unit. Run a short cycle to test for vibrations. If the noise diminishes, you’ve successfully stabilized your dishwasher. If not, verify no other loose parts or flooring issues. Remember, persistent vibrations may also indicate unbalanced or worn components, which might need professional diagnostics.
Evaluate the Results and Take Additional Steps if Needed
If vibrations or noise continue, revisit your adjustments. Sometimes, uneven flooring causes persistent issues; in such cases, a more comprehensive approach, such as adjusting the subfloor or consulting a technician, might be necessary. Before proceeding with complex repairs, check out how appliance diagnostics can save your warranty benefits, ensuring you don’t void coverage with DIY fixes.
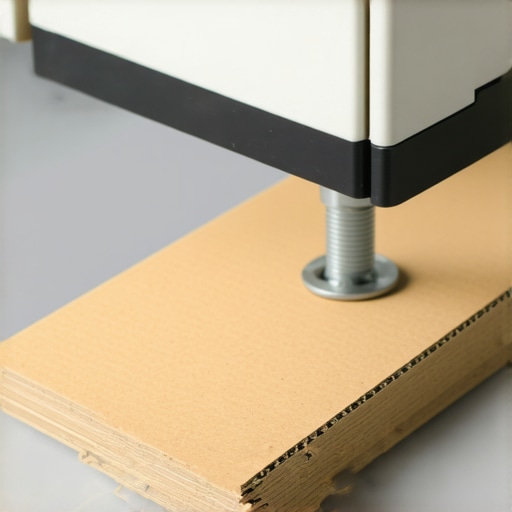
By systematically adjusting the feet and using simple materials like cardboard, you can significantly reduce dishwasher vibrations and noise. This approach is quick, inexpensive, and often all you need to restore peace in your kitchen.
Many homeowners operate under the misconception that warranties and diagnostics are straightforward safeguards, but in reality, there’s a complex layer of nuances that often trip up even seasoned DIYers. One common myth is that a warranty will cover any issue as long as you can demonstrate the malfunction. However, most warranties strictly require professional diagnostics before covering repairs, emphasizing the importance of understanding how to effectively communicate with technicians and document problems. Failing to recognize this can lead to denied claims and unnecessary expenses.
Another prevalent mistake is assuming that running diagnostics yourself is always effective or enough to warrant warranty coverage. While basic troubleshooting can sometimes resolve issues, advanced problems—like intermittent electrical faults or control board failures—demandexpert diagnostics. As highlighted by appliance repair experts, attempting to diagnose complex component failures without proper tools might mask deeper issues or even void your warranty if not performed following manufacturer guidelines. For example, attempting to reset a faulty control board without proper diagnostics can sometimes lead to further damage and void the warranty, as explained in [this detailed guide](https://applianceoutletpro.com/how-appliance-diagnostics-can-save-your-warranty-benefits).
Furthermore, many people overlook the importance of understanding the fine print in warranty policies. Warranties often exclude damages caused by improper installation, environmental factors, or neglect—details that are easy to miss but crucial to know. Displaying a comprehensive knowledge of your warranty terms can prevent you from spending money on repairs that aren’t covered. Additionally, recognizing when professional diagnostics are warranted can save time and money. If your dishwasher exhibits signs like abnormal noises or inconsistent cleaning, as discussed in [this article](https://applianceoutletpro.com/top-signs-your-dishwasher-needs-professional-diagnostics), scheduling expert diagnostics early can identify issues before they escalate.
A critical nuance many miss is the connection between diagnostics and maintaining coverage. Some manufacturers and service plans stipulate that proper diagnostic procedures must be followed to qualify for warranty repairs. Skipping this step or misdiagnosing the issue can trigger warranty voiding consequences. So, how do you avoid this trap? The key is to rely on certified professionals for diagnostics when issues are beyond basic troubleshooting, and to keep detailed records of all diagnostic tests and repair communications.
So, let’s dig deeper into this: How can you ensure your diagnostics align with warranty requirements, and what steps should you take to protect your coverage? Do not underestimate the power of understanding your warranty’s fine print and collaborating effectively with qualified technicians. This knowledge can be the difference between a covered repair and out-of-pocket expenses, saving you significant money and hassle in the long run. Have you ever fallen into this trap? Let me know in the comments.
Investing in Reliable Diagnostics Tools
Over the years, I’ve found that having the right diagnostic tools can be a game-changer for maintaining appliance longevity. A high-quality multimeter is essential for testing electrical components like the heating element and door latches. I personally prefer a digital multimeter that offers auto-ranging and holds function, such as the Fluke 115, because it simplifies troubleshooting and reduces guesswork. Additionally, a non-contact voltage tester is invaluable for safely verifying power supply issues without risking shock, especially when working inside panels or near wiring. Using these tools consistently ensures I can quickly identify if a malfunction is electrical or mechanical, saving both time and money.
The Power of Proper Software and Diagnostic Modes
Modern dishwashers and appliances often feature built-in diagnostic modes accessible through specific button combinations. The secret test button combo, for example, allows me to run self-diagnostic tests that pinpoint issues like sensor failures or control board errors. Exploring these functions can often reveal underlying problems before they escalate—sometimes even within a few minutes. I recommend reviewing your appliance’s manual or manufacturer support sites for instructions tailored to your model. Taking advantage of these diagnostic modes not only helps in early problem detection but also ensures that warranty claims are supported by concrete evidence, as discussed in this article.
Embracing Long-Term Maintenance Habits
To keep your dishwasher performing optimally over the years, establish a routine maintenance schedule. This includes cleaning the filter regularly, inspecting door gaskets for leaks using food coloring tests, and checking spray arms for clogs with a simple toothpick fix. I also advocate for periodic use of descaling agents, especially if you have hard water, to prevent mineral buildup that strains components. Regularly monitoring water pressure and ensuring proper drainage also contribute to the longevity of your appliance. Investing in these habits minimizes unexpected breakdowns and keeps your dishwasher operating efficiently—saving money and extending its lifespan.
How do I maintain my dishwasher’s diagnostics over time?
Maintaining your diagnostic knowledge involves staying updated with your appliance model’s manuals and leveraging online resources like troubleshooting guides. Document any recurring errors and your troubleshooting steps; this record can be helpful when consulting professional technicians or warranty providers. Additionally, scheduling annual inspections by a professional can preemptively address issues before they affect performance. Remember, understanding your diagnostics not only empowers you but also ensures warranty compatibility, preventing costly repairs later. For complex sensor failures or control board issues, expert diagnostics are often required, as highlighted in this resource. I encourage you to try running the self-diagnostic mode on your current appliance to familiarize yourself with its functions and limitations. Taking this step today will make troubleshooting smoother tomorrow.
What I Wish I Learned Before Wasting Time and Money
One of the most valuable lessons I discovered is that simple adjustments often outweigh costly repairs. I once spent hours replacing parts when, in reality, leveling my dishwasher with a piece of cardboard and a few tools would have solved the noise problem instantly. It taught me to trust basic DIY fixes and to approach issues with patience rather than immediately assuming the worst.
Another insight was the importance of understanding warranty policies. Many overlook the fine print and inadvertently void their coverage by attempting unapproved repairs or misdiagnosing problems. Knowing when to call a professional—not just for peace of mind, but to keep warranty benefits intact—can save a significant amount of money in the long run. For example, carefully following manufacturer troubleshooting steps detailed in this guide helped me navigate warranty claims effectively.
I also realized that diagnostics tools are an investment worth making. A good multimeter and familiarity with your appliance’s diagnostic test modes can be game-changers, helping you identify issues quickly and accurately. Exploring the secret diagnostic modes on my dishwasher allowed me to catch problems early before they led to costly repairs.
Finally, embracing a routine maintenance mindset—cleaning filters, checking door gaskets, and running periodic tests—can prevent many common issues. Proactive care not only extends your appliance’s lifespan but also keeps it running quietly and efficiently, making your kitchen a more peaceful place.
Tools and Resources That Changed My Approach
Over the years, I’ve come to rely on specific tools that simplify diagnostics and repairs. A high-quality multimeter, for instance, helps me verify electrical components like the door latch switch or heating element. Pairing this with the built-in diagnostic modes—detailed in this resource—makes troubleshooting more precise and less time-consuming.
For reference, I trust the comprehensive guides on this site for in-depth symptom analysis. They’ve helped me avoid unnecessary parts replacements and understand what really needs fixing. Remember, sometimes a simple visual inspection combined with the right tools uncovers issues that might seem complicated at first glance.
Finally, never underestimate the power of community knowledge. Forums, YouTube tutorials, and manufacturer FAQs are invaluable for step-by-step guidance. When in doubt, consulting a professional through links like this page ensures your warranty remains valid, and repairs are done correctly.
Your Next Move Starts Now
Taking control of your dishwasher’s health isn’t just about fixing noise or leaks—it’s about empowering yourself to understand your appliance better and to act confidently. Whether it’s leveling the unit, diagnosing subtle issues, or knowing when to sit back and call a pro, each step strengthens your DIY skills and preserves your warranty benefits.
Start today by familiarizing yourself with diagnostic modes or inspecting your unit with a level. Small actions now can prevent costly repairs later—and bring that peaceful silence you deserve. The journey to appliance mastery begins with a single step, and your future self will thank you for it.