

I’ll never forget the winter of 2019. Every time the furnace kicked on, my bedroom door would start this rhythmic, maddening tap-tap-tap against the frame. It was like a tiny, invisible ghost was trying to get my attention, and frankly, I was losing my mind. I actually tried taped-up cardboard as a buffer once—it looked terrible and fell off by morning. I felt ridiculous. Should I really be calling a professional to fix a noise? I felt like I should know how to handle this, but I didn’t. That moment of frustration led me down a rabbit hole of home maintenance that taught me one thing: the simplest fixes are usually the most effective.
Stop the Noise Before You Lose Your Mind
The truth is, a rattling door is rarely a sign of structural failure. It’s usually just a sign that your door and its frame aren’t as snug as they used to be. Weather changes, house settling, or even just heavy-handed closing can create a gap. I used to think I needed to replace the whole latch assembly. I was wrong. In fact, I made a huge mistake early on by trying to bend the metal strike plate with a pair of pliers while it was still attached to the wall. I ended up cracking the wood trim and had to learn the trick to tightening loose hinges and frame screws the hard way. Today, we’re going to avoid those amateur blunders. We are going to make that door sit tight and silent using a few clever tricks that won’t cost you a dime in labor.
Is a DIY fix actually going to hold up over time?
Skepticism is healthy. You’re probably wondering if a bit of weatherstripping or a minor adjustment is just a band-aid fix. But here’s the kicker: even the pros usually just do what I’m about to show you. They just charge you $150 for the expert label. According to a study by the International Association of Certified Home Inspectors, minor shifts in door frames are a completely normal part of a home’s aging process, meaning these adjustments are standard maintenance, not emergency repairs. Have you ever felt like you were being scammed by a repair bill for something that took five minutes to fix? I certainly have, which is why I’m a firm believer in the Neighbor-to-Neighbor DIY approach.
Finding the Source of the Vibration
Before we grab the toolbox, we have to play detective. Much like running a sound check for a noisy appliance, you need to isolate exactly where the movement is happening. Is it the top of the door? Is it the latch? Or is it the hinges? Most of the time, it’s the strike plate. If the hole in the plate is just a hair too wide for the latch, the door will rattle. Think of it like leveling a machine on an uneven floor—if there’s a gap, there’s going to be noise. In the next section, I’ll show you exactly how to tighten that gap without ruining your paint job.
Tighten the Latch Gap Without Buying New Hardware
The most common reason for that annoying vibration is a tiny gap between the door latch and the strike plate. When the wind blows or the AC kicks on, the door moves back and forth within that fraction of an inch. Think of it like troubleshooting dishwasher problems where a loose component causes a systemic failure; you don’t need a new door, you just need a better fit.
The Five-Minute Tab Tweak
Open your door and look at the metal plate on the frame where the latch clicks in. Most strike plates have a small metal ‘tang’ or tab in the center of the hole. This little piece of metal is designed to be adjustable. I remember visiting my sister’s house and her pantry door sounded like a percussion instrument every time someone walked by. I grabbed a flathead screwdriver, inserted it into the strike plate hole, and gave that little tab a tiny nudge toward the door stop. 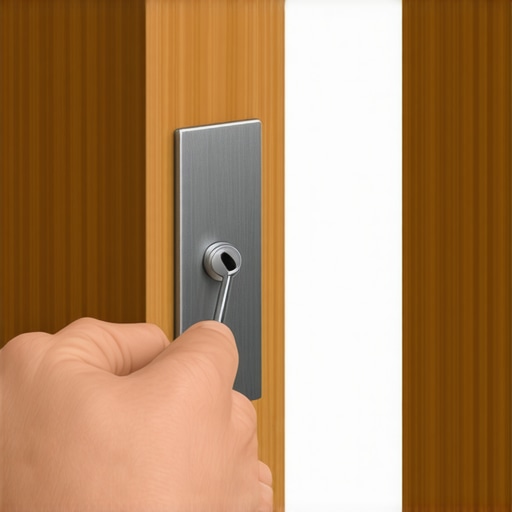 At first, I over-bent it—a classic rookie move—and the door wouldn’t even latch. I had to back it off just a hair. Once I found the sweet spot, the door closed with a solid, satisfying ‘thunk’ and didn’t budge an inch. It’s the same principle as when you learn how to identify a faulty control board without a technician; you’re looking for the smallest point of failure that causes the biggest headache.
Give the Door a Little Cushion
If adjusting the tab doesn’t do the trick, or if your strike plate doesn’t have an adjustable tab, you need to address the physical gap. Over time, the original bumpers or seals on a door frame compress and lose their bounce. Just like replacing a brittle door seal on an old appliance prevents leaks, adding a fresh buffer to your door frame stops the movement. You can buy small, adhesive rubber bumpers at any hardware store for a few bucks. Place one at the top and one at the bottom of the door stop—the part of the frame the door hits when it closes. This creates tension against the latch, effectively ‘locking’ it in place so it can’t rattle. This is often the same kind of logic used when a repair tech checks the air gap first; you’re verifying the simple physical barriers before assuming a mechanical failure.
Check Your Hinge Screws for Stability
Sometimes the rattle isn’t at the latch at all; it’s at the hinges. If the screws have worked themselves loose, the whole door will hang slightly askew. I once spent an hour messing with a strike plate only to realize the top hinge was sagging because the screws were barely holding on. It’s similar to the simple trick to leveling a dishwasher on an uneven floor; if the foundation isn’t square, nothing else will line up. Tighten every single screw on the hinge plates. If the holes are stripped and the screws just spin, shove a few toothpicks coated in wood glue into the hole, snap them off, and then drive the screw back in. This gives the metal threads something to bite into, pulling the door back into its proper, silent alignment. This easy fix can save you from a major repair bill, much like how a toothpick can save your spray arm in a kitchen appliance.Let’s dig deeper into the logic of professional diagnostics, because once you’ve mastered the small stuff like toothpicks and hinge screws, you’re ready to tackle the high-stakes world of warranty claims. Most people assume that having a service plan means they’re fully protected from any repair bill, but that’s a dangerous oversimplification. I’ve seen countless homeowners get blindsided by unexpected costs because they didn’t understand the fine print about normal wear and tear on appliances. A common myth is that an extended warranty is a safety net for every possible issue, but in reality, many providers exclude failures caused by lack of maintenance. If you aren’t tracking the specific symptoms of a failure, you might find that why your service plan might be a waste of money becomes a painful reality. The hidden nuance that experts know—and beginners don’t—is that the ‘smart’ features on your machine are actually logging your mistakes. If you’ve been skipping necessary cleanings or ignoring error codes, that data is stored for the technician to see.
Why the Wrong Soap Choice Destroys Your Repair Eligibility
This is where the ‘oops’ factor really kicks in. According to the Association of Home Appliance Manufacturers (AHAM), using the wrong type of detergent or over-sudsing creates mechanical strain that isn’t covered by standard terms. I’ve seen technicians walk into a kitchen, look at a box of cheap pods, and immediately write up a denial. This is why your service technician wants to see your detergent box before they even open the unit. They are looking for ‘user-induced’ failure. If you want to avoid this trap, you need to understand how appliance diagnostics can save your warranty benefits by proving the failure was mechanical rather than environmental.
Can the manufacturer really deny my claim based on the soap I use?
Absolutely. If the internal sensors detect excessive residue or if the drain pump fails due to a buildup of non-compatible soap, the manufacturer classifies it as misuse. To stay ahead, learn how to get professional-grade diagnostic codes from your interface yourself. Being able to cite specific error codes when you call for service shows the provider you are informed and helps you determine when to trust a warranty for dishwasher repairs versus when to handle it yourself. Another nuance people miss is the ‘No Failure Found’ (NFF) charge. If you call a tech out because of a noise and they can’t replicate it, you might get hit with a hefty bill despite having a warranty. This is why your warranty provider might deny a no-failure-found claim. I always recommend taking the photo evidence you need for every warranty claim or recording a video of the specific issue before they arrive. #IMAGE_PLACE_HOLDER_C# It’s much like troubleshooting dishwasher problems with expert diagnostics; you need hard data to back up your claim. Have you ever had a warranty claim denied for a reason that felt like a total technicality? Let me know in the comments, I’d love to hear your horror stories and see if we can find a workaround together.I’ve spent years collecting tools, but if you forced me to keep only one for home maintenance, it wouldn’t be a wrench—it would be my digital multimeter. Most people are intimidated by them, but once you learn how to use a multimeter to find a shorted wire, you stop guessing and start knowing. For instance, when my dishwasher refused to heat last spring, I didn’t just blindly order parts. I checked for continuity and verified the exact multimeter reading for a healthy thermal fuse. It turned out to be a twelve-dollar fuse instead of a three-hundred-dollar control board. I also swear by a cheap USB borescope that plugs right into my phone. Using a borescope to find clogs in your internal drain hose is like having X-ray vision for your plumbing; it’s the difference between a five-minute fix and a three-hour teardown of the entire cabinet assembly. 
How do I keep my modern appliances running for a decade or more?
The secret isn’t just luck; it’s proactive intervention. Modern machines are incredibly sensitive to mineral buildup, which can choke the life out of high-efficiency pumps. I make it a habit to learn how to flush out hard water deposits from the intake valve every year, especially if you live in an area with heavy calcium. Technical documentation, like the Whirlpool W10130913 Tech Sheet, emphasizes that even a ten percent reduction in water flow can cause the circulation pump to run hotter than intended, leading to premature failure. This is where understanding appliance diagnostics and improving your warranty claims becomes vital. If you can prove you’ve performed these basic flushes, a service technician is much less likely to flag your unit for neglect or denied coverage.
Don’t Fear the Digital Diagnostic Menu
In the near future, I predict we’ll see even more manufacturers locking their diagnostic software behind proprietary apps. We’re already seeing brands hide error logs behind complex button sequences that feel like a video game cheat code. That’s why you need to master how to get professional-grade diagnostic codes from your interface now, before these systems become fully encrypted. Sometimes, the fix for a cycle that never seems to end is as simple as knowing how to recalibrate your turbosity sensor manually. If your machine is acting up, don’t just call for help—grab your phone, record the error flashes, and try to pull the code yourself. It’s the most empowering feeling in home ownership. If you’re struggling to get a provider to listen, you might even learn how to get a manufacturer to pay for an out-of-warranty repair by citing these specific sensor failures as known factory defects rather than wear and tear. I strongly encourage you to try pulling your machine’s diagnostic codes this weekend, even if it’s working perfectly, just so you know the sequence before an emergency happens.
Hard Lessons from My Years in the DIY Trenches
Reflecting on my journey from a rattled bedroom door to diagnosing computer-controlled systems, I’ve realized that the biggest barrier isn’t the difficulty of the repair, but the fear of the unknown. Here are a few things I learned the hard way:
- Small noises are usually early warnings. If you catch a vibration before it becomes a failure, you’re not just saving money; you’re preventing a catastrophe.
- The manufacturer is not always on your side. Knowing how to negotiate a repair credit from your manufacturer is a skill that pays for itself a hundred times over.
- Documentation is your shield. I now keep these three receipts to ensure a smooth repair claim every single time I buy a new unit or a replacement part. It’s the difference between a covered fix and a denied claim.
- Trust your gut, but verify with data. If a machine sounds off, it probably is. Check for top signs your dishwasher needs professional diagnostics before the warranty expires.
The Handful of Tools That Changed My Repair Game
If you want to move beyond basic door adjustments and into serious home maintenance, you need a curated kit. These aren’t just gadgets; they are the keys to understanding appliance diagnostics and improving your warranty claims. First, get a high-quality multimeter; it’s the only way to prove a component is actually dead. Second, a telescopic mirror helps you see leaks in tight corners without pulling the whole machine out. Third, always have a set of torx drivers, as modern manufacturers love using them to discourage DIYers. Finally, I always keep a digital copy of the service manual on my phone. Having that specific data at your fingertips makes you a formidable advocate for your own home. #IMAGE_PLACEHOLDER_E#
You’ve Got This—Start Fixing Today
Taking ownership of your home’s maintenance is about more than just saving a few hundred dollars; it’s about the peace of mind that comes from knowing you aren’t helpless when things go wrong. Whether you are quieting a rattling door or troubleshooting dishwasher problems with advanced diagnostic codes, you are building a valuable set of skills. Don’t be afraid to get your hands a little dirty and challenge the professional-only label. Have you ever successfully negotiated with a manufacturer after a claim denial? Let me know your best strategies in the comments below!