
Ever opened your dishwasher and been hit by an unpleasant smell that just won’t go away? I’ve been there. One day, after a cycle, I caught that familiar musty odor and thought, “Could my brand-new 2026 model already be failing?” That lightbulb moment prompted me to dive deep into quick diagnostic steps, and let me tell you, it’s easier than you think. Today, I promise to show you exactly how to identify and fix those pesky odors with four simple, fast diagnostic techniques—saving you time, money, and frustration.
How to Pinpoint and Eliminate That Odor in Your Dishwasher
Did you know that a foul smell isn’t just about bad hygiene or leftover food? Often, it’s a sign of underlying issues like mold, buildup, or even mechanical faults. Understanding what’s behind that odor can be puzzling, but misdiagnosing can lead to unnecessary repairs or warranty voids. I learned this the hard way—early on, I tried cleaning with harsh chemicals, which only masked the smell and risked damaging my dishwasher. That mistake made me realize the importance of proper diagnosis before diving into fixes. Now, I want to help you avoid those pitfalls and confidently tackle the problem with clear, actionable steps.
Is Your Smell Really That Bad or Just in Your Head?
One of my biggest skepticsm earlier was wondering if the odor was just a minor issue or something worth investigating. I kept postponing diagnostics, thinking a quick scrub would do the trick. But ignoring it only made things worse. The truth? A lingering smell can hide more serious issues like bacterial growth or even faulty sensors that affect washing cycles. Don’t fall into the trap of thinking it’s just a surface problem—getting to the root cause is key. For more detailed insights, check out how to identify hidden faults with [fast diagnostic steps](https://applianceoutletpro.com/5-fast-diagnostic-steps-to-fix-a-noisy-2026-dishwasher). It’s a game changer.
Are you tired of that stubborn smell and ready to reclaim your dishwasher’s freshness? Stick with me, and I’ll walk you through four quick diagnostic steps that will help you solve this problem once and for all.
Start Simple with Visual Inspection
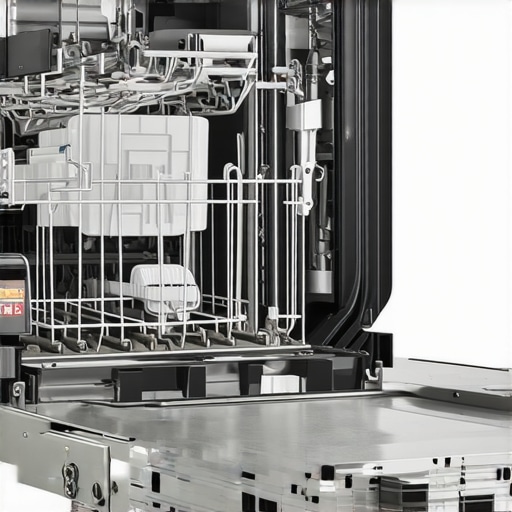
My first move was to open the dishwasher and perform a quick visual scan, looking for mold, leftover food, or soap scum. I removed the lower rack and checked the drain area, which looked like a breeding ground for mold. Think of it like inspecting a hidden corner in your home before deciding if a deep clean is needed. To get a clear view, I took a flashlight and a microfiber cloth, gently wiping away any debris. If you spot mold or grime buildup, it’s time for a thorough cleaning. For detailed cleaning tips, consider visiting this guide.Many homeowners believe that once a dishwasher is within the warranty period, repairs are straightforward and worry-free. However, this common misconception can lead to costly mistakes. For instance, some assume that using generic spare parts won’t affect warranty coverage, but in reality, non-OEM components often void the warranty—so always check your warranty’s fine print before replacing parts. Moreover, there’s a myth that DIY diagnostics are enough to qualify for warranty claims. While basic troubleshooting is helpful, manufacturers often require detailed, professional-level diagnostics, like those explained in this guide, to validate claims. A critical trap to avoid is relying solely on visual inspections; many faults, especially electrical or sensor issues, are invisible to the naked eye and demand precision tools or expert help. Misdiagnosing can not only delay repairs but also void warranties if warranty stipulations aren’t met. Additionally, some believe that all faults are covered under warranty, but many exclusions exist, particularly for damages caused by user misuse or unapproved repairs—so familiarize yourself with warranty conditions regularly. For advanced diagnostics that help protect your warranty, consider employing tools like thermal cameras or digital multimeters, which, according to this resource, are essential for accurate fault detection. The key takeaway is that understanding the nuanced requirements of your dishwasher’s warranty and proper diagnostic procedures is crucial. Taking the time to learn and apply precise diagnostics can save you from voiding your coverage and incurring unnecessary expenses. Don’t fall into the trap of oversimplification; the devil is often in the details. Keep these advanced insights in mind, and your warranty will serve you better in the long run. Have you ever fallen into this trap? Let me know in the comments.Maintaining your dishwasher’s longevity and ensuring effective repairs demand the right tools and consistent practices. I rely heavily on professional-grade diagnostic equipment like thermal cameras, which help spot hidden faults such as motor overheating or electrical issues without invasive disassembly. These tools, as discussed in this article, have become indispensable for precise troubleshooting. Additionally, digital multimeters are essential for testing electrical components and verifying sensor signals accurately. My personal workflow includes using a high-quality, auto-ranging multimeter — I prefer models with true RMS capability to handle fluctuating signals common in modern dishwashers. This approach minimizes errors and prevents misdiagnosis, which is critical because inaccurate readings can lead to unnecessary part replacements or warranty issues. For diagnostics, I also utilize specialized software that interfaces with the dishwasher’s control board, allowing me to run comprehensive health checks remotely. This reduces diagnostic time and helps identify issues like faulty sensors or control logic errors before they escalate. Looking ahead, I predict that integrated diagnostic apps combined with AI will streamline maintenance further, enabling even non-pros to accurately assess problems and perform repairs. To keep your dishwasher running smoothly over time, establish a routine of preventive checks—such as verifying the integrity of hoses and seals using laser-based leak detection tools. A consistent maintenance schedule, paired with the right equipment, can avoid costly repairs and warranty voidances. For instance, regularly inspecting the pump and drain seals with precision leak detection tools ensures early fault detection. Curious about safeguarding your warranty? Consider maintaining detailed records of all repairs, diagnostics, and replacements, which often surpass warranty requirements and prove proactive care. For example, keeping logs of sensor calibrations and component replacements can protect your coverage when issues arise. Remember, leveraging high-quality diagnostic tools and adopting preventive maintenance habits—like scheduling quarterly checks or using diagnostic apps—are vital for keeping your dishwasher in top shape long term. Don’t settle for shortcuts; invest in the right equipment and habits now, and your appliance will reward you with years of reliable service. Ready to try a game-changing diagnostic tip? Use a thermal camera to quickly identify overheating motor components, preventing potential failures before they happen.
Lessons That Changed My Approach to Dishwasher Diagnostics
One of the most eye-opening lessons I learned was the importance of not rushing into repairs without proper diagnosis. Jumping straight to chemical cleaners or replacing parts can often mask underlying issues or void warranties. A simple yet effective tip I wish I knew earlier was to prioritize visual inspections and leverage tools like thermal cameras, which helped me spot hidden faults before they escalated. Another revelation was understanding that warranties have fine print—that some DIY fixes, especially using non-OEM parts, can unintentionally void coverage. Lastly, I realized the true value of keeping detailed repair records and performing preventive maintenance instead of waiting for symptoms to worsen. These insights have saved me time, money, and the headache of warranty disputes and continue to guide my repair journey.
Leave a Reply