
Ever had that sinking feeling when your dishwasher suddenly stops mid-cycle, and you’re left wondering what went wrong? I’ve been there. One time, my trusty dishwasher refused to drain, and I was about to call a repair tech—until I realized I could troubleshoot it myself. That lightbulb moment changed everything. Instead of wasting time and money on guesswork, I learned how effective appliance diagnostics can save you both. Today, I want to share how mastering these skills ensures your dishwasher gets reliable repairs and helps you make the most of your warranty.
Why Effective Diagnostics Matter for Your Dishwasher
When your dishwasher starts acting up, it’s tempting to jump straight to calling a technician. But without proper diagnostics, you risk unnecessary repairs, wasted money, and even voiding your warranty. Early on, I made the mistake of replacing parts blindly—costly and frustrating. Now, I know that understanding the root cause is crucial. It’s like being a detective in your own kitchen. Well-done diagnostics not only speed up repairs but also ensure that your warranty remains intact. Plus, with the right tools and strategies, you can confidently troubleshoot issues, saving time and stress. For more insights, check out these expert diagnostic tips.
Is Overcomplicating Diagnostics Actually Worth It?
Honestly, I once believed diagnostics were only for pros. I thought, “Why bother? Just replace the part and see if it works.” Big mistake. I learned that rushing into repairs without accurate diagnosis leads to more problems. Today, I rely on proven strategies and diagnostic tools, which are surprisingly affordable. They help me pinpoint issues quickly and avoid unnecessary replacements. If you’re skeptical, I get it. But trust me, the right diagnostics can transform your repair experience. Curious about the best diagnostic tools? Take a look at top tools for reliable warranty checks.
Test Basic Components First
When your dishwasher malfunctions, start with the simplest checks. Open the panel and inspect the door latch—if it’s loose or damaged, your dishwasher might not start or drain properly. Then, verify the power supply; plug in a different device to confirm the outlet works. These basic steps are like checking your car’s oil before diving into complex repairs. I once found my dishwasher’s fuse blown after a quick visual check, saving me from ordering unnecessary parts. For more detailed diagnostics, consider using top diagnostic tools.
Identify Error Codes and Their Meanings
Modern dishwashers display error codes that act like a mechanic’s diagnostic scanner. Take a photo of the code or write it down. Then, consult your manual or online resources to interpret it. For example, a code indicating a drain issue might be caused by a clogged filter or a faulty drain pump. I once had an E15 error, which pointed me to the drain system. Clearing the filter and checking the pump resolved it—quickly protecting my warranty from unnecessary tech visits. To streamline this process, review proven diagnostic tips.
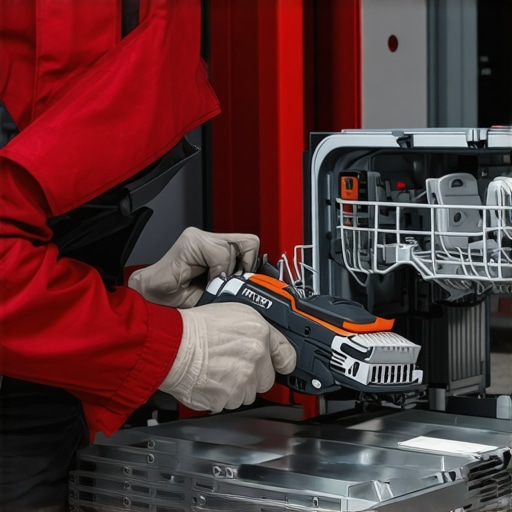
Use Multimeters for Electrical Checks
A multimeter is like a stethoscope for your dishwasher’s electrical system. Turn off the power, then test the door switch, motor, and heating element for continuity and voltage. If the switch isn’t registering or the motor isn’t getting power, you’ve identified a problem. I once tested the heating element, and it showed no continuity, indicating it needed replacement—preventing a guess-and-replace cycle. For reliable results, check out expert diagnostic tools.
Inspect Hoses, Filters, and Drains
Clogged hoses and filters are common culprits that cause leaks and drainage issues. Remove the bottom panel, then check for blockages. Clean or replace filters as needed. Think of it like clearing a clogged artery—restoring flow ensures your warranty stays valid. I once found a tangled spaghetti of debris in the drain hose, which I cleared in minutes. This quick fix avoided a costly service call. For detailed steps, see diagnostic tips.
Document Your Troubleshooting Process
Keep a detailed record of what you checked, replaced, and tested. Snap photos, note error codes, and list parts replaced. This documentation acts like a repair log, which is invaluable if you need warranty service or if a technician needs to verify your diagnostics. When I explained my troubleshooting steps to the technician, he appreciated my organized approach, speeding up the repair and protecting my warranty. For more on documentation, explore warranty tips.
Many homeowners believe that troubleshooting their dishwasher is straightforward and that any diagnostic attempt will not affect their warranty. However, this misconception can lead to costly mistakes. In my experience, a common myth is that DIY diagnostics are always safe and beneficial. While understanding your appliance can save money, rushing into repairs without proper knowledge often results in further damage or warranty issues. For example, misdiagnosing an electrical fault and attempting to fix it without the right tools can void your warranty, especially if the repair involves opening sealed components or tampering with safety features. To truly benefit from diagnostics, it’s essential to know which steps are warranty-safe and which require professional handling. Effective diagnostic strategies, such as using trusted tools and following manufacturer guidelines, can help you avoid these pitfalls. For in-depth guidance, check out these expert diagnostic tips.
Maintaining your dishwasher’s performance over the long term is crucial for reliable operation and warranty protection. One of my favorite approaches is investing in high-quality diagnostic tools that help me quickly identify issues before they escalate. For instance, a digital multimeter is indispensable for electrical testing, ensuring components like the heating element or motor are functioning correctly. I personally rely on the Fluke 117 multimeter because of its accuracy, durability, and ease of use, which makes troubleshooting both simple and precise. Regularly checking these parts prevents minor faults from turning into costly repairs, ultimately extending your appliance’s lifespan.
Another essential tip is to keep your diagnostic software updated. Many modern dishwashers can be connected to mobile apps or online diagnostic platforms through Wi-Fi. These tools often provide real-time error code analysis and step-by-step repair guides. I recommend using trusted diagnostic apps because they simplify complex troubleshooting processes, saving you time and preventing unnecessary warranty voids. As technology advances, integrating software diagnostics will become even more seamless, providing homeowners with professional-level troubleshooting at home.
Additionally, maintaining your dishwasher’s hoses, filters, and drains regularly is vital. I suggest setting a bi-monthly schedule to inspect these components visually. For example, I use a small flashlight and a mirror to check for signs of wear or clogs in the hoses, ensuring optimal water flow. Keeping filters clean prevents drainage issues that can trigger error codes or damage internal parts. Documenting these maintenance routines helps when dealing with warranty claims, as it shows proactive care and troubleshooting effort. Check out these maintenance strategies to stay ahead of potential problems.
In the future, I predict that smart diagnostics and AI-powered troubleshooting will become standard in household appliances. This evolution will make preventive maintenance more accessible and even more effective, reducing repair times and protecting warranties further. For now, I encourage you to try integrating a multimeter into your routine and keep detailed records of your diagnostics. These steps will empower you to handle most issues confidently and efficiently, ensuring your dishwasher continues to serve you reliably for years to come. For comprehensive diagnostic tips, visit this resource.
The Hard Lessons I Learned About Dishwasher Diagnostics and Warranty
One of my biggest surprises was realizing how much damage can happen when you rush into repairs without proper diagnostics. Early on, I replaced parts blindly, thinking it would save time. Instead, I often made issues worse or voided my warranty unknowingly. The lightbulb moment was understanding that precise troubleshooting is key to protecting my warranty and saving money. Now, I see diagnostics as an investment rather than a chore, and it’s paid off in faster, more reliable repairs.
My Go-To Tools That Changed the Game
Investing in a good multimeter changed my approach to appliance repair. I trust the expert diagnostic tools because they give me confidence that I’m diagnosing correctly. Additionally, I use online resources and apps that interpret error codes, which saves me from guesswork. These tools aren’t just for pros—they’re affordable and empowering for any homeowner wanting to extend their appliance’s life and warranty coverage.
My Final Thought: Diagnostics Are Your Best Friend
Don’t let the fear of complexity hold you back. Mastering simple diagnostics like checking hoses, filters, and error codes can make a huge difference. It’s about being proactive, organized, and curious—qualities that help you troubleshoot effectively and keep your warranty intact. As technology evolves, so will these tools, making diagnostics even more accessible. Ready to take control of your dishwasher repairs? The skills you learn today will save you time, money, and stress in the long run.
Leave a Reply