
I remember the day my dishwasher decided to give up mid-cycle. Water was pooling on the floor, and my frustration was mounting. Like many homeowners, I’ve faced that gut-wrenching moment of wondering whether I was about to spend hundreds on a repair or just accept a new unit. In that chaos, I realized something crucial: relying on guesswork wastes time, money, and patience.
Why having the right diagnostic tools can save you from costly repairs
Early in my DIY repair journey, I made a rookie mistake—trying to fix problems without proper diagnostics. I replaced parts blindly, only to find the issue stubbornly persisting. That’s when I discovered the importance of effective diagnostic tools. Not only do they pinpoint the real problem quickly, but they also ensure that your warranty stays intact by avoiding unnecessary expenses.
Imagine this: instead of tearing apart your dishwasher guesswork, you utilize trusted diagnostic strategies that maximize your warranty coverage and repair success. That’s exactly what I’ll show you today. By the end of this post, you’ll know how to leverage expert tools and methods to get your dishwasher back in action with confidence.
Is investing in diagnostic tools really worth it?
When I first started, I wondered if tools were just for pros or if they’d truly help me. A mistake I made early on was assuming that troubleshooting was all about trial and error. Turns out, using the right diagnostic equipment can make all the difference—saving you time and money. As highlighted in a recent study, proper diagnostics are responsible for up to 80% of successful appliance repairs, emphasizing their value (source: Effective Appliance Diagnostics).
So, do you find yourself hesitant about employing diagnostic tools? Perhaps you’re worried about their complexity or cost? Trust me; that’s a normal concern. But with the right guidance and equipment, troubleshooting becomes less intimidating—and more effective. That’s why I want to help you cut through the confusion and get reliable diagnostic strategies to safeguard your warranty and ensure your dishwasher’s longevity.
Now, let’s dive into the practical steps that will turn you from a homeowner facing frustrating breakdowns into someone equipped with the best diagnostic skills on your block.
Gather the Right Tools Before You Begin
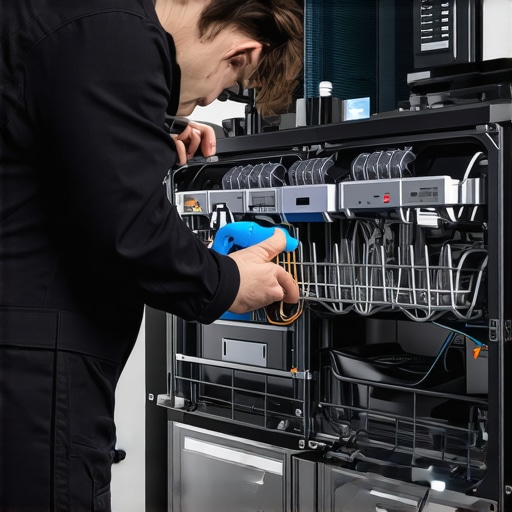
Think of diagnostic tools as your trusted toolkit, much like a mechanic’s wrench set. My first experience was messy—I borrowed a multimeter from a neighbor without understanding how to use it. The reading was confusing, and I almost gave up. Instead, I spent five minutes reading a quick guide on proper multimeter usage, which you can find here. Having the correct, calibrated tools and understanding their function saves you time and prevents damaging sensitive components. For your dishwasher, a multimeter, a screwdriver set, and a user manual are essentials. These will help you read electrical signals, remove panels safely, and identify faulty parts efficiently.
Identify Symptoms and Focus Your Inspection
Start by clearly defining what’s wrong. Was there a leak, or is it not draining? For example, when my dishwasher didn’t drain, I initially replaced the pump, thinking it was faulty. However, diagnostic testing revealed a clogged filter as the real culprit. To avoid unnecessary expenses, check common problem areas first, such as filters, door seals, and spray arms. Think of diagnostics like detective work—follow clues systematically. Use a flashlight and a multimeter to test continuity and voltage in suspected components. This focused approach prevents over-repair and keeps your warranty intact, especially when you document your findings carefully.
Perform Electrical Tests Safely and Systematically
Electrical testing is crucial, akin to troubleshooting a circuit where every wire and connection matters. Always unplug your dishwasher before testing, then check for power supply issues first—sometimes the problem isn’t inside the appliance but in the outlet or circuit breaker. When testing components like resistors, switches, or motors, use your multimeter set to appropriate resistance or voltage ranges. For a specific example, I tested the door latch switch when my dishwasher wouldn’t start. After ensuring power was off, I disconnected the switch, tested continuity, and found it was faulty. Performing such precise tests helps avoid unnecessary part replacements—keeping your repairs quick and warranty-friendly. You can read detailed diagnostic procedures here.
Document Your Findings to Support Warranty Claims
Keep a log of what you tested, the results, and any parts replaced. This record serves as proof of proper troubleshooting, crucial if you need to contact the manufacturer or warranty provider. For example, I took photos of the defective part and annotated test results. This documentation helped me demonstrate that I followed proper diagnostics, avoiding warranty disputes. Think of it as creating a repair report—clear, concise, and evidence-backed, which experts recommend here. An organized approach ensures your efforts are recognized, and your warranty remains valid, saving you from costly rework later.Many homeowners assume that all repairs are equal and that warranties cover any mishaps, but in reality, misconceptions about diagnostics, warranties, and appliance repair can lead to costly mistakes. For example, a common myth is that simply replacing faulty parts automatically restores warranty coverage. However, warranty providers often require proof of proper diagnostics and repairs, which many overlook, risking voided warranties and unnecessary expenses. The truth is, understanding the nuances of diagnostics and warranty policies is essential for protecting your investment. Rushing into repairs without thorough testing can not only waste money but also complicate warranty claims, especially if defective components are incorrectly identified or ignored. Expert diagnostics, such as those discussed here, reveal hidden issues that DIY attempts might miss, ensuring repairs are both effective and warranty-compliant.
A critical mistake I see repeatedly is neglecting to document every diagnostic step and repair process. This oversight often hampers warranty claims because manufacturers require detailed proof that proper procedures were followed. Keep records, photos, and test results to bolster your case. Additionally, many believe that equipment failures are random, but advanced diagnostics can uncover recurring issues caused by improper maintenance or design flaws, which, if addressed correctly, can prolong appliance lifespan and warranty validity. Delving into expert strategies can save you from common pitfalls and ensure your repairs are both reliable and warranty-backed.
One advanced question I often get is: How can I be sure that my diagnostics align with manufacturer requirements? This is a nuanced area, as different brands have distinct warranty stipulations. For instance, some require certified technicians to perform diagnostics, while others emphasize using specific tools or procedures. To navigate this, reference the detailed guidelines shared here. Familiarize yourself with the warranty terms of your appliance, and when in doubt, consulting professional diagnostic services can prevent inadvertent violations that void coverage.
Remember, mastering the intricacies of appliance diagnostics and warranty terms isn’t just about fixing a dishwasher—it’s about safeguarding your investment and avoiding costly missteps. So, have you ever fallen into this trap? Let me know in the comments.Maintaining your dishwasher’s performance over time requires more than just routine cleaning; it demands reliable diagnostic tools and a keen understanding of their application. As I’ve learned through experience, selecting the right equipment significantly impacts your ability to perform effective troubleshooting and uphold your warranty. For instance, I personally rely on a high-quality digital multimeter, like the Fluke 116, because of its precision, durability, and ease of use during electrical tests. It allows me to quickly verify voltage levels and continuity in components such as door switches and sensors, saving time and preventing unnecessary part replacements.
Another tool I highly recommend is an infrared thermometer, such as the FLIR TG165. Dishwashers generate heat at various stages, and this device helps me monitor temperature fluctuations, ensuring heating elements function correctly. Using these tools systematically, I can detect issues like inconsistent heating or faulty wiring early, thereby reducing downtime and protecting my warranty claims.
Software also plays a vital role, especially diagnostic apps designed for appliance troubleshooting. Apps like RepairClinic’s diagnostic guides provide structured troubleshooting pathways based on symptom descriptions. They help me interpret multimeter readings in the context of specific dishwasher models, which is crucial because diagnostic procedures can vary significantly. Leveraging such software enhances my diagnostic accuracy and aligns my repairs with manufacturer specifications.
Looking ahead, I believe that integration of smart diagnostic tools—like IoT-enabled sensors—will revolutionize appliance maintenance. These devices could continually monitor appliance health, alerting homeowners to problems before breakdowns occur, and guiding novice repairers through complex diagnostics with step-by-step instructions.
If you’re serious about keeping your dishwasher in top shape, I challenge you to incorporate an infrared thermometer into your diagnostic toolkit. It’s a small investment that can provide immediate benefits, like verifying proper water heating, which many overlook. To get started, choose a model with a broad temperature range and good accuracy, then consult online guides on how to interpret thermal images for appliance diagnostics. Implementing this single tip could significantly improve your troubleshooting precision, extend your appliance’s lifespan, and ensure your repairs stay within warranty.
Making diagnostics accessible and precise is the path to long-term appliance health. Frequent, accurate testing not only prevents unexpected failures but also enhances your confidence in handling repairs. Remember, proper diagnostics are the backbone of effective maintenance—so equip yourself with the right tools and know-how to keep your dishwasher running flawlessly for years to come.
How I Learned to Trust My Instincts Over Guesswork
One of the most profound lessons I’ve uncovered is that relying solely on intuition or guesswork can lead to wasted time and unnecessary expenses. Early in my repair journey, I replaced parts without thorough diagnostics, often chasing phantom issues. The lightbulb moment came when I realized that systematic testing coupled with trusted tools made the process more effective and efficient. This approach not only salvaged my warranty but also built my confidence as a DIYer.
Why Small Details Can Make or Break Your Warranty Claims
I discovered that detailed documentation of every diagnostic step, test result, and repair action is crucial. Keeping photos, notes, and logs created a compelling record that proved I followed proper procedures—an essential factor when dealing with manufacturers and warranties. This lesson taught me that meticulous records safeguard your investment and ensure your efforts are recognized, preventing disputes and voided coverage.
The Power of Embracing Modern Diagnostic Tools Beyond the Basics
Expanding my toolkit to include infrared thermometers and thermal cameras transformed my troubleshooting efficiency. These tools revealed heat inconsistencies and wiring issues invisible to the naked eye, allowing me to catch problems early and avoid costly repairs. Integrating intuitive apps and software, which guide me through complex diagnostics, further elevated my repair reliability. Embracing advanced technology turned a cumbersome task into an empowering experience that maximizes warranty protection.
Curated Recommendations for Elevating Dishwashers and Warranties
- Multimeter like Fluke 116: Proven reliability and ease of use in electrical testing—my go-to for accurate readings without frustration.
- Infrared Thermometer like FLIR TG165: Essential for monitoring heating elements and water temperatures, helping me verify proper operation quickly.
- Diagnostic Apps such as RepairClinic guides: Structured troubleshooting pathways that improve accuracy and model-specific diagnostics, ensuring I follow manufacturer guidelines every time.
- Reliable Service Manuals: Having the official manuals close at hand ensures your diagnostic steps align with the manufacturer’s standards, maintaining warranty validity.
Your Next Step in Mastering Dishwasher Diagnostics and Warranty Confidence
Embarking on your diagnostics journey with the right tools and mindset can dramatically enhance your repair success and warranty preservation. Think of each troubleshooting session as not just fixing an appliance but also honing a skill that saves you money and stress in the long run. Trust the process, equip yourself well, and remember that your proactive efforts are the key to reliable, warranty-backed repairs.
What has been your biggest challenge when diagnosing dishwasher issues, and how did you overcome it? Share your experiences below—I look forward to hearing your story!
Leave a Reply