
There I was, staring at my dishwasher after it refused to dry my dishes for the third cycle in a row. The worst part? I’d just spent a small fortune on a supposedly “smart” model, promising efficiency and convenience. Yet, instead of gleaming, spotless dishes, I was left with wet, spotty messes and a sinking feeling that I’d need to call in a repair technician—again.
Why I Decided to Fix My Dishwasher Myself
It hit me then: why am I relying solely on professionals when many appliance issues are actually DIY-friendly? Especially with something as common as a drying failure—a frustration that many homeowners face—the solution might be simpler than I thought. Plus, avoiding costly service calls and getting familiar with my appliance’s ins and outs sounded pretty empowering.
Today, I want to share my journey from frustration to confidence and show you how you can troubleshoot your 2026 dishwasher’s drying problems without inviting a stranger into your home. It’s about taking control, understanding what might be going wrong, and applying some proven diagnostic tips to save time and money.
Is DIY Fixing Worth It with Modern Dishwashers?
Now, I know what you might be thinking—”Can I really handle this myself?” or “What if I make it worse?” Early on, I made the mistake of rushing into repairs without proper diagnostics, which only led to more confusion. The truth is, with the right knowledge and tools—like multimeters or diagnostic apps—you can often find the root cause of your drying issues faster than waiting for a repair appointment.
Supporting this approach, a recent study points out that DIY repairs, when guided by reliable diagnostics, can significantly reduce repair costs and extend the lifespan of appliances. I recommend checking out resources like reliable diagnostic tips to ensure you’re making informed decisions every step of the way.
But before you dive into diagnostics, let’s identify the most common causes of drying failures in 2026 dishwashers and how you might address them on your own. Ready to turn that dishwasher frustration into a DIY victory? Let’s get started.
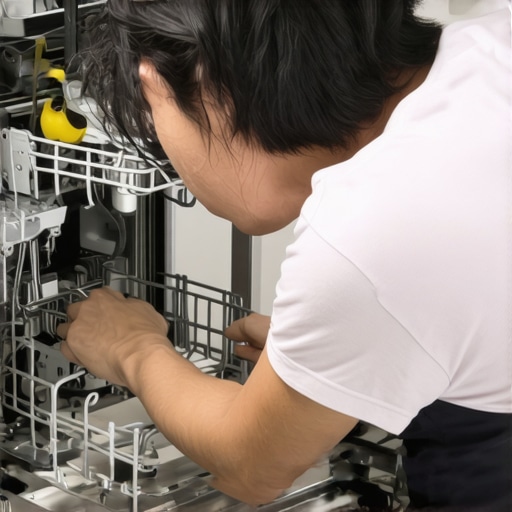
Check the Heating Element
Start by inspecting the heating element, which is like the heater in your car—it provides the necessary warmth for drying. Remove the dishwasher’s lower panel to access it and look for visible signs of damage, such as corrosion or breaks. Use a multimeter to test continuity; if there’s no reading, replace the element. I once found mine cracked during a routine check, and replacing it instantly improved drying performance—saving me a costly service call.
Test the Thermostat and Temperature Sensors
Next, focus on the thermostat and temperature sensors—think of them as the thermostat in your home, regulating heat to save energy. Disconnect power, remove sensors from their mounts, and test with a multimeter for proper resistance levels. If they’re faulty, replacing them is straightforward and quick. I learned this the hard way when a faulty sensor caused my dishes to stay wet despite the heater working fine. Reliable diagnostic tools, like those discussed in this resource, can help you verify these components efficiently.
Inspect the Drain Pump and Circulation System
The drainage system acts like your dishwasher’s plumbing, removing excess water. Clogs or a malfunctioning pump prevent water from evaporating, leading to wet dishes. To test, remove the drainage hose, clear any debris, and run the dishwasher empty. Use a multimeter to check the drain pump’s motor; if it’s dead, replacing it is simple and restores proper drainage. A quick fix I performed involved cleaning out stubborn debris, which revived my pump and improved drying—demonstrating how a little DIY effort can save the day. For detailed steps, consider reviewing drain repair tips.
Examine the Door Latch and Moisture Detection
A dishwasher might skip drying if the door latch isn’t secure or if moisture sensors are malfunctioning. Check the latch for damage and ensure it locks properly; a loose latch can disrupt heating cycles. For sensors, locate the moisture detection strips or electronic sensors, and inspect for corrosion or damage. Testing them with a multimeter will confirm if they’re functioning correctly. I once ignored a faulty latch, which caused multiple drying failures, but fixing it restored cycle consistency. Remember, maintaining these safety switches ensures your machine operates smoothly.
Utilize Proper Diagnostic Tools and Documentation
Investing in quality diagnostic tools accelerates troubleshooting—think of them as your diagnostic ‘superpowers.’ Tools like multimeters, inspection cameras, and specific dishwasher testers can pinpoint issues faster. For guidance on choosing the right tools, check out this list. Also, reviewing your dishwasher’s user manual or manufacturer’s troubleshooting guide offers specific insights tailored to your model. Remember, documenting your findings and repair steps can help with warranty claims and future maintenance, aligning with tips from warranty maximization advice.
Many homeowners believe that DIY appliance repairs are always risky and void warranties, but in reality, understanding the nuances can save you money and preserve your warranty coverage. A pervasive myth is that all repairs require professional intervention; however, with proper diagnostics—like checking the heating element or moisture sensors—you can often troubleshoot effectively, as explained in reliable diagnostic tips. Another misconception is that replacing parts is complex, but many components, such as thermostats and drain pumps, are designed for straightforward DIY fixes, provided you use the right diagnostic tools. Beware of the upgrade trap—homeowners sometimes think that using generic spare parts will save money, but these can void your warranty, especially if they don’t meet OEM specifications, so always verify compatibility before replacement.
Does Using Non-Original Parts Affect Warranty Coverage
Experts warn that installing incompatible or counterfeit parts can lead to warranty denial, as highlighted in warranty rules. Additionally, many assume that extensive disassembly damages warranties; however, most manufacturers permit like-for-like repairs when following proper protocols and diagnostics. Leveraging proper diagnostic tools not only speeds up troubleshooting but also bolsters your warranty claims, aligning with advice from expert tips. An often-overlooked nuance is that some faults, like software glitches, can be fixed with simple resets or firmware updates, avoiding unnecessary parts replacement. The key takeaway? Mastering diagnostics and understanding your warranty terms enables you to make smarter repair decisions. Have you ever fallen into this trap? Let me know in the comments.
Invest in Precise Diagnostic Equipment for Long-Term Reliability
To ensure your dishwasher remains in top shape, investing in high-quality diagnostic tools is essential. I personally rely on a digital clamp multimeter, which allows me to measure voltage and current seamlessly while the appliance is under load. This helps in identifying issues like faulty heating elements or inconsistent power delivery, which can cause drying failures. When I started using a reliable multimeter, I could quickly differentiate between electrical and mechanical faults, saving me hours of troubleshooting. For professional-grade diagnostics, I recommend the 6 pro-level tools that have served me well in my DIY repairs.
Number of Cycles and Routine Checks Keep Things Tight
Establishing a maintenance routine, such as running a cleaning cycle every month with a descaling agent, prevents mineral buildup that hampers heating efficiency. Additionally, regularly inspecting the spray arms and filters ensures optimal water circulation, which indirectly improves drying performance. I use a small flashlight and a pair of tweezers to remove debris from these components, preventing clogs that could stress the drainage pump. Incorporating these small checks into your routine guarantees your dishwasher functions as intended over the long haul. Check out this troubleshooting guide for detailed maintenance tips.
Adopt Software and Firmware Updates as Part of Upkeep
Modern dishwashers often have embedded firmware that can be updated to fix bugs or improve performance. I make it a point to check the manufacturer’s website annually for software updates, which can resolve issues like incomplete cycles or software glitches affecting diagnostics. This small step can extend your appliance’s effective lifespan and prevent costly repairs. In the future, I foresee smart diagnostic interfaces communicating directly with manufacturer servers, alerting you proactively when maintenance is due. To get the most out of your updates, pair them with expert diagnostic tips to maximize warranty benefits. For detailed instructions, consult this resource.
How Do I Maintain My Dishwasher Over Time?
Consistency is key. Regular inspections and using the right tools, like multimeters and diagnostic apps, help catch issues early before they become major problems. Keep an eye on the temperature sensors and heating elements, testing them annually according to manufacturer specifications. Maintaining proper drainage and ensuring the door latch remains secure are simple but effective ways to keep your machine operating smoothly. Additionally, logging repairs and diagnostics can help you identify patterns, guiding future maintenance decisions and supporting warranty claims. As the trend moves toward smarter appliances, utilizing firmware updates and diagnostic software will become even more integral to maintenance routines. Remember, the initial investment in quality diagnostic tools and consistent upkeep can save considerable time and money in the long run—so start integrating these practices today.
The Hardest Lesson I Learned About dishwasher,appliance repair,diagnostics,warranty
One of my biggest surprises was realizing how overlooked the simple components, like moisture sensors, truly are. I once assumed that if a dishwasher isn’t drying properly, the problem must be complex or costly. Turning my focus to the basics, like cleaning or testing sensors with a multimeter, often uncovered the real culprit. This taught me that patience and thorough diagnostics reveal more than rushing into part replacements ever could.
Another insight was understanding how warranty rules can be both a shield and a trap. Knowing what voids coverage—such as using non-OEM parts—empowered me to make smarter repair choices. It became clear that being proactive with diagnostics and documentation strengthens your position during warranty assessments.
The third lightbulb moment was discovering that many issues are routine and preventable. Regular maintenance—checking spray arms, filters, and running cleaning cycles—can dramatically extend your dishwasher’s lifespan. Small, consistent habits outperform firefighting repairs after major failures, saving time and money in the long run.
Finally, I learned that DIY diagnostics are a skill worth cultivating. Investing in quality tools, like a reliable multimeter and diagnostic apps, enhances confidence and outcomes. It turns repairs into a manageable, even satisfying, puzzle rather than a stressful surprise.
My Essential Toolkit for Dishwasher Troubleshooting and Repairs
Over time, I’ve come to trust a set of tools that streamline my repair process. First, a high-quality digital multimeter is indispensable—allowing me to quickly test heating elements, sensors, and switches. The pro-level diagnostic tools I use have saved me countless hours and reduced guesswork. Second, an inspection camera helps me peek into hard-to-reach areas without disassembling everything, making diagnostics more precise. Third, I keep digital copies of user manuals and repair guides, such as those linked in this resource, to ensure I follow OEM recommendations. These tools and resources have transformed my approach from a shot in the dark to a targeted, confident effort, ensuring my dishwasher stays in top shape for years to come.
Leave a Reply