
Ever felt that sinking feeling when your dishwasher suddenly stops working just before a big family dinner? I’ve been there. One weekend, my trusty dishwasher decided to throw a tantrum right before hosting friends. I was frustrated, not just because of the inconvenience but also because I didn’t know if I could fix it myself or if I’d have to call in a pro and risk losing my warranty coverage. That lightbulb moment made me realize something essential: understanding the ins and outs of diagnostics and repair tips can save you money, time, and even your warranty.
Why Getting Your Dishwasher Diagnosed Properly Matters Now More Than Ever
Most people don’t realize that a little knowledge about diagnostics can be a game changer. When your dishwasher acts up, jumping straight to calling a repair service might seem easiest, but it can actually cost you more — especially if you miss the chance to diagnose the problem early. Proper diagnostics not only help you identify the real issue faster but also ensure that any repairs you do or get done are covered under warranty. This is crucial because many warranties require proof of proper troubleshooting before they’ll cover repairs.
In my early days, I made the mistake of ignoring simple troubleshooting steps and ended up paying out of pocket for what could have been a warranty-covered repair. Trust me, the difference between a DIY diagnostic and a rushed fix is huge. It’s like the difference between a quick check-up and ignoring symptoms until the whole system fails. Plus, with the right diagnostic tools and strategies, you can spot issues before they become expensive disasters.
If you’re tired of unexpected breakdowns and want to make sure your warranty stays intact, then stick around. I’ll walk you through the essential steps to diagnose your dishwasher correctly, avoid costly mistakes, and maximize your warranty benefits. Curious if your current troubleshooting approach is enough? Let’s dive into the details that most homeowners overlook.
Knowing When and How to Diagnose Your Dishwasher Effectively
Before we get into the nuts and bolts, ask yourself: have you ever tried to fix something only to realize you weren’t diagnosing the real problem? This is a common mistake. Early on, I fixed minor issues without proper diagnostics, which sometimes masked bigger problems. It’s a mistake I learned the hard way. Instead of guessing, I now follow proven diagnostic strategies, which you can see outlined in this expert guide.
In the next sections, I’ll share simple, effective diagnostic tips that anyone can apply. These will help you troubleshoot common dishwasher issues, save money, and protect your warranty coverage. Ready to become your own appliance detective? Let’s get started!
Identify the Root Cause Before You Fix
Start by assessing the symptoms your dishwasher displays. Is it not draining, leaking, or not starting? Use a process of elimination to pinpoint the issue. For example, if water isn’t filling, check the water supply and inlet valve first. This initial step is crucial because jumping into repairs without proper diagnosis can lead to unnecessary costs and void warranties. Remember, a clear understanding of the problem is the foundation of effective troubleshooting. For more detailed diagnostic techniques, visit this trusted guide.
Gather Essential Diagnostic Tools
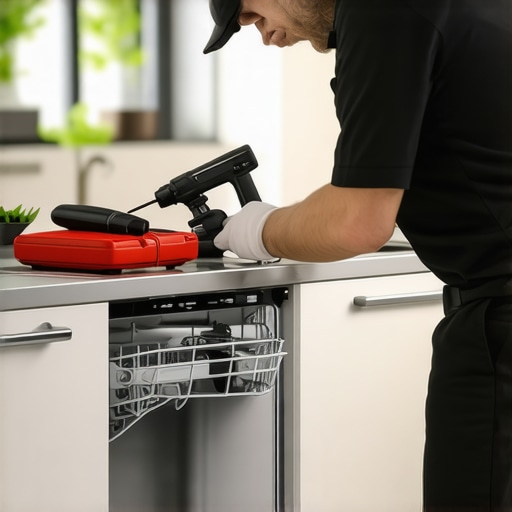
Equip yourself with basic tools such as a multimeter, a flashlight, and a screwdriver. A multimeter is invaluable for testing electrical components like fuses, switches, and the motor. Think of it as a stethoscope for your dishwasher—allowing you to listen to its inner workings. Don’t forget to consult this list of top diagnostic tools to ensure you’re well-prepared for accurate readings. Proper tools save you time and prevent accidental damage during troubleshooting.
Perform Visual Inspections and Safety Checks
Before diving into complex tests, do a thorough visual check. Look for leaks, damaged hoses, or corrosion. Ensure the door latch engages properly, as a faulty latch can prevent operation. Think of this as a quick health check for your appliance—spotting obvious issues early. Always unplug the dishwasher before inspecting electrical parts to avoid shocks. For a step-by-step visual checklist, refer to this troubleshooting resource.
Test Electrical Components Carefully
Use your multimeter to test the continuity of the door switch, thermal fuse, and control board connections. For example, if the dishwasher isn’t starting, a faulty door switch might be the culprit. Set your multimeter to the continuity setting, and touch the probes to the terminals—if no beep or reading appears, replace the part. Document your findings with photos or notes to provide evidence if warranty service is needed. For detailed testing procedures, see this expert guide.
Check Mechanical Parts and Moving Components
Inspect the pump, motor, and spray arms for blockages, damage, or wear. Rotate the spray arms manually to see if they spin freely. A jammed pump can cause water drainage issues. Think of these parts as the limbs of a robot—if one is stuck or broken, the entire system fails. If you find a broken or clogged part, replace or clean it. For detailed mechanical diagnostics, visit this repair tip collection.
Perform Test Cycles and Observe Behavior
Run a short cycle with the dishwasher empty and observe each stage. Listen for unusual noises and watch for leaks or error messages. Use this trial to identify if the problem persists or occurs intermittently. Record the cycle details and any anomalies. This real-world test confirms your diagnosis and can often reveal issues that static inspections miss. For more advanced troubleshooting, see this expert diagnostic approach.
Many homeowners operate under misconceptions about diagnosing dishwasher issues, which can lead to expensive mistakes and even void warranties. Let’s clear up some of these myths and highlight the hidden nuances that even seasoned DIYers often overlook.
Why Believing in Quick Fixes Can Backfire
It’s tempting to assume that a quick online search or a simple reset will solve complex dishwasher problems. However, this approach often masks underlying issues that require proper diagnostics. Rushing into repairs without understanding the root cause can cause further damage, making repairs more costly and risking warranty coverage. Expert guides emphasize the importance of methodical troubleshooting to prevent falling into this trap.
The Oops You Must Avoid: Skipping Diagnostic Checks
One of the most common mistakes is skipping thorough diagnostics, especially electrical testing. Many think that replacing a visible part or resetting the machine is enough. But electrical faults, control board issues, or sensor failures often require careful testing with a multimeter. Ignoring this step can result in repeated repairs or warranty denial. For advanced troubleshooting, it’s beneficial to follow proven diagnostic strategies detailed in this resource.
Advanced Question: How Do Modern Smart Diagnostics Change the Game?
With the advent of smart appliances, some assume that diagnostics are entirely automated. While modern dishwashers do provide error codes, understanding what those codes mean and how to interpret them remains crucial. Relying solely on machine-generated diagnostics without manual testing can lead you astray. Combining smart diagnostics with hands-on testing ensures you don’t miss hidden issues, especially those related to wiring or mechanical wear, which are often overlooked. Studies, such as those summarized in this article, show that a hybrid approach yields the best results for warranty adherence and repair efficiency.
Have you ever fallen into this trap? Let me know in the comments. Remember, understanding the nuances of diagnostics not only saves you money but also helps keep your warranty intact and your dishwasher running smoothly for years to come.
Investing in Quality Diagnostic Tools for Long-Term Success
When it comes to keeping your dishwasher running smoothly, having the right diagnostic tools is essential. Personally, I rely on a high-quality digital multimeter because it allows me to quickly identify electrical issues such as faulty switches or control boards. I prefer models with auto-ranging capabilities, like the Fluke 117, which simplifies testing without needing manual adjustments and provides accurate readings even in noisy environments. Additionally, a flashlight with a focused beam is invaluable for inspecting tight spaces and hidden components, especially when troubleshooting leaks or corrosion. For mechanical diagnostics, I recommend a set of precision screwdrivers and a flexible inspection mirror; these help me access hard-to-reach screws and visually examine internal parts without unnecessary disassembly.
Routine Maintenance to Prevent Future Failures
Preventive maintenance is your best defense against unexpected breakdowns. Regularly cleaning filters, spray arms, and seals can extend the lifespan of your dishwasher and improve performance. I schedule a deep cleaning every three to six months, which involves removing and soaking spray arms, then clearing out any mineral deposits with a vinegar solution. Checking door latches and water inlet valves for proper function also helps prevent issues that could void warranty coverage. Remember, adhering to the manufacturer’s maintenance recommendations is crucial; neglecting these can lead to costly repairs and warranty disputes. For detailed maintenance routines, see this comprehensive guide.
How do I maintain my diagnostic tools over time?
Properly caring for your diagnostic equipment ensures longevity and accuracy. Store your multimeter and other tools in a clean, dry case to prevent damage from moisture or dust. Regularly calibrate your multimeter according to the manufacturer’s instructions, especially if you notice inconsistent readings. Additionally, replace worn batteries promptly to avoid inaccurate measurements. Keeping your tools in top condition means you can trust your diagnostics and avoid unnecessary repairs or warranty issues. As the trend moves toward smarter diagnostics, integrating software updates and new testing accessories will become increasingly vital. Staying current with the latest diagnostic technologies enhances your repair efficiency and warranty compliance. For the most effective maintenance practices, review this expert resource.
What’s next for appliance diagnostics and repair?
Looking ahead, I predict a rise in the adoption of IoT-enabled diagnostic tools that can communicate directly with your smartphone or cloud-based service. These innovations will streamline troubleshooting and provide real-time alerts for potential issues, drastically reducing downtime. For now, investing in reliable equipment and maintaining it properly is the best way to ensure your repairs are effective and your warranty remains valid. I encourage you to try out a comprehensive diagnostic approach, like performing electrical tests on your control board, to see how much time and money it can save you. Remember, well-maintained tools and proactive care are the pillars of a durable, trouble-free dishwasher. For more advanced tips, explore this detailed guide.
The Hidden Lessons I Learned About Dishwasher Diagnostics and Warranties
- Never underestimate the power of thorough diagnostics—skipping steps can cost you hundreds and risk voiding your warranty. My biggest lightbulb moment was realizing that proper troubleshooting isn’t just about fixing the problem but about protecting your investment.
- Investing in quality diagnostic tools like a Fluke multimeter has saved me countless trips to the repair shop. Knowing how to use these tools correctly means I catch issues early and keep my warranty intact.
- Understanding that electrical testing and mechanical inspections are equally important changed my approach completely. It’s not just about replacing parts; it’s about diagnosing the root cause accurately, which saves money and hassle in the long run.
- Too many rely solely on error codes, but combining smart diagnostics with manual testing gives a clearer picture. This hybrid method ensures I don’t overlook hidden issues that could jeopardize warranty coverage.
My Go-To Resources for Mastering Dishwasher Diagnostics
- Expert Guides: The articles on this site have been invaluable for understanding complex electrical and mechanical troubleshooting. They break down each step clearly, saving me time and guesswork.
- Diagnostic Tools: I trust the top-rated multimeters and inspection mirrors recommended here because they’re reliable and easy to use, making diagnostics less intimidating even for beginners.
- Maintenance Checklists: Routine upkeep from this detailed guide helps me prevent issues before they start, keeping my warranty safe and my dishwasher running smoothly.
Take Action and Protect Your Investment Today
The future of appliance diagnostics is exciting, with smart tools becoming more accessible. But the most important step you can take now is to start applying these diagnostic strategies yourself. With patience and the right knowledge, you can troubleshoot confidently, save money, and maximize your warranty coverage. Remember, every repair is an opportunity to learn and become more self-reliant. Are you ready to take control of your dishwasher’s health and become a troubleshooting pro? Drop a comment below with your biggest challenge or success story with appliance diagnostics—I’d love to hear from you!
,
Leave a Reply