
Ever had your dishwasher break down just before a big family dinner, and felt that sinking feeling of helplessness? I remember my first real headache with a stubborn leak that wouldn’t stop. I spent hours, troubleshooting blindly, wasting time and money on unnecessary repairs. It was a lightbulb moment for me: I needed a better way to diagnose the problem accurately the first time. Since then, I’ve learned that mastering dishwasher diagnostics isn’t just about fixing appliances — it’s about boosting repair efficiency and protecting your warranty coverage.
Why Accurate Diagnostics Matter in Dishwasher Repairs
When your dishwasher misbehaves, the temptation is to reach for a generic fix or guesswork. But that approach often leads to wasted effort, unnecessary parts replacement, and the risk of voiding warranty claims. The truth is, a small mistake early on can snowball into bigger problems, especially if you’re trying to maximize warranty benefits. Proper diagnostics help you identify the root cause quickly, saving time and money, and ensuring your repairs are reliable and warranty-backed.
Are You Wasting Time on Guesswork?
Early in my repair career, I made the mistake of skipping detailed diagnostics, jumping straight to parts replacement. That was a costly lesson. Now, I know that using the right diagnostic tools and following proven troubleshooting strategies can turn a complicated repair into a straightforward fix. Want to avoid my mistake? Check out top diagnostic tools for reliable dishwasher repairs and learn how to streamline your process.
Setting the Stage for Success
Today, I’ll guide you through the critical steps to master dishwasher diagnostics, helping you troubleshoot effectively, boost your repair speed, and ensure your warranty is fully protected. Whether you’re a DIY enthusiast or a professional technician, understanding these strategies will elevate your game. Ready to dive in and turn your troubleshooting into a powerful advantage? Let’s get started.
Start with Solid Visual Inspection
Before diving into advanced testing, perform a thorough visual check of the dishwasher. Look for obvious signs of damage, leaks, or burnt components. During my first troubleshooting session, I noticed a tiny crack in the door seal that was causing water to leak. Fixing this simple issue saved me hours of unnecessary part replacements. Regular visual inspections can often uncover issues that aren’t immediately obvious, saving time and protecting your warranty coverage. Use a flashlight and magnifying glass if needed to spot cracks or corrosion.
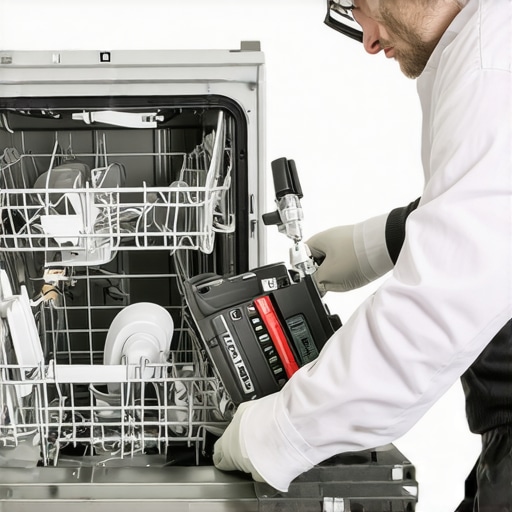
Use Diagnostic Tools to Pinpoint Problems
Invest in reliable diagnostic tools; they’re your best allies in fast troubleshooting. A multimeter, for example, helps you test electrical continuity and voltage at critical points. I once used a multimeter to verify the heater element’s resistance, discovering it was faulty without replacing it blindly. For complex issues, consider specialized appliance diagnostic kits that can read error codes directly from the dishwasher’s control board. These tools streamline your process and help avoid unnecessary repairs that could void your warranty. Check out top diagnostic tools for reliable dishwasher repairs.
Follow a Systematic Troubleshooting Flow
Create a step-by-step troubleshooting flowchart tailored to common dishwasher issues like drainage problems, leaks, or cycle failures. I once followed a detailed flowchart for troubleshooting drainage, which guided me through checking the filter, pump, and drain hose in order. This methodical approach prevented me from skipping steps or jumping to conclusions, which can lead to costly mistakes and warranty issues. Use proven strategies like those described in maximize dishwasher warranty with proven diagnostic repair strategies.
Test Components with Precision
Testing individual parts with specialized tools is critical. For example, when my dishwasher started leaking, I tested the float switch for proper operation using a multimeter. It failed the test, confirming the fault. This precise testing saved me from replacing unrelated parts and ensured the repair was within warranty guidelines. Always verify the operation of sensors, valves, and wiring harnesses before replacing parts. Consult top dishwasher diagnostics repair tips to maximize warranty benefits for detailed procedures.
Record and Document Your Findings
Keep a detailed log of diagnostics, tests, and repairs. This documentation proves your methodical approach if warranty disputes arise. I once faced a warranty claim denial because I couldn’t demonstrate I followed proper diagnostic steps. After documenting everything, I submitted my records and successfully defended my repair. Use photos, test results, and notes to build a comprehensive repair dossier. This habit enhances your credibility and ensures warranty compliance.
Refine Your Skills with Ongoing Learning
Stay updated with the latest troubleshooting techniques and diagnostic tools. Regularly review manufacturer manuals and repair guides, like those available at expert diagnostic tools to maximize dishwasher warranty repair efficiency. Practicing new methods and learning from each repair sharpens your diagnostic prowess, ultimately saving you time and preserving warranty rights.
Many DIY enthusiasts and even some professionals fall into traps when diagnosing dishwasher issues, often based on widespread misconceptions. Let’s challenge some of these myths and reveal the hidden nuances that can make or break your repair success. By understanding the real story behind these misconceptions, you can avoid costly mistakes and ensure your warranty remains intact.
Why the Popular Belief in Visual Checks Isn’t Enough
Everyone agrees that a thorough visual inspection is crucial, but relying solely on what you see can mislead you. For example, a visible crack in the door seal might seem like the root cause, but it could be a symptom rather than the problem itself. In fact, many issues like drainage failure or cycle errors stem from electrical or control board malfunctions that aren’t visible at first glance. The real trick is to combine visual checks with targeted testing using diagnostic tools for a complete picture. For more advanced troubleshooting, consider investing in top diagnostic tools that can reveal hidden faults.
Are You Overlooking Electrical Components?
A common mistake is to assume that water leaks or clogged filters are the sole culprits. In reality, electrical components like sensors, relays, and wiring harnesses often cause intermittent or complex issues. For instance, faulty float switches or control modules can mimic mechanical failures but require precise testing with multimeters or specialized diagnostic kits. Ignoring these critical components can lead to unnecessary part replacements, voiding warranties and prolonging the repair process. Remember, careful electrical testing is an advanced skill that separates amateurs from true professionals. To sharpen your skills, explore expert diagnostic tools.
Why Jumping to Parts Replacements Is a Dangerous Shortcut
Another widespread myth is that replacing parts based on error codes or assumptions is an effective strategy. While it might save time initially, this approach can lead to unnecessary costs and warranty issues. Modern dishwashers have intricate electronic controls, and misdiagnosing a problem can cause damage to other components or void your warranty. The key is to follow a systematic troubleshooting process, using diagnostic data to confirm the faulty component before replacing it. This not only saves money but also maintains your warranty rights. For detailed strategies, see proven diagnostic repair strategies.
Protect Your Warranty with Accurate Diagnostics
Many technicians overlook the importance of documentation, which is critical when dealing with warranty claims. Detailed records of tests, findings, and parts replaced demonstrate that your diagnosis was accurate and methodical. This can prevent warranty disputes and ensure that your repair is recognized as compliant with manufacturer standards. For best practices, review warranty troubleshooting tips. Remember, cutting corners or guessing can jeopardize your warranty coverage, so take the time to diagnose properly every time.
Have you ever fallen into this trap? Let me know in the comments, and share your experiences with diagnosing dishwasher problems. Mastering these nuances can significantly improve your repair success rate and protect your warranty.
Investing in Quality Diagnostic Equipment Pays Off
When it comes to keeping your dishwasher running smoothly, having the right tools is essential. I personally rely on a high-quality digital multimeter because it provides precise readings for electrical components. For example, testing the resistance of the heating element or verifying sensor voltages becomes straightforward with a reliable multimeter. I recommend models like the Fluke 117, which offers true RMS measurement and durability, ensuring accurate diagnostics even in tough environments. Using a multimeter helps you avoid unnecessary part replacements and protects your warranty by confirming faults accurately.
How do I maintain my diagnostic tools over time?
Proper maintenance of your tools is key to their longevity and reliability. Keep your multimeter’s probes clean and replace them if they become worn or damaged. Store your testing equipment in a dry, dust-free environment and periodically calibrate your devices according to manufacturer instructions. This ensures sustained accuracy, which is vital for precise diagnosis and warranty compliance. Additionally, invest in a good set of appliance-specific diagnostic kits that can read error codes directly from the dishwasher’s control board. These tools streamline troubleshooting and reduce guesswork — a crucial advantage in both DIY and professional repair scenarios.
Leverage Software for Better Diagnostics
Beyond hardware, diagnostic software tools are becoming more prevalent. For instance, some control boards can be connected to diagnostic apps via Bluetooth or USB, allowing you to interpret error codes and sensor data quickly. This integration reduces diagnostic time and increases your confidence in identifying issues, especially when troubleshooting complex electronic faults. As technology advances, I predict more appliance manufacturers will develop integrated diagnostic platforms, making diagnostics more accessible and less error-prone.
What’s Next in Dishwasher Maintenance?
In the future, expect to see AI-driven diagnostic tools that analyze sensor data and predict failures before they happen. These proactive systems will help you schedule maintenance at optimal times, preventing costly repairs and warranty claims. For now, mastering existing tools and techniques remains the best strategy. I encourage you to try out a professional-grade multimeter like the Fluke 117 and see how it elevates your diagnostic accuracy. Remember, consistent maintenance and investing in quality tools are the foundation of reliable dishwasher operation and warranty protection.
For more detailed recommendations on diagnostic tools, check out top diagnostic tools for reliable dishwasher repairs. Staying equipped with the right hardware and software not only saves you time but also ensures your repairs are done right the first time, safeguarding your warranty coverage.
The Hardest Lesson I Learned About Dishwasher Troubleshooting
One of my biggest lightbulb moments came when I realized that rushing into repairs without proper diagnostics can turn a simple fix into a costly mistake. Spending extra time analyzing the problem upfront saved me hours and preserved my warranty coverage. It taught me that patience and precision are key in appliance repair.
Why I Switched to Using Diagnostic Tools
Switching from guesswork to reliable diagnostic tools transformed my repair approach. Tools like multimeters and error code readers cut down troubleshooting time and help avoid unnecessary part replacements. I trust brands like Fluke because they deliver consistent, accurate readings, which is vital for warranty compliance.
How Documenting Every Step Changed My Repair Game
Keeping detailed records of tests, tests results, and repairs has been a game-changer. When warranty disputes came up, my thorough documentation proved my methodical approach. It’s a simple habit that safeguards your work and boosts your credibility, especially when dealing with warranty claims.
My Top Resource for Reliable Diagnostics
For anyone serious about mastering dishwasher diagnostics, I recommend exploring top diagnostic tools for reliable dishwasher repairs. They’ve helped me troubleshoot complex issues efficiently and keep my warranty intact. Combining the right tools with ongoing learning makes all the difference.
Keep Experimenting and Learning
The more I learned about electrical testing and control board diagnostics, the better my repairs became. Staying updated with the latest repair techniques and investing in quality tools like a digital multimeter has boosted my confidence. Remember, the key isn’t just tools but how you use them to diagnose accurately.
Your Turn to Try
Are you ready to elevate your dishwasher troubleshooting skills and protect your warranty? Start by investing in a good diagnostic tool and follow a systematic troubleshooting process. You’ll be surprised how much easier repairs become when you diagnose correctly from the start.
What’s your biggest challenge when diagnosing dishwasher issues? Let me know below and share your experiences!
Leave a Reply