
Ever been in the middle of a busy morning when your dishwasher suddenly refuses to cooperate? Maybe it leaks, stops mid-cycle, or just refuses to turn on. I’ve been there, frustrated and clueless. It’s like watching a reliable friend suddenly go silent, and you’re left scrambling for answers. I used to think I could handle minor dishwasher issues with a quick Google search and a few DIY tricks. But I quickly learned that without the right diagnostic tools, I was only guessing — and guesswork can sometimes make things worse.
Why Accurate Diagnosis Matters for Dishwasher Repairs
When your dishwasher acts up, the first instinct might be to call in a professional or try a quick fix. But here’s the truth I’ve discovered: rushing in without proper diagnostics can lead to wasted time, unnecessary expenses, and sometimes even damage to your appliance. The secret isn’t just in fixing the problem, but in finding it efficiently. That’s where top appliance diagnostic tools come in, turning guesswork into certainty. They help you identify the root cause quickly, so repairs are faster, more reliable, and often covered under warranty if done right. This not only saves money but also prolongs your dishwasher’s lifespan. Want to avoid unnecessary expenses and frustration? I’ll show you how these diagnostic tools can make all the difference, based on my experience and what I’ve learned along the way.
Is Over-Hyped Equipment Really Worth It
At first, I was skeptical about investing in advanced diagnostic tools. I wondered if they were just fancy gadgets that homeowners like me didn’t really need. I remember buying a basic multimeter, thinking it was enough. Turns out, I made a mistake early on: relying solely on generic tools without understanding how to interpret their readings led me down more rabbit holes. The truth is, not all diagnostic tools are created equal. To truly benefit from them, you need the right set for your specific appliance issues. Curious if these tools are worth the hype? Let’s explore what makes the best diagnostic tools for reliable dishwasher repairs and how they can save you headaches. For more detailed insights, check out this comprehensive guide on [maximizing dishwasher warranty with proven diagnostic strategies](https://applianceoutletpro.com/maximize-dishwasher-warranty-with-proven-diagnostic-strategies). Now, let’s get into how you can equip yourself with the right tools and avoid common pitfalls.
Start with Visual Inspection
Before diving into technical diagnostics, perform a thorough visual check of your dishwasher. Look for obvious issues like leaks, disconnected hoses, or debris blocking the drain. During a repair session I once noticed a loose wire connection that caused the dishwasher to short circuit. Fixing that instantly resolved the problem. This step is quick and often reveals the root cause without needing complex tools, setting a solid foundation for further diagnostics.
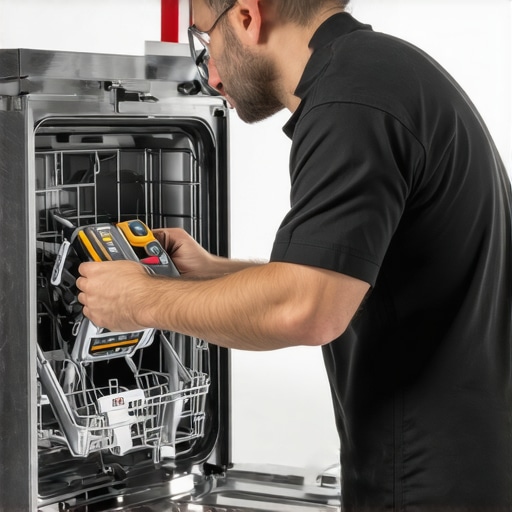
Use a Multimeter to Test Electrical Components
Think of a multimeter as the detective’s magnifying glass for electrical faults. Set it to measure voltage or resistance, and carefully test the door latch, heating element, and motor connections. In my experience, a faulty door latch often causes the dishwasher to refuse to start. By testing continuity with a multimeter, I confirmed the latch was broken, saving me from replacing the entire control board. For reliable results, always consult your appliance’s wiring diagram and reference guides like warranty diagnostics tips.
Check Water Flow with Pressure and Flow Meters
Water issues are a common culprit. Use a pressure gauge to verify water flow to the dishwasher. If water isn’t filling properly, the issue could be with the inlet valve or water supply line. I once had a dishwasher that stopped mid-cycle, and testing the water pressure revealed a clogged inlet filter. Cleaning it restored normal operation immediately. This step ensures your dishwasher gets the right amount of water, preventing leaks or incomplete washes.
Test Thermostats and Heating Elements
Heating problems are often due to faulty thermostats or elements. Using a specialized tester or multimeter, check the resistance of these parts. A broken heating element can cause your dishes to stay cold and the cycle to run longer. I replaced a burnt-out element based on readings from my multimeter, which saved me from calling a professional. For better accuracy, consider investing in a dedicated appliance diagnostic tool like top diagnostic tools.
Assess Drainage with a Drain Pump Tester
Drain issues can lead to water pooling or error messages. Use a drain pump tester to confirm if the drain pump is functioning properly. During one repair, I manually tested the pump’s motor with a simple continuity check and found it was dead. Replacing it quickly fixed the drainage problem. Ensuring the pump is operational prevents water from backing up and causing damage.
Validate Safety Devices and Sensors
Sensors such as float switches and thermal cut-offs are critical for safe operation. Use a multimeter or sensor tester to verify their functionality. I once replaced a faulty float switch that was falsely signaling a full tub, preventing the dishwasher from starting. Proper testing of safety devices helps avoid unnecessary part replacements and guarantees safe operation.
Leverage Diagnostic Apps and Manuals
Modern dishwashers often have error codes that can be deciphered with manufacturer manuals or diagnostic apps. When I encountered an unknown error code, referencing the manual and using a diagnostic app saved me hours of trial-and-error troubleshooting. These tools streamline the process, especially when combined with physical tests.
By systematically applying these diagnostic techniques and tools, you transform guesswork into precise repairs. Investing in reliable diagnostic equipment not only speeds up fixing your dishwasher but also helps you maximize warranty coverage and avoid unnecessary expenses. Remember, combining visual checks with electronic testing creates a comprehensive repair strategy that’s both effective and budget-friendly. For more expert tips, explore maximizing your dishwasher warranty and learn how to get the most out of your repair efforts.
Many homeowners believe that investing in advanced diagnostic tools automatically guarantees successful repairs and maximizes warranty coverage. However, the real challenge lies in understanding the nuances of these tools and avoiding common pitfalls that can undermine their effectiveness.
One widespread myth is that owning the most expensive or high-tech diagnostic device will instantly solve all dishwasher issues. In reality, the effectiveness of diagnostic tools depends heavily on proper use and interpretation. For example, a sophisticated multimeter or pressure gauge is only as good as the technician’s knowledge of appliance systems. Misreading data or misinterpreting error codes can lead to unnecessary part replacements or overlooking the actual problem.
Let’s dig deeper into a critical nuance: many users rely solely on diagnostic tools without cross-checking with visual inspections or manufacturer manuals. This approach can be misleading because some issues, like clogged filters or loose wiring, are better identified through simple visual cues. Overlooking these can cause you to chase phantom faults, wasting time and money. For more tips on combining physical inspections with electronic diagnostics, visit this expert guide.
Are Diagnostic Tools the Ultimate Fix or Just Part of the Puzzle?
Many think that diagnostic tools are the ultimate solution, but in my experience, they are just one piece of the puzzle. Advanced diagnostics can reveal faulty components — but only if you understand the appliance’s design and common failure points. For example, a faulty water inlet valve might show abnormal resistance, but confirming the problem often requires inspecting the water supply and filter system. Relying solely on electronic readings without physical checks can lead to misdiagnosis.
Additionally, a trap many fall into is overconfidence in digital error codes. While these codes provide valuable clues, they are not infallible. Manufacturers sometimes update their error codes, and misinterpretation can cause unnecessary repairs. Always consult the latest manuals or use trusted diagnostic apps, and remember that combining these with visual and mechanical checks vastly improves accuracy. To learn more about leveraging diagnostic tools effectively, explore trusted repair strategies here.
Finally, avoid the trap of equating high-end tools with expertise. Technology is only part of the solution; experience, understanding, and careful analysis are equally vital. If you’re serious about effective diagnostics, consider investing time in learning how to interpret readings correctly and understanding common failure modes. It’s worth it, especially if you want to maximize your warranty benefits and avoid costly mistakes.
Have you ever fallen into this trap? Let me know in the comments.
Keeping your dishwasher running smoothly over the years requires more than just occasional repairs; it demands a proactive maintenance routine complemented by the right tools. Having invested in quality diagnostic equipment, I’ve found that regular upkeep not only extends the lifespan of your appliance but also ensures that when issues do arise, you can address them swiftly and effectively.
How do I maintain my dishwasher over time?
One of the best ways to ensure long-term performance is to incorporate routine checks using specific tools designed for appliance diagnostics. For example, a digital multimeter is indispensable for testing electrical components like thermostats and switches. I prefer using a high-quality Fluke multimeter because of its accuracy and durability, which means I can reliably detect faulty wiring or sensors before they cause larger problems. Regularly testing these parts with a multimeter helps catch issues early, saving money and avoiding inconvenient breakdowns.
In addition to electrical tests, inspecting water flow and drainage is crucial. I recommend using a pressure gauge to verify water inlet pressure periodically. This simple step can prevent problems like incomplete washes or leaks caused by clogged filters or faulty valves. For drain assessments, a drain pump tester can be invaluable. I’ve used a basic continuity tester in the past to confirm pump motor functionality, and it’s amazed me how often a simple test can reveal hidden issues.
Maintaining the cleanliness of filters and spray arms is equally vital. I schedule a monthly visual inspection and cleaning routine, which is quick and can dramatically improve washing performance. A small brush or a toothpick works great for clearing debris, and I always make sure to check for wear or cracks that might cause leaks.
Future trends in appliance maintenance
Looking ahead, I believe that smart diagnostic tools integrated with mobile apps will become standard. These tools will provide real-time alerts and detailed troubleshooting guidance, making maintenance even more accessible. For example, some advanced sensors can now monitor water temperature and flow continuously, warning you of potential issues before they escalate. Staying ahead of these trends means investing in versatile, future-proof equipment now, like multi-function diagnostic devices that combine electrical testing, sensor analysis, and software diagnostics.
If you’re serious about maintaining your dishwasher’s performance and maximizing warranty coverage, I recommend starting with a reliable multimeter and a pressure gauge. These tools are fundamental and will give you a solid foundation for ongoing maintenance. Plus, incorporating regular visual inspections and cleaning routines will keep everything in check. Want to learn more about how to use these tools effectively? Check out this guide for expert tips on appliance diagnostics and warranty maximization. Don’t wait for a breakdown—start your maintenance routine today and keep your dishwasher working perfectly for years to come.
Lessons I Didn’t Expect to Learn About Appliance Diagnostics
- One of my biggest surprises was how often a simple visual check reveals the culprit—like a loose wire or a clogged filter—that no diagnostic tool can detect alone. It taught me to trust my eyes first before reaching for electronic testers.
- Investing in advanced tools isn’t a magic bullet. The real value comes from understanding how to interpret readings correctly. Without proper knowledge, even the best diagnostic tools can lead you astray and cause unnecessary repairs.
- My most eye-opening discovery was that error codes are helpful but not foolproof. Cross-referencing them with manufacturer manuals and actual physical checks often saves me from replacing the wrong parts and prolongs my appliance’s life.
My Go-To Tools for Reliable Dishwasher Repairs
- Multimeter: I trust a high-quality multimeter like Fluke for electrical tests. It’s precise and durable, helping me catch wiring issues or faulty sensors early.
- Pressure Gauge: Verifying water flow with a reliable pressure gauge prevents leaks and incomplete washes. It’s a simple yet powerful diagnostic addition.
- Drain Pump Tester: Confirming pump functionality with a continuity tester has saved me from costly replacements. It’s an underrated tool that provides clarity on drainage issues.
- Manufacturer Manuals & Diagnostic Apps: These resources decode error codes and guide me through troubleshooting, making complex diagnosis manageable even for a DIY enthusiast.
Take Action Now and Keep Your Dishwasher in Top Shape
The future of appliance maintenance is bright with smart diagnostics and proactive care. By combining the right tools with a curious mindset, you can troubleshoot effectively, maximize warranty benefits, and extend your dishwasher’s lifespan. Don’t wait for a breakdown—start inspecting, testing, and learning today. Your appliance will thank you for it. Want to share your biggest repair challenge? Drop a comment below and let’s troubleshoot together!
Leave a Reply